Did you find this guide helpful?
Some test text!
Web
Guides
Web / Guides / Putting it all together
Creating custom annotations for your viewer
WebViewer allows you to create your own annotations that can be customized in several different ways. You can change the appearance and behaviors of the annotation, selection box, and control handles. As an example of this, we're going to walk through the steps to create a custom triangle annotation.
To save annotations in WebViewer, they must output XFDF that meets the XFDF specification in order to function properly in compliant viewers. Since this is a custom annotation, it would not render and behave the same in another viewer as it will not conform to the XFDF specfication. Nor will the viewer have the custom logic to handle it. However, WebViewer can automatically handle converting the custom annotation to a stamp annotation (and vice-versa) to preserve the appearance of the page as much as possible. All custom rendering and behavior will only work in WebViewer, where you have custom logic to handle it.
Creating the custom annotation class
First let's create a basic triangle annotation class.
WebViewer(
  // ...
).then(function(instance) {
  const { Annotations } = instance.Core;

  class TriangleAnnotation extends Annotations.CustomAnnotation {
    constructor() {
      super('triangle'); // provide the custom XFDF element name
      this.Subject = 'Triangle';
    }
  }

  // this is necessary to set the elementName before instantiation
  TriangleAnnotation.prototype.elementName = 'triangle';
});
We'll have it inherit from Annotations.CustomAnnotation and set the XFDF element name to triangle. The element name is what's used for the annotation's XML element in the XFDF . Notice that triangle is not in the XFDF specification so this normally would not work. By inheriting from the CustomAnnotation class, the annotation will be able to automatically take advantage of saving as a stamp when downloading the document. This will allow the custom annotation to appear similar to how it appears in WebViewer in another viewer.
Next, let's define the draw function on the class so that the annotation knows how to render itself. The draw function takes a canvas context and is called whenever the annotation should be drawn.
class TriangleAnnotation extends Annotations.CustomAnnotation {
  // ...
  draw(ctx, pageMatrix) {
    // the setStyles function is a function on markup annotations that sets up
    // certain properties for us on the canvas for the annotation's stroke thickness.
    this.setStyles(ctx, pageMatrix);

    // first we need to translate to the annotation's x/y coordinates so that it's
    // drawn in the correct location
    ctx.translate(this.X, this.Y);
    ctx.beginPath();
    ctx.moveTo(this.Width / 2, 0);
    ctx.lineTo(this.Width, this.Height);
    ctx.lineTo(0, this.Height);
    ctx.closePath();
    ctx.fill();
    ctx.stroke();
  }
}
Lastly, we want to register our annotation type so that the AnnotationManager recognizes our custom type when reading and outputting XFDF.
const { annotationManager } = instance.Core;

// ...

// register the annotation type so that it can be saved to XFDF files
annotationManager.registerAnnotationType(TriangleAnnotation.prototype.elementName, TriangleAnnotation);
Adding the annotation to a document
Although we can programmatically create and add this annotation, it would not be intuitive for regular users. To allow a user to actually add the annotation to a document, we'll need to create a tool so that the user can use to create our annotation through the UI. Our triangle just depends on two mouse points so we can inherit from the GenericAnnotationCreateTool which handles that for us.
// we also need to access the Tools namespace from the instance
const { Annotations, Tools } = instance.Core;

// ...

class TriangleCreateTool extends Tools.GenericAnnotationCreateTool {
  constructor(documentViewer) {
    // TriangleAnnotation is the class (function) for our annotation we defined previously
    super(documentViewer, TriangleAnnotation);
  }
};
With our tool created we can add a button to the UI so that it can be switched to.
// access annotationManager and documentViewer objects from the instance
const { Annotations, Tools, annotationManager, documentViewer } = instance.Core;

// ...

const triangleToolName = 'AnnotationCreateTriangle';

const triangleTool = new TriangleCreateTool(documentViewer);
instance.UI.registerTool({
  toolName: triangleToolName,
  toolObject: triangleTool,
  buttonImage: '<svg xmlns="http://www.w3.org/2000/svg" width="24" height="24" viewBox="0 0 24 24" fill="currentColor">' +
    '<path d="M12 7.77L18.39 18H5.61L12 7.77M12 4L2 20h20L12 4z"/>' +
    '<path fill="none" d="M0 0h24v24H0V0z"/>' +
  '</svg>',
  buttonName: 'triangleToolButton',
  tooltip: 'Triangle'
}, TriangleAnnotation);

instance.UI.setHeaderItems((header) => {
  header.getHeader('toolbarGroup-Shapes').get('freeHandToolGroupButton').insertBefore({
    type: 'toolButton',
    toolName: triangleToolName
  });
});

documentViewer.addEventListener('documentLoaded', () => {
  // set the tool mode to our tool so that we can start using it right away
  instance.UI.setToolMode(triangleToolName);
});
At this point you should see a new button in the toolbar with a triangle icon, and the new triangle tool should be automatically selected. Clicking and dragging on the document should create a triangle annotation.
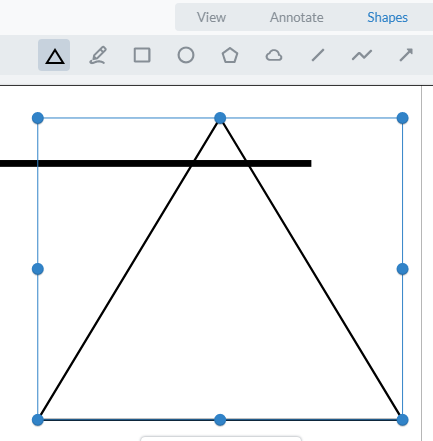
After creating some triangles you might notice that the selection box is a rectangle and has eight control handles. This isn't terrible but we could probably make it better by having a control handle for each corner and drawing the selection box around the edges of the annotation.
Making customizable vertices
First, we will add a property on the annotation that takes an array of vertices which can be adjusted individually by a user moving the control points. Then define a new selection model and control handles to resize the annotation. A SelectionModel defines the selection behavior of the annotation.
We'll add the array to the annotation constructor:
// you can also get Core from the instance
const { Core } = instance;

class TriangleAnnotation extends Annotations.CustomAnnotation {
  constructor() {
    super('triangle'); // Provide the custom XFDF element name
    this.Subject = 'Triangle';
    // create simple property
    this.vertices = [];
    const numVertices = 3;
    // initialize points
    for (let i = 0; i < numVertices; ++i) {
      this.vertices.push(new Core.Math.Point());
    }
  }
}
Then we'll update the draw function on the annotation to use the vertices:
class TriangleAnnotation extends Annotations.CustomAnnotation {
  // ...
  draw(ctx, pageMatrix) {
    // the setStyles function is a function on markup annotations that sets up
    // certain properties for us on the canvas for the annotation's stroke thickness.
    this.setStyles(ctx, pageMatrix);

    // draw the triangle lines using vertices from our list
    ctx.beginPath();
    ctx.moveTo(this.vertices[0].x, this.vertices[0].y);
    ctx.lineTo(this.vertices[1].x, this.vertices[1].y);
    ctx.lineTo(this.vertices[2].x, this.vertices[2].y);
    ctx.closePath();
    ctx.fill();
    ctx.stroke();
  }
}
Then for the tool we'll override the mouseMove function to set the vertices on creation:
class TriangleCreateTool extends Tools.GenericAnnotationCreateTool {
  // ...
  mouseMove(e) {
    // call the parent mouseMove first
    super.mouseMove(e);
    if (this.annotation) {
      // set the vertices relative to the annotation width and height
      this.annotation.vertices[0].x = this.annotation.X + this.annotation.Width / 2;
      this.annotation.vertices[0].y = this.annotation.Y;
      this.annotation.vertices[1].x = this.annotation.X + this.annotation.Width;
      this.annotation.vertices[1].y = this.annotation.Y + this.annotation.Height;
      this.annotation.vertices[2].x = this.annotation.X;
      this.annotation.vertices[2].y = this.annotation.Y + this.annotation.Height;

      // update the annotation appearance
      annotationManager.redrawAnnotation(this.annotation);
    }
  }
}
Creating a custom selection model
At this point the drawing of the annotation should look the same as before, however you won't be able to move the annotation. To fix this, let us create the custom selection model and control handles. Since the selection model needs us to define which type of control handles are used, we will start by defining the custom control handles.
class TriangleControlHandle extends Annotations.ControlHandle {
  constructor(annotation, index) {
    super();
    this.annotation = annotation;
    // set the index of this control handle so that we know which vertex it corresponds to
    this.index = index;
  }
  // returns a rect that should represent the control handle's position and size
  getDimensions(annotation, selectionBox, zoom) {
    let x = annotation.vertices[this.index].x;
    let y = annotation.vertices[this.index].y;
    // account for zoom level
    const width = Annotations.ControlHandle.handleWidth / zoom;
    const height = Annotations.ControlHandle.handleHeight / zoom;

    // adjust for the control handle's own width and height
    x -= width * 0.5;
    y -= height * 0.5;
    return new Core.Math.Rect(x, y, x + width, y + height);
  }
  // this function is called when the control handle is dragged
  move(annotation, deltaX, deltaY, fromPoint, toPoint) {
    annotation.vertices[this.index].x += deltaX;
    annotation.vertices[this.index].y += deltaY;

    // recalculate the X, Y, width and height of the annotation
    let minX = Number.MAX_VALUE;
    let maxX = -Number.MAX_VALUE;
    let minY = Number.MAX_VALUE;
    let maxY = -Number.MAX_VALUE;
    for (let i = 0; i < annotation.vertices.length; ++i) {
      const vertex = annotation.vertices[i];
      minX = Math.min(minX, vertex.x);
      maxX = Math.max(maxX, vertex.x);
      minY = Math.min(minY, vertex.y);
      maxY = Math.max(maxY, vertex.y);
    }

    const rect = new Annotations.Rect(minX, minY, maxX, maxY);
    annotation.setRect(rect);
    // return true if redraw is needed
    return true;
  }
}
Then we can define our selection model that use our custom control point.
// selection model creates the necessary control handles
class TriangleSelectionModel extends Annotations.SelectionModel {
  constructor(annotation, canModify) {
    super(annotation, canModify);
    if (canModify) {
      const controlHandles = this.getControlHandles();
      // pass the vertex index to each control handle
      controlHandles.push(new TriangleControlHandle(annotation, 0));
      controlHandles.push(new TriangleControlHandle(annotation, 1));
      controlHandles.push(new TriangleControlHandle(annotation, 2));
    }
  }
}
Finally, we can assign this new selection model as the selection model for our triangle. Notice we assign the class instead of an instance since this the selection model is dynamically created.
class TriangleAnnotation extends Annotations.CustomAnnotation {
  constructor() {
    // ...
    this.selectionModel = TriangleSelectionModel;
  }
}
Now there should be a control handle for each point of the triangle and if you drag them around you'll move that vertex of the triangle! However you may notice that if you try to drag and move the annotation it won't work. To fix this let's override the resize function on the annotation.
class TriangleAnnotation extends Annotations.CustomAnnotation {
  // ...
  resize(rect) {
    // this function is only called when the annotation is dragged
    // since we handle the case where the control handles move
    const annotRect = this.getRect();
    // determine how much change in each dimension
    const deltaX = rect.x1 - annotRect.x1;
    const deltaY = rect.y1 - annotRect.y1;

    // shift the vertices by the amount the rect has shifted
    this.vertices = this.vertices.map((vertex) => {
      vertex.translate(deltaX, deltaY);
      return vertex;
    });
    this.setRect(rect);
  }
}
Next, let's change the selection box so that it's displayed around the sides of the triangle. We'll do this by overriding the drawSelectionOutline function on the selection model.
class TriangleSelectionModel extends Annotations.SelectionModel {
  // ...
  // changes how we draw the selection outline
  drawSelectionOutline(ctx, annotation, zoom) {
    // adjust for zoom
    if (typeof zoom !== 'undefined') {
      ctx.lineWidth = Annotations.SelectionModel.selectionOutlineThickness / zoom;
    } else {
      ctx.lineWidth = Annotations.SelectionModel.selectionOutlineThickness;
    }

    // changes the selection outline color if the user doesn't have permission to modify this annotation
    if (this.canModify()) {
      ctx.strokeStyle = Annotations.SelectionModel.defaultSelectionOutlineColor.toString();
    } else {
      ctx.strokeStyle = Annotations.SelectionModel.defaultNoPermissionSelectionOutlineColor.toString();
    }

    ctx.beginPath();
    ctx.moveTo(annotation.vertices[0].x, annotation.vertices[0].y);
    ctx.lineTo(annotation.vertices[1].x, annotation.vertices[1].y);
    ctx.lineTo(annotation.vertices[2].x, annotation.vertices[2].y);
    ctx.closePath();
    ctx.stroke();

    // draw a dashed line around the triangle
    const dashUnit = Annotations.SelectionModel.selectionOutlineDashSize / zoom;
    const sequence = [dashUnit, dashUnit];
    ctx.setLineDash(sequence);
    ctx.strokeStyle = 'rgb(255, 255, 255)';
    ctx.stroke();
  }
  // change the selection testing to match the shape of the triangle
  testSelection(annotation, x, y, pageMatrix) {
    // the canvas visibility test will only select the annotation
    // if a user clicks exactly on it as opposed to the rectangular bounding box
    return Annotations.SelectionAlgorithm.canvasVisibilityTest(annotation, x, y, pageMatrix);
  }
}
For fun, let's also override the control handle's draw function to make them look like triangles as well.
class TriangleControlHandle extends Annotations.ControlHandle {
// ...
draw(ctx, annotation, selectionBox, zoom) {
const dim = this.getDimensions(annotation, selectionBox, zoom);
ctx.fillStyle = '#FFFFFF';
ctx.beginPath();
ctx.moveTo(dim.x1 + (dim.getWidth() / 2), dim.y1);
ctx.lineTo(dim.x1 + dim.getWidth(), dim.y1 + dim.getHeight());
ctx.lineTo(dim.x1, dim.y1 + dim.getHeight());
ctx.closePath();
ctx.stroke();
ctx.fill();
}
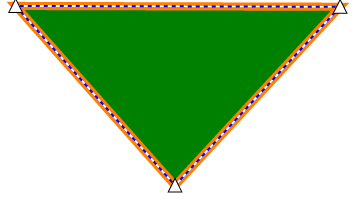
}If everything went well you should have triangle annotations that look something like this:
Saving the custom annotation
As mentioned early on, the CustomAnnotation class does handle saving our custom type as a stamp and automatically reloads the stamp as the custom type if it is registered. However, it will only preserve our type and our custom vertices property needs to be persisted as well.
If you download the document now and open it in another viewer, you will see the stamp of your custom annotation. If you tried to load this document or import the annotation through XFDF, you would notice that it isn't able to be reloaded. This is because WebViewer doesn't know that it needs to save the vertices array. We also need to save the vertices into the XFDF but we also run into another issue: vertices is not in the specification or part of the stamp.
Thus, we will need to save this into the annotation's custom data. To do this we can override the serialize and deserialize functions which are called when the annotation should be saved or loaded respectively.
class TriangleAnnotation extends Annotations.CustomAnnotation {
  // ...
  serialize(element, pageMatrix) {
    // save our custom property into the custom data
    this.setCustomData('vertices', this.vertices);
    // perform regular serialization on other properties
    const el = super.serialize(element, pageMatrix);
    return el;
  }
  deserialize(element, pageMatrix) {
    // perform regular deserialization for other properties
    super.deserialize(element, pageMatrix);
    // read our custom property out from custom data
    const storedVertices = this.getCustomData('vertices');
    // set the property after initializing the data as points
    this.vertices = storedVertices.map(v => new Core.Math.Point(v.x, v.y));
  }
}
After making this change you should be able to export XFDF and import the string back. You should also be able to download the document and reload it with your exact annotation still there. Viewing this annotation in another viewer will show the annotation as a stamp. Changes to the stamp will like not affect your custom annotation after loading it back in WebViewer
Stamp image settings (optional)
Now that you can save and load your custom annotation, you might have noticed if you open this custom annotation in another viewer, the triangle edges are cut off and it may look lower res. This is because the edges of the triangle are rendered past the bounds of the annotation and the image has been rasterized.
There are two static properties you can tweak to adjust this: OutputImagePadding and QualityScale.
TriangleAnnotation.OutputImagePadding = 25; // adds 25 pixels all around
TriangleAnnotation.QualityScale = 2; // doubles the resolution at the cost of memory
Please note that adding too much padding may scale down the perceived image. These options will not affect your WebViewer as the custom logic is available there.
Using Serialized Data
Using the annotation's custom data is useful for storing custom data. With CustomAnnotation, there is a SerializedData property that will automatically save the data attached to it. It is better to use this for primitive values rather than for complex objects.
For example, it would be better to store the number of vertices on this rather than the vertices since the vertices need to be transformed back into Point. It is still not impossible but carries some limitations.
class TriangleAnnotation extends Annotations.CustomAnnotation {
  // custom property
  get CustomID() {
    // attempt to get a customId value from the map
    return this.SerializedData.customId;
  }
  set CustomID(id) {
    // set a customId value from the map
    this.SerializedData.customId = id;
  }
}
Saving custom XFDF (optional)
There may be some cases where you would prefer the XFDF to reflect the actual type of the custom annotation and not a stamp. For example, if you are only saving the XFDF of the annotations as opposed to the document. In this case, you can switch the static SerializationType property on the CustomAnnotation class from STAMP to CUSTOM. Please note that this will affect annotations of the same type and the custom XFDF will be discarded when merging with the document. If you are downloading the document, be sure to switch it back to stamp temporarily.
TriangleAnnotation.SerializationType = Annotations.CustomAnnotation.SerializationTypes.CUSTOM; // use custom XFDFInstead of a stamp in the XFDF:
<stamp page="0" rect="131.96,227.76999999999998,294.27,407.23" color="#000000" flags="print" name="bb8ac8fa-ff92-08ff-c2e5-90dbaeb9edde" title="Guest" subject="Triangle" date="D:20210319141059-07'00'" creationdate="D:20210319140524-07'00'">
    <trn-custom-data bytes="..."/>
    <imagedata>data:image/png;base64,...</imagedata>
</stamp>
Your output XFDF should then look like this:
<triangle page="0" rect="131.96,227.76999999999998,294.27,407.23" color="#000000" flags="print" name="bb8ac8fa-ff92-08ff-c2e5-90dbaeb9edde" title="Guest" subject="Triangle" date="D:20210319141059-07'00'" creationdate="D:20210319140524-07'00'">
    <trn-custom-data bytes="..."/>
</triangle>
If you feel you want to add the custom properties to the XFDF (instead of custom data), feel free to include the following in your serialize and deserialize functions:
class TriangleAnnotation extends Annotations.CustomAnnotation {
  serialize(element, pageMatrix) {
    const el = super.serialize(element, pageMatrix);
    // create an attribute to save the vertices list
    el.setAttribute('vertices', Annotations.XfdfUtils.serializePointArray(this.vertices, pageMatrix));
    return el;
  }
  deserialize(element, pageMatrix) {
    super.deserialize(element, pageMatrix);
    // read it back as points from the attribute
    this.vertices = Annotations.XfdfUtils.deserializePointArray(element.getAttribute('vertices'), pageMatrix);
  }
}
Get the answers you need: Chat with us