> For the complete documentation index, see [llms.txt](https://docs.apryse.com/llms.txt). Markdown versions of documentation pages are available by appending `.md` to page URLs; this page is available as [Markdown](https://docs.apryse.com/android/ui-customization/customize-quick-menu.md).
# Customize quick menu in Android
Learn how to customize the quick menu in Android by overriding default menu resources or creating your own. Add, remove, and modify items programmatically for a personalized experience. Create your ow
## Customize quick menu in Android
It is possible to customize the quick menu by [overriding the default menu resource XML files](#override-menu-resources), or by [creating your own](#create-your-own-quick-menu).
## Add/remove item to the quick menu
It is possible to programmatically modify the quick menu by calling methods to add and remove items.
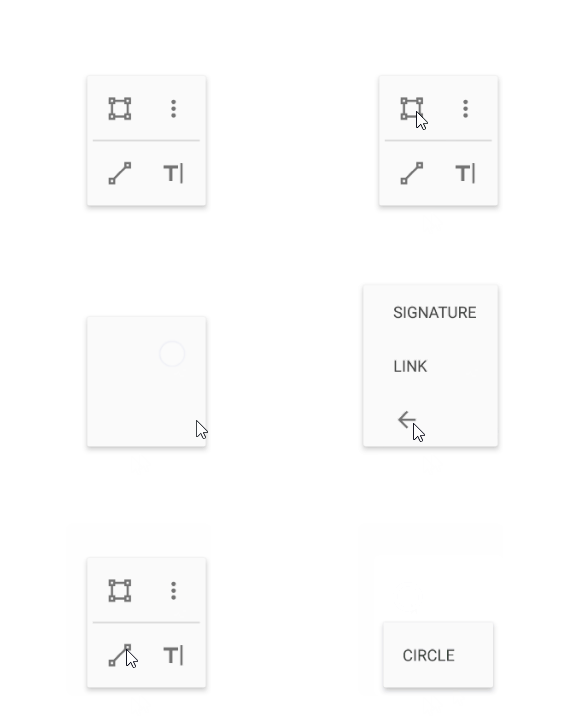
The following example will customize the quick menu for the Square tool by overriding the `onShowQuickMenu` function and adding a link button. Menu entries can be moved around and removed as well.
{% hint style="info" %}
You can see a [completed example in GitHub](https://github.com/ApryseSDK/pdftron-android-samples/tree/master/CustomUI/)
{% endhint %}
1. Add a menu entry to the `ids.xml` in `Resources/values` to identify it:
{% tabs %}
{% tab title="XML" %}
{% code lineNumbers="true" %}
```xml
...
...
```
{% endcode %}
{% endtab %}
{% endtabs %}
1. Create event handler for the `onShowQuickMenu` event, and add the code below to create a new `QuickMenuItem` and specify the order you would like for it to show:
{% tabs %}
{% tab title="Java" %}
{% code lineNumbers="true" %}
```java
if (annot.getType() == Annot.e_Square) {
QuickMenuItem item = new QuickMenuItem(MainActivity.this, R.id.qm_custom_link,
QuickMenuItem.FIRST_ROW_MENU);
item.setTitle(R.string.qm_custom_link);
item.setIcon(R.drawable.ic_link_black_24dp);
item.setOrder(3);
ArrayList items = new ArrayList<>(1);
items.add(item);
quickMenu.addMenuEntries(items);
}
```
{% endcode %}
{% endtab %}
{% endtabs %}
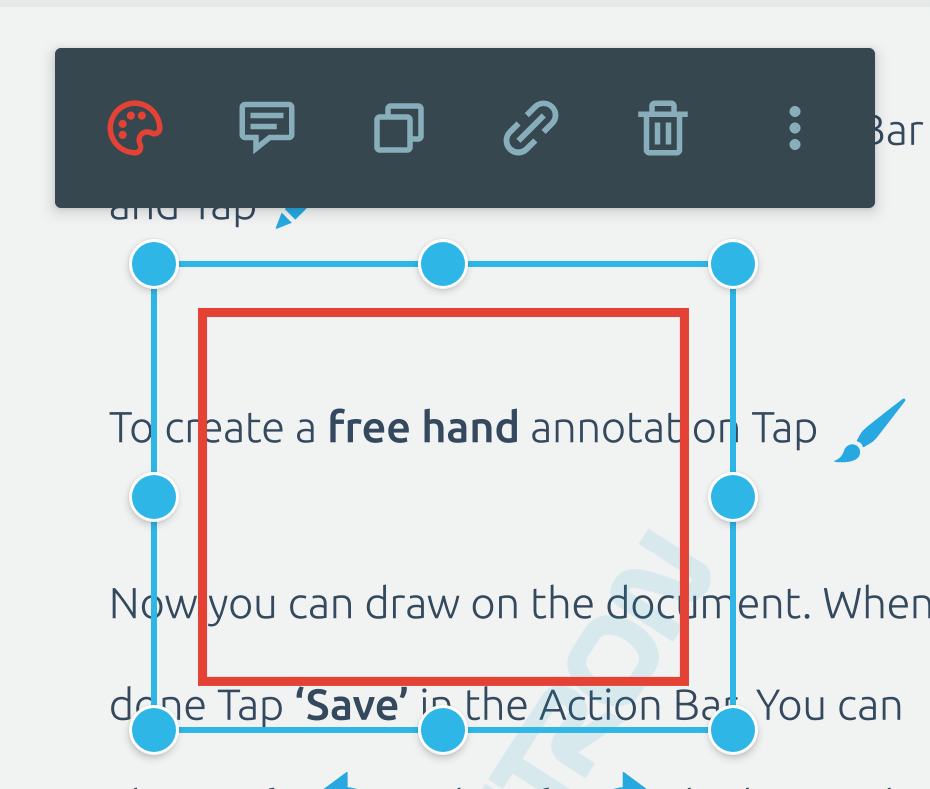
The quick menu for the square tool will now have a link item at the 3rd (0 index) position like this:
Quickmenu items can be removed by calling the `removeMenuEntries` method in the `QuickMenu` class:
{% tabs %}
{% tab title="Java" %}
{% code lineNumbers="true" %}
```java
if (annot.getType() == Annot.e_Square) {
QuickMenuItem item = new QuickMenuItem(MainActivity.this, R.id.qm_custom_link,
QuickMenuItem.FIRST_ROW_MENU);
ArrayList items = new ArrayList<>(1);
items.add(item);
quickMenu.removeMenuEntries(items);
}
```
{% endcode %}
{% endtab %}
{% endtabs %}
***
### Override menu resources
In this tutorial you will customize the quick menu for the `Pan` tool by overriding the default menu resource XML file in the Apryse SDK.
1. Create a menu resource XML file called `pan.xml` in your project's `Resources/menu` folder. This `pan.xml` file will automatically be used instead of the default one in the tools package. To override other quick menus, refer to the [table below](#quick-menu-resources) to determine the name of the menu resource file.
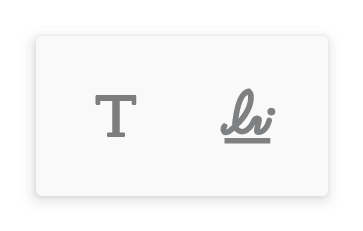
2. Add two items to you menu in `pan.xml` with the `id` attributes `@+id/qm_free_text` and `@+id/qm_floating_sig`:Here we use the ids `@+id/qm_free_text` and `@+id/qm_floating_sig` to override the `Free Text` and `Signature` menu items.Now, when you long-press on a blank space, you will see:
```xml
```
{% hint style="info" %}
You can also create your own menu items by providing a unique id, or by overriding our other menu items using the menu ids defined in the tools package. You can learn more about [handling custom menu item click events](#click-events).
{% endhint %}
#### Quick menu resources
| `pan` | Pan | Long press on blank space |
| ------------------------ | ------------------- | ---------------------------------------------------------------------------------------------------- |
| `text_select` | TextSelect | Long press on text |
| `annot_simple_shape` | AnnotEdit | Single tap on Square, Circle, Line, Polygon, Polyline, Text |
| `annot_free_text` | AnnotEdit | Single tap on FreeText |
| `annot_link` | AnnotEdit | Single tap on Link |
| `annot_signature` | AnnotEdit | Single tap on signature (type: Annot.e\_Stamp and custom field: Signature.SIGNATURE\_ANNOTATION\_ID) |
| `annot_stamper` | AnnotEdit | Single tap on Stamp(type: Annot.e\_Stamp) |
| `annot_file_attachment` | AnnotEdit | Single tap on FileAttachment |
| `annot_free_hand` | AnnotEdit | Single tap on Ink |
| `annot_general` | AnnotEdit | Single tap on all other annotation types |
| `annot_edit_text_markup` | AnnotEditTextMarkup | Single tap on TextMarkup annotations |
| `type` | AnnotEditTextMarkup | Click quick menu item with id `R.id.type` |
| `sig_field_image` | DigitalSignature | Single tap on digital image signature |
| `annot_edit_thickness` | DigitalSignature | Click quick menu item with id `R.id.thickness` |
| `sig_field_paths` | DigitalSignature | Single tap on digital signature, or click on items in quick menu `R.menu.annot_edit_thickness` |
## Create your own quick menu
You can use quick menus in a [`ToolManager`](/android/ui-customization/custom-tool.md) as well as in your application logic directly. By the end of this tutorial, you will be able to create your own quick menu.
1. First, add a menu resource XML file in your project's `res/menu` folder. For example, let's create a file called `custom.xml`.
By default, all menu items are placed in the first row of the quick menu. If you want to specify the location of a menu item, enclose the item inside a group with a group id from this list:
| **Group id** | **Location in quick menu** |
| --------------------------- | ----------------------------------------------------------------------------------------------------------------------- |
| `@id/qm_first_row_group` | First row group id: all menu items inside this group will be displayed in the first row of the quick menu. |
| `@id/qm_second_row_group` | Second row group id: all menu items inside this group will be displayed in the second row of the quick menu. |
| `@id/qm_overflow_row_group` | Overflow list group id: all menu items inside this group will be displayed in the overflow menu list of the quick menu. |
1. Add the following to `custom.xml`:
{% tabs %}
{% tab title="XML" %}
{% code lineNumbers="true" %}
```xml
```
{% endcode %}
{% endtab %}
{% endtabs %}
You can also add a sub menu by specifiying it in the menu resource XML. For example, we can add an Oval menu item as a submenu under the Rectangle menu item by changing `custom.xml` to:
{% tabs %}
{% tab title="XML" %}
{% code lineNumbers="true" %}
```xml
```
{% endcode %}
{% endtab %}
{% endtabs %}
For more information on defining an XML menu resource, see [Defining a Menu in XML](https://developer.android.com/guide/topics/ui/menus#xml).
1. After adding the menu resource XML, initialize `QuickMenu` as follows:
{% tabs %}
{% tab title="Java" %}
{% code lineNumbers="true" %}
```java
private void initQuickMenu(PDFViewCtrl pdfViewCtrl) {
QuickMenu quickMenu = new QuickMenu(pdfViewCtrl);
quickMenu.initMenuEntries(R.menu.custom);
}
```
{% endcode %}
{% endtab %}
{% tab title="Kotlin" %}
{% code lineNumbers="true" %}
```kotlin
private fun initQuickMenu(pdfViewCtrl: PDFViewCtrl) {
val quickMenu = QuickMenu(pdfViewCtrl)
quickMenu.initMenuEntries(R.menu.custom)
}
```
{% endcode %}
{% endtab %}
{% endtabs %}
Alternatively, if you want to customize menu items manually you can call [QuickMenu.inflate](https://sdk.apryse.com/api/android/javadoc/reference/com/pdftron/pdf/tools/QuickMenu.html#inflate\(int\)) to prevent auto-initialization. Then after customizing the items, call [QuickMenu.initMenuEntries](https://sdk.apryse.com/api/android/javadoc/reference/com/pdftron/pdf/tools/QuickMenu.html#initMenuEntries\(\)) to apply your changes:
{% tabs %}
{% tab title="Java" %}
{% code lineNumbers="true" %}
```java
private void initQuickMenu(PDFViewCtrl pdfViewCtrl) {
QuickMenu quickMenu = new QuickMenu(pdfViewCtrl);
quickMenu.inflate(R.menu.custom);
QuickMenuItem quickMenuItem = (QuickMenuItem) quickMenu.getMenu().findItem(R.id.rectangle);
// Customize my quick menu item
quickMenuItem.setIcon(R.drawable.my_custom_icon);
quickMenuItem.setTitle(R.string.my_custom_title);
// Initialize quick menu
quickMenu.initMenuEntries();
}
```
{% endcode %}
{% endtab %}
{% tab title="Kotlin" %}
{% code lineNumbers="true" %}
```kotlin
private fun initQuickMenu(pdfViewCtrl: PDFViewCtrl) {
val quickMenu = QuickMenu(pdfViewCtrl)
quickMenu.inflate(R.menu.custom)
val quickMenuItem = quickMenu.menu.findItem(R.id.rectangle) as QuickMenuItem
// Customize my quick menu item
quickMenuItem.setIcon(R.drawable.my_custom_icon)
quickMenuItem.setTitle(R.string.my_custom_title)
// Initialize quick menu
quickMenu.initMenuEntries()
}
```
{% endcode %}
{% endtab %}
{% endtabs %}
1. When you want to show the quick menu, set an anchor view that defines where the quick menu should appear by calling [`QuickMenu.SetAnchor(View)`](https://sdk.apryse.com/api/android/javadoc/reference/com/pdftron/pdf/tools/QuickMenu.html#setAnchor\(android.view.View\)), then call [`QuickMenu.Show()`](https://sdk.apryse.com/api/xamarinandroid/tools/api/pdftron.PDF.Tools.QuickMenu.html#pdftron_PDF_Tools_QuickMenu_Show)
{% tabs %}
{% tab title="Java" %}
{% code lineNumbers="true" %}
```java
private void showQuickMenu(QuickMenu quickMenu, View view) {
quickMenu.setAnchor(view);
quickMenu.show();
}
```
{% endcode %}
{% endtab %}
{% tab title="Kotlin" %}
{% code lineNumbers="true" %}
```kotlin
private fun showQuickMenu(quickMenu: QuickMenu, view: View) {
quickMenu.setAnchor(view)
quickMenu.show()
}
```
{% endcode %}
{% endtab %}
{% endtabs %}
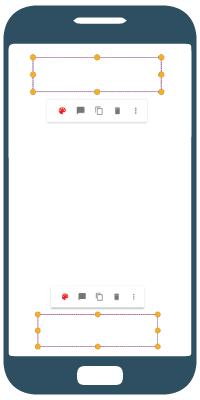
The quick menu will automatically adjust its position to either the top or bottom of the anchor view, depending on the space available:
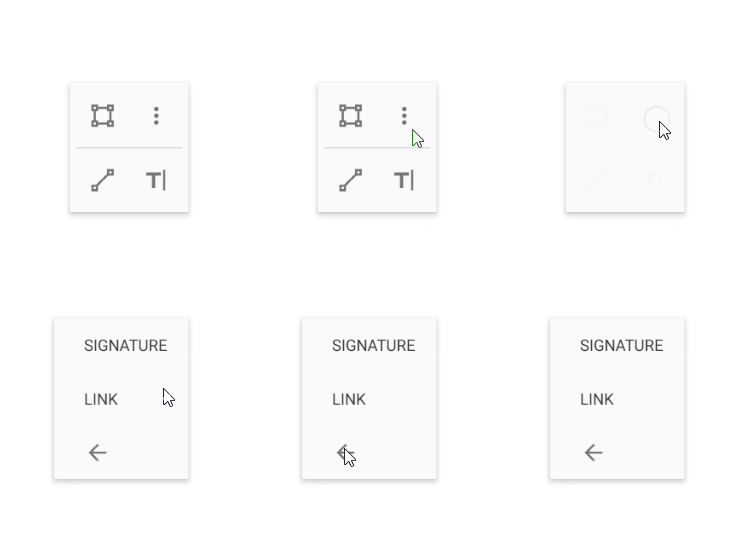
At this point, you should see the following when the quick menu is shown:
Without sub menu:
With sub menu:
### Click events
Click events from your custom items will **not** be automatically handled by the Apryse SDK if the menu item id does not match any of the default ids defined in the tools package (located in the `PDFViewCtrlTools\res\menu\ids.xml` file). You will have to handle these events as described [in the Quick Menu guide](/android/ui-customization/quick-menu.md#quick-menu-events) or by implementing [`onDismiss()`](https://sdk.apryse.com/api/android/javadoc/reference/com/pdftron/pdf/tools/QuickMenu.OnDismissListener.html#onDismiss\(\)):
{% tabs %}
{% tab title="Java" %}
{% code lineNumbers="true" %}
```java
quickMenu.setOnDismissListener(new QuickMenu.OnDismissListener() {
@Override
public void onDismiss() {
// Get selected quick menu item
QuickMenuItem selectedMenuItem = quickMenu.getSelectedMenuItem();
// Provide functionality depending on the menu item selected
// ...
}
});
```
{% endcode %}
{% endtab %}
{% tab title="Kotlin" %}
{% code lineNumbers="true" %}
```kotlin
quickMenu.setOnDismissListener {
// Get selected quick menu item
val selectedMenuItem = quickMenu.selectedMenuItem
// Provide functionality depending on the menu item selected
// ...
}
```
{% endcode %}
{% endtab %}
{% endtabs %}
{% hint style="info" %}
If your quick menu is controlled by a [custom tool](/android/ui-customization/custom-tool.md), you can simply override [`Tool.onQuickMenuClicked(QuickMenuItem)`](https://sdk.apryse.com/api/android/javadoc/reference/com/pdftron/pdf/tools/Tool.html#onQuickMenuClicked\(com.pdftron.pdf.tools.QuickMenuItem\)) in your custom tool to listen for quick menu click events.
{% endhint %}
## Quick menu style
### Icon style
You can call the following methods to customize the quick menu item icons programmatically before they are initialized:
| **Method call** | **Description** |
| -------------------------------------------------------------------------------------------------------------------------------------------------------------------------------------------------------------------------------------------------------------------------------------------------------------------------------- | ---------------------- |
| [`QuickMenuItem.setIcon(Drawable)`](https://sdk.apryse.com/api/android/javadoc/reference/com/pdftron/pdf/tools/QuickMenuItem.html#setIcon\(android.graphics.drawable.Drawable\)) or [`QuickMenuItem.setIcon(int)`](https://sdk.apryse.com/api/android/javadoc/reference/com/pdftron/pdf/tools/QuickMenuItem.html#setIcon\(int\)) | Set the menu item icon |
| [`QuickMenuItem.setColor(int)`](http://sdk.apryse.com/api/android/javadoc/reference/com/pdftron/pdf/tools/QuickMenuItem.html#setColor\(int\)) | Set the icon color |
| [`QuickMenuItem.setOpacity(float)`](https://sdk.apryse.com/api/android/javadoc/reference/com/pdftron/pdf/tools/QuickMenuItem.html#setOpacity\(float\)) | Set the icon opacity |
**Example**
{% tabs %}
{% tab title="Java" %}
{% code lineNumbers="true" %}
```java
private void initQuickMenu(Context context, PDFViewCtrl pdfViewCtrl) {
QuickMenu quickMenu = new QuickMenu(pdfViewCtrl);
quickMenu.inflate(R.menu.custom);
QuickMenuItem noteItem = (QuickMenuItem) quickMenu.getMenu().findItem(R.id.my_quickmenu_item);
// Customize the menu item by setting a custom icon, with a red color and 0.5 opacity
noteItem.setIcon(R.drawable.my_custom_icon);
noteItem.setColor(context.getResources().getColor(R.color.red));
noteItem.setOpacity(0.5f);
// Initialize the quick menu after customizing menu items
quickMenu.initMenuEntries();
}
```
{% endcode %}
{% endtab %}
{% tab title="Kotlin" %}
{% code lineNumbers="true" %}
```kotlin
private fun initQuickMenu(context: Context, pdfViewCtrl: PDFViewCtrl) {
val quickMenu = QuickMenu(pdfViewCtrl)
quickMenu.inflate(R.menu.custom)
val noteItem = quickMenu.menu.findItem(R.id.my_quickmenu_item) as QuickMenuItem
// Customize the menu item by setting a custom icon, with a red color and 0.5 opacity
noteItem.setIcon(R.drawable.my_custom_icon)
noteItem.setColor(context.resources.getColor(R.color.red))
noteItem.opacity = 0.5f
// Initialize the quick menu after customizing menu items
quickMenu.initMenuEntries()
}
```
{% endcode %}
{% endtab %}
{% endtabs %}
You can also customize the icon using the `android:icon` attribute in your menu resource XML file. Additionally if your Android app supports minimum API level 26, you can set the icon tint color and tint mode by setting the `android:iconTint` and `android:iconTintMode` attributes.
**Example**
{% tabs %}
{% tab title="XML" %}
{% code lineNumbers="true" %}
```xml
```
{% endcode %}
{% endtab %}
{% endtabs %}
### Button style
`QuickMenu` uses `R.style.QuickMenuButton` for the buttons style. You can change the style by overriding it in your `res/value/style.xml` file.
If you want to change the button style the after quick menu is displayed, you can find the button by calling [`QuickMenu.findMenuItem(QuickMenuItem)`](https://sdk.apryse.com/api/android/javadoc/reference/com/pdftron/pdf/tools/QuickMenu.html#findMenuItem\(int\)). Once the button is found, how you set its style programmatically depends on whether it is an [ImageButton](https://developer.android.com/reference/android/widget/ImageButton.html) or a [Button](https://developer.android.com/reference/android/widget/Button.html).
**Example**
{% tabs %}
{% tab title="Java" %}
{% code lineNumbers="true" %}
```java
/**
* Update quick menu appearance item color
* @param color
*/
public void updateQuickMenuStyleColor(int color) {
if (quickMenu == null) {
return;
}
// Find appearance quick menu item
QuickMenuItem menuItem = (QuickMenuItem) quickMenu.getMenu().findItem(R.id.appearance);
if (menuItem != null) {
menuItem.setIconColor(color);
View button = quickMenu.findButtonByMenuItem(menuItem);
if (button != null) {
if (button instanceof ImageButton) {
((ImageButton) button).setColorFilter(color, PorterDuff.Mode.SRC_IN);
} else if (button instanceof Button) {
((Button) button).setTextColor(color);
}
}
}
}
```
{% endcode %}
{% endtab %}
{% tab title="Kotlin" %}
{% code lineNumbers="true" %}
```kotlin
/**
* Update quick menu appearance item color
* @param color
*/
fun updateQuickMenuStyleColor(color: Int) {
if (quickMenu == null) {
return
}
// find appearance quick menu item
val menuItem = quickMenu.getMenu().findItem(R.id.appearance) as QuickMenuItem
menuItem.setIconColor(color)
val button = quickMenu.findButtonByMenuItem(menuItem)
if (button != null) {
if (button is ImageButton) {
(button as ImageButton).setColorFilter(color, PorterDuff.Mode.SRC_IN)
} else if (button is Button) {
(button as Button).setTextColor(color)
}
}
}
```
{% endcode %}
{% endtab %}
{% endtabs %}
### Background
The quick menu background uses `drawable/quickmenu_bg_rect.xml` for **API 21 and above** and `drawable/quickmenu_bg_rect_old_api` for **API under 21**. You can change the background by overriding these drawable files.
### Divider
There is a hairline divider between the first and second row of the quick menu. If both rows exist, the divider is `VISIBLE` by default. You can hide this hairline divider by calling [`QuickMenu.setDividerVisibility(View.INVISIBLE)`](https://sdk.apryse.com/api/android/javadoc/reference/com/pdftron/pdf/tools/QuickMenu.html#setDividerVisibility\(int\))
---
# Agent Instructions
This documentation is published with GitBook. GitBook is the documentation platform designed so that both humans and AI agents can read, navigate, and reason over technical content effectively. Learn more at gitbook.com.
## Querying This Documentation
If you need additional information that is not directly available in this page, you can query the documentation by asking a question.
Perform an HTTP GET request on the following URL with the `ask` and `goal` query parameters:
```
GET https://docs.apryse.com/android/ui-customization/customize-quick-menu.md?ask=&goal=
```
`ask` is the immediate question: it should be specific, self-contained, and written in natural language.
`goal` is what the user is ultimately trying to achieve, the reason they need the answer. Sharing it helps GitBook give you a better, more relevant answer. A goal is most helpful when it describes the outcome the user wants rather than restating the question. For example, with `ask=how do I create an API token`, a goal like `automate deployments from our CI pipeline` lets GitBook tailor the answer to that use case.
The response will contain a direct answer to the question and relevant excerpts and sources from the documentation.
Use this mechanism when the answer is not explicitly present in the current page, you need clarification or additional context, or you want to retrieve related documentation sections.