> For the complete documentation index, see [llms.txt](https://docs.apryse.com/llms.txt). Markdown versions of documentation pages are available by appending `.md` to page URLs; this page is available as [Markdown](https://docs.apryse.com/core/get-started/frameworks/dotnetcore.md).
# Build a .NET PDF library app with Apryse Server SDK
Learn how to build a simple .NET PDF application using the Apryse .NET PDF library and Server SDK to generate PDFs programmatically.
This guide shows how to build a simple .NET PDF application that uses the [Apryse Server SDK](https://docs.apryse.com/try-now?tab-cfc13cf95cb8=server+%2F+desktop+sdk) and PDFNet library to generate a PDF programmatically. You’ll set up a minimal project, install the SDK, and add the required code to create a blank PDF document. This example provides a practical foundation for building more advanced document‑generation workflows.
To get started, choose your preferred platform from the following tabs.
{% tabs %}
{% tab title="Windows" %}
{% tabs %}
{% tab title=".NET" %}
## Prerequisites
Before you start:
* Install [Visual Studio](https://visualstudio.microsoft.com/downloads/) to build, test, and deploy applications.
* Install the latest active version of the [.NET SDK](https://dotnet.microsoft.com/en-us/download/dotnet) to build your application.
* Get your Apryse trial key.
{% @apryse-license-key/apryse-license-key platform="SERVER" variant="full" %}
{% hint style="info" %}
**Run Apryse SDK in production**
A commercial license key is required for use in a production environment. [Contact sales](https://apryse.com/form/contact-sales) to purchase a commercial license key.
{% endhint %}
{% hint style="warning" %}
**Keep your commercial license key confidential**
License keys are uniquely generated and strictly confidential. Don't publish or store them in any public location, including public GitHub repositories.
{% endhint %}
## 1. Set up your project
Set up your project by creating a folder and preparing your workspace for the application.
1. Open **Visual Studio** and go to **File > New > Project.**
2. When creating a new project, select **Console App**, then click **Next.**
3. Add a **Project name**.
4. Specify where to save your project using the **Location** field, then click **Next.**
{% hint style="info" %}
**Info**
Remember the file location for your project. You'll need it later when verifying this workflow.
{% endhint %}
5. In the **Framework** dropdown, select the .NET version. For example, **.NET 8 (Long Term Support**), then click **Create.** A default app is created, where you can run and debug your project.
## 2. Add the Apryse SDK
Next, integrate the Apryse Server SDK into your .NET application and add the code needed to generate a PDF.
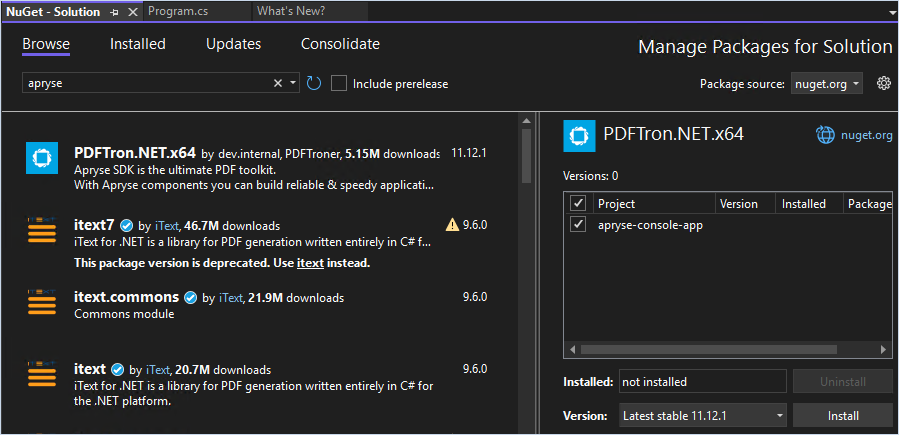
1. In **Visual Studio**, go to **Tools >** **NuGet Package Manager >** **Manage NuGet Packages for Solution**.
2. From the **Browse** tab, enter *Apryse* in the **Search** field. This shows you the various packages that Apryse has published.
3. From the search results, select **PDFTron.NET.x64**.
4. In the **Manage Packages for Solution** dialog, select the project, then click **Install.**
Manage NuGet Packages dialog in Visual Studio with PDFTron.NET.x64 installation options.
5. In the **Preview Changes** modal, click **Apply** to install the package in your project.
6. Check the **Output window** **(Package Manager)** to confirm the installation completed successfully:
{% code lineNumbers="true" %}
```
Restoring packages...
Installed PDFTron.NET.x64 11.12.1 from...
Installing NuGet package PDFTron.NET.x64 11.12.1...
Generating MSBuild file...
Writing assets file to disk...
Successfully installed 'PDFTron.NET.x64'
========== Finished ==========
```
{% endcode %}
7. Go to the **`Program.cs`** file in the **Solutions Explorer.** Replace the entire file with this code, making sure to update your license key and save the file:
// Import namespaces
using System;
using pdftron;
using pdftron.Common;
using pdftron.PDF;
using pdftron.SDF;

// Create console app entry point
namespace myApp
{
    class Program
    {
        static void Main(string[] args)
        {
            Console.WriteLine("Hello World!");

            // Initialize Apryse SDK
            // Replace with your demo license key
            PDFNet.Initialize("visitor.claims.serverKey || "YOUR_LICENSE_KEY"");

            // Using PDFNet related classes and methods, must
            // catch or throw PDFNetException
            try
            {
                using (PDFDoc doc = new PDFDoc())
                {
                    doc.InitSecurityHandler();
                    // Start a new page
                    Page newPg = doc.PageCreate();

                    // Add page to document
                    doc.PagePushBack(newPg);

                    // Save document as a linearized PDF
                    doc.Save("output.pdf", SDFDoc.SaveOptions.e_linearized);
                    System.Console.WriteLine("Done. Results saved in linearized_output.pdf");
                }
            }
            catch (PDFNetException e)
            {
                System.Console.WriteLine(e.Message);
            }
            // Make the program wait to terminate after user input
            Console.ReadKey();
        }
    }
}
{% hint style="info" %}
**Info**
If you're signed in with an Apryse account, your license key is automatically prepopulated in all code snippets.
{% endhint %}
With this code, you can:
* Import the required Apryse `PDFNet` namespaces.
* Define a console application entry point using `Main`.
* Log a startup message to the console.
* Initialize the Apryse SDK with a license key.
* Create a new PDF document, add a blank page, and save it as a linearized PDF.
* Automatically release document resources with the `using` statement.
## 3. Verify your output
Finally, build and run your application to confirm that the Apryse Server SDK is working correctly. After the application runs successfully, it will generate a blank PDF file locally.
1. In Visual Studio, run the app by selecting the **Start** button on the toolbar, or by pressing **F5.** A successful output looks similar to:
{% code lineNumbers="true" %}
```cmd
Hello World!
PDFNet is running in demo mode.
PackageV2: base
Done. Results saved in linearized_output.pdf
```
{% endcode %}
2. Navigate to this directory, where the build output is created by default:
{% code lineNumbers="true" %}
```
C:\Users\\source\repos\\\bin\Debug\\
```
{% endcode %}
3. Verify the blank `output.pdf` file was generated programmatically using the Apryse Server SDK. The folder structure looks similar to:
{% code lineNumbers="true" %}
```
C:\Users\\source\repos\
└── apryse-console-app\
├── apryse-console-app.sln
└── apryse-console-app\
└── bin\
└── Debug\
└── net8.0\
├── apryse-console-app.deps.json
├── apryse-console-app.dll
├── apryse-console-app.exe
├── apryse-console-app.pdb
├── apryse-console-app.runtimeconfig.json
├── libPDFNetC.dylib
├── libPDFNetC.so
├── PDFNetC.dll
├── PDFTronDotNet.dll
└── output.pdf
```
{% endcode %}
{% endtab %}
{% tab title="Azure Functions" %}
This guide will help you set up Apryse SDK serverless Azure functions. Your free trial includes unlimited trial usage and support from solution engineers.
## Prerequisites
* [Visual Studio 2019](https://visualstudio.microsoft.com/vs/older-downloads/)
* An active [Azure account](https://azure.microsoft.com/en-us/)
* [Apryse SDK DLLs](/core/get-started/download.md)
## Initial setup
In this particular guide, we will demonstrate how to set up an Azure function to use Apryse SDK.
First, create an Azure function using [this guide](https://docs.microsoft.com/en-us/azure/azure-functions/functions-create-your-first-function-visual-studio/).
Next, edit your csproj to include `PDFNetC.dll` and reference `PDFTronDotNet.dll` from the [download package](/core/get-started/download.md).
## Integrate into your application
Once you have followed the initial setup instructions, you can begin calling Apryse SDK APIs in your Azure function source. For example:
{% code lineNumbers="true" %}
```csharp
using System.IO;
using System.Threading.Tasks;
using Microsoft.AspNetCore.Http;
using Microsoft.AspNetCore.Mvc;
using Microsoft.Azure.WebJobs;
using Microsoft.Azure.WebJobs.Extensions.Http;
using Microsoft.Extensions.Logging;
using Newtonsoft.Json;
using System;
using System.Drawing;
using System.Drawing.Imaging;
using System.Runtime.InteropServices;
using pdftron;
using pdftron.Common;
using pdftron.PDF;
using pdftron.SDF;
namespace FunctionApp
{
public static class YourAzureFunctionClass
{
[FunctionName("YourAzureFunctionName")]
public static async Task Run(
[HttpTrigger(AuthorizationLevel.Anonymous, "get", "post", Route = null)] HttpRequest req, ILogger log)
{
PDFNet.Initialize("YOUR_APRYSE_LICENSE_KEY");
// your Azure function
}
}
}
```
{% endcode %}
## Run Sample Code
You can update C# script of your Azure function project with the following code or [download the source code from our github repository](https://github.com/PDFTron/azure-function-example/blob/master/server/OfficeToPDF.cs). This snippet shows how to process a request sent from a client to convert an office document to PDF and send the output to client.
{% code lineNumbers="true" %}
```csharp
using System.IO;
using System.Threading.Tasks;
using Microsoft.AspNetCore.Http;
using Microsoft.AspNetCore.Mvc;
using Microsoft.Azure.WebJobs;
using Microsoft.Azure.WebJobs.Extensions.Http;
using Microsoft.Extensions.Logging;
using Newtonsoft.Json;
using System;
using System.Drawing;
using System.Drawing.Imaging;
using System.Runtime.InteropServices;
using pdftron;
using pdftron.Common;
using pdftron.PDF;
using pdftron.SDF;
// This example shows how to create Azure functions using Apryse SDK.
// A REST API request was posted with base64 encoded data by the client.
// The request would be processed by the server and a response with base64 encoded data of OfficeToPDF output would be sent to the client.
namespace FunctionApp
{
public static class OfficeToPDF
{
[FunctionName("OfficeToPDF")]
public static async Task Run(
[HttpTrigger(AuthorizationLevel.Anonymous, "get", "post", Route = null)] HttpRequest req,
ILogger log)
{
try
{
log.LogInformation("C# HTTP trigger function processed a request.");
string requestBody = await new StreamReader(req.Body).ReadToEndAsync();
dynamic data = JsonConvert.DeserializeObject(requestBody);
PDFNet.Initialize("YOUR_APRYSE_LICENSE_KEY");
string file_data = "";
string json_data = "";
log.LogInformation("Reading file data from the request ...");
try
{
file_data = System.Convert.ToString(data.file.data);
if (!string.IsNullOrEmpty(file_data))
{
log.LogInformation($"data: {data}");
log.LogInformation("Converting base64 string to bytes...");
Byte[] input_bytes = System.Convert.FromBase64String(file_data);
Byte[] output_bytes;
log.LogInformation("Processing using OfficeToPDF() ...");
pdftron.Filters.MemoryFilter memoryFilter = new pdftron.Filters.MemoryFilter(input_bytes.Length, false);
pdftron.Filters.FilterWriter writer = new pdftron.Filters.FilterWriter(memoryFilter);
writer.WriteBuffer(input_bytes);
writer.Flush();
memoryFilter.SetAsInputFilter();
PDFDoc pdfdoc = new PDFDoc();
pdftron.PDF.Convert.OfficeToPDF(pdfdoc, memoryFilter, null);
log.LogInformation("Saving output as bytes ...");
output_bytes = pdfdoc.Save(SDFDoc.SaveOptions.e_linearized);
log.LogInformation("Converting output bytes to base64 string and send a response ...");
string base64_str = System.Convert.ToBase64String(output_bytes);
// create json data
var myData = new
{
type = "File",
title = "Transfer base64 encoded Office2PDF output.",
file = new
{
encoding = "base64",
data = base64_str,
fileName = "docx2pdf.pdf",
contentType = "application/pdf"
}
};
// transform it to Json object
json_data = JsonConvert.SerializeObject(myData);
log.LogInformation($"data: {myData}");
}
}
catch (Exception ex)
{
log.LogInformation("No data is sent!");
}
log.LogInformation("Sending response to the request ...");
string responseMessage = !string.IsNullOrEmpty(json_data) ? json_data : $"Hello! PDFNet version = {PDFNet.GetVersion()}. This HTTP triggered function executed successfully.";
return new OkObjectResult(responseMessage);
}
catch (Exception ex)
{
log.LogInformation($"Error occured: {ex.Message}");
return new OkObjectResult("Exception occurred!");
}
}
}
}
```
{% endcode %}
The last step is to publish your Azure function and have it running and its url ready. Make sure to set `Settings/Configuration/General settings/Platform` to `64-bit` in Azure portal.
### Testing
In order to use this Azure function to convert an office document to PDF, the client needs to `post` a REST API request to the server. The request must include `json` data structured as in C# code above.
{% code lineNumbers="true" %}
```python
json_data = {
"file": {
"encoding": "base64",
"data": base64_string_of_your_office_document,
"filename": filename,
"content-type": "application/pdf"
}
}
```
{% endcode %}
Upon receiving a client's request, a response will be sent back to the client including the base64 encoded pdf output using the same json structure. All the client needs to do now is decode the encoded data into pdf. That's it! You can access the [sample python code on Github](https://github.com/PDFTron/azure-function-example/tree/master/client/). After cloning the repository and installing necessary packages, please refer to `/client/README.txt` for detailed instructions. Navigate to the `client` folder, run the following command, and see the reponse to client's request in the console and check the output in the `output` folder:
{% code lineNumbers="true" %}
```sh
python AzureExample.py --url
```
{% endcode %}
The client will send a REST API request to convert `/input/simple-word_2007.docx` to pdf and the server will send back the encoded data, which will then be saved as pdf in the `output` folder.
You can experiment with your own office document by putting it inside `input` folder:
{% code lineNumbers="true" %}
```sh
python AzureExample.py --url --filename
```
{% endcode %}
We have shown how to set an Azure function using Apryse SDK. You can now experiment making your own functions, URLs, and can fully utilize Apryse SDK. If your have any questions, please don't hesitate to contact us!
{% endtab %}
{% endtabs %}
{% endtab %}
{% tab title="Linux" %}
## Prerequisites
Before you start:
* Install [Visual Studio Code](https://code.visualstudio.com/Download) or another code editor to develop and debug your code.
* Install the latest version of [.NET](https://snapcraft.io/dotnet) to build your application. See the Ubuntu for Developers [how-to guide](https://documentation.ubuntu.com/ubuntu-for-developers/howto/dotnet-setup/). To install different runtimes or SDKs, see [Installing .NET components](https://documentation.ubuntu.com/ubuntu-for-developers/howto/dotnet-setup/#installing-net-components) and [available .NET versions](https://documentation.ubuntu.com/ubuntu-for-developers/reference/availability/dotnet/?_gl=1*1p7wabr*_gcl_au*MjIxMDAzOTkuMTc2MjI3NTYzNw..).
* Get your Apryse trial key.
{% @apryse-license-key/apryse-license-key platform="SERVER" variant="full" %}
{% hint style="info" %}
**Run Apryse SDK in production**
A commercial license key is required for use in a production environment. [Contact sales](https://apryse.com/form/contact-sales) to purchase a commercial license key.
{% endhint %}
{% hint style="warning" %}
**Keep your commercial license key confidential**
License keys are uniquely generated and strictly confidential. Don't publish or store them in any public location, including public GitHub repositories.
{% endhint %}
{% hint style="info" %}
**Info**
For Alpine Linux-specific instructions, see the [Alpine Linux guide](/core/get-started/get-started/alpine.md).
{% endhint %}
## 1. Set up your project
Set up your project by creating a folder and preparing your workspace for the application.
1. In your file manager, create a **Documents > NewApryseProject** folder.
2. Right-click the **NewApryseProject** folder and select **Open in Terminal**.
3. In your terminal, create a new .NET console application:
{% code lineNumbers="true" %}
```bash
dotnet new console
```
{% endcode %}
A successful output looks similar to:
{% code lineNumbers="true" %}
```bash
The template "Console App" was created successfully.
Processing post-creation actions...
Restoring /.csproj:
Restore succeeded.
```
{% endcode %}
## 2. Add the Apryse SDK
Next, integrate the Apryse Server SDK into your .NET application and add the code needed to generate a PDF.
1. Navigate to the `~/Documents/NewApryseProject` directory in your terminal, then run one of these commands to install the Apryse SDK:
{% code lineNumbers="true" %}
```bash
# Choose ONE of the following based on your system architecture:
# Run to add the PDFTron .NET package for x64 (Intel/AMD) systems
dotnet add package PDFTron.NET.x64
# Run to add the PDFTron .NET package for ARM64 systems
dotnet add package PDFTron.NET.ARM
```
{% endcode %}
The command downloads the .NET package from NuGet and makes the library available to your application. A successful output looks like:
{% code lineNumbers="true" %}
```bash
Build succeeded.
info : Adding PackageReference for package 'PDFTron.NET.ARM' into project ...
info : Installed PDFTron.NET.ARM .
info : PackageReference for package 'PDFTron.NET.ARM' version '' added ...
log : Restored /.csproj.
```
{% endcode %}
2. Open the `Program.cs` file in Visual Studio Code or your preferred code editor:
{% code lineNumbers="true" %}
```
~/Documents/NewApryseProject/Program.cs
```
{% endcode %}
3. Replace `Program.cs` with the following code, update your license key, and save your changes:
// Import namespaces
using System;
using pdftron.Common;
using pdftron.PDF;
using pdftron.SDF;

// Create console app entry point
namespace myApp
{
    class Program
    {
      static void Main(string[] args)
      {
          Console.WriteLine("Hello World!");

          // Initialize Apryse SDK
          // Replace with your demo license key
          pdftron.PDFNet.Initialize("visitor.claims.serverKey || "YOUR_LICENSE_KEY"");

          using(PDFDoc doc = new PDFDoc()){

            // Start a new page
            Page page = doc.PageCreate();

            // Add page to document
            doc.PagePushBack(page);

            // Save document as a linearized PDF
            doc.Save("output.pdf", SDFDoc.SaveOptions.e_linearized); // Save document as a linearized PDF

          }
      }
    }
}
{% hint style="info" %}
**Info**
If you're signed in with an Apryse account, your license key is automatically prepopulated in all code snippets.
{% endhint %}
With this code, you can:
* Import the required Apryse `PDFNet` namespaces.
* Define a console application entry point using `Main`.
* Log a startup message to the console.
* Initialize the Apryse SDK with a license key.
* Create a new PDF document, add a blank page, and save it as a linearized PDF.
* Automatically release document resources with the `using` statement.
## 3. Verify your output
Finally, build and run your application to confirm that the Apryse Server SDK is working correctly. After the application runs successfully, it will generate a blank PDF file locally.
1. Go to the **Documents > NewApryseProject** folder, and right-click to select **Open in Terminal**.
2. In the terminal, build and launch the application:
{% code lineNumbers="true" %}
```bash
dotnet run
```
{% endcode %}
A successful output looks similar to:
{% code lineNumbers="true" %}
```bash
Hello World!
PDFNet is running in demo mode.
PackageV2: base
```
{% endcode %}
3. Go to the **Documents** > **NewApryseProject** folder using the file manager.
4. Verify the blank `output.pdf` file was generated programmatically using the Apryse Server SDK. The folder structure looks similar to:
{% code lineNumbers="true" %}
```
NewApryseProject/
├── bin/
├── obj/
├── NewApryseProject.csproj
├── output.pdf
└── Program.cs
```
{% endcode %}
{% endtab %}
{% tab title="macOS" %}
## Prerequisites
Before you start:
* Install [Visual Studio Code](https://code.visualstudio.com/Download) or another code editor to develop and debug your code.
* Install the latest active version of the [.NET SDK](https://dotnet.microsoft.com/en-us/download/dotnet) to build your application.
* Get your Apryse trial key.
{% @apryse-license-key/apryse-license-key platform="SERVER" variant="full" %}
{% hint style="info" %}
**Run Apryse SDK in production**
A commercial license key is required for use in a production environment. [Contact sales](https://apryse.com/form/contact-sales) to purchase a commercial license key.
{% endhint %}
{% hint style="warning" %}
**Keep your commercial license key confidential**
License keys are uniquely generated and strictly confidential. Don't publish or store them in any public location, including public GitHub repositories.
{% endhint %}
## 1. Set up your project
Set up your project by creating a folder and preparing your workspace for the application.
1. In your file manager, create a **Documents > NewApryseProject** folder.
2. Right-click the **NewApryseProject** folder and select **New Terminal at Folder**.
3. In your terminal, create a new .NET console application:
{% code lineNumbers="true" %}
```bash
dotnet new console
```
{% endcode %}
A successful output looks similar to:
{% code lineNumbers="true" %}
```bash
The template "Console App" was created successfully.
Restore succeeded.
```
{% endcode %}
## 2. Add the Apryse SDK
Next, integrate the Apryse Server SDK into your .NET application and add the code needed to generate a PDF.
1. Navigate to the `~/Documents/NewApryseProject` directory in your terminal, then install the Apryse SDK:
{% code lineNumbers="true" %}
```bash
dotnet add package PDFTron.NET.x64
```
{% endcode %}
The command downloads the .NET package from NuGet and makes the library available to your application. A successful output looks like:
{% code lineNumbers="true" %}
```bash
Build succeeded.
Adding PackageReference for package 'PDFTron.NET.x64' to project...
GET https://api.nuget.org/v3/index.json
OK https://api.nuget.org/v3/index.json
Restoring packages...
Installed PDFTron.NET.x64 x.x.x.
Generating build files...
Restore succeeded.
```
{% endcode %}
2. Open the `Program.cs` file in Visual Studio Code or your preferred code editor:
{% code lineNumbers="true" %}
```
~/Documents/NewApryseProject/Program.cs
```
{% endcode %}
3. Replace `Program.cs` with the following code, update your license key, and save your changes:
// Import namespaces
using System;
using pdftron.Common;
using pdftron.PDF;
using pdftron.SDF;

// Create console app entry point
namespace myApp
{
    class Program
    {
        static void Main(string[] args)
        {
            Console.WriteLine("Hello World!");

            // Initialize Apryse SDK
            // Replace with your demo license key
            pdftron.PDFNet.Initialize("visitor.claims.serverKey || "YOUR_LICENSE_KEY"");

            using (PDFDoc doc = new PDFDoc())
            {
                // Start a new page
                Page page = doc.PageCreate();

                // Add page to document
                doc.PagePushBack(page);

                // Save document as a linearized PDF
                doc.Save("output.pdf", SDFDoc.SaveOptions.e_linearized);
            }
        }
    }
}
{% hint style="info" %}
**Info**
If you're signed in with an Apryse account, your license key is automatically prepopulated in all code snippets.
{% endhint %}
With this code, you can:
* Import the required Apryse `PDFNet` namespaces.
* Define a console application entry point using `Main`.
* Log a startup message to the console.
* Initialize the Apryse SDK with a license key.
* Create a new PDF document, add a blank page, and save it as a linearized PDF.
* Automatically release document resources with the `using` statement.
## 3. Verify your output
Finally, build and run your application to confirm that the Apryse Server SDK is working correctly. After the application runs successfully, it will generate a blank PDF file locally.
1. Go to the **Documents** > **NewApryseProject** folder, and right-click to select **New Terminal at Folder**.
2. In the terminal, build and launch the application:
{% code lineNumbers="true" %}
```bash
dotnet run
```
{% endcode %}
A successful output looks similar to:
{% code lineNumbers="true" %}
```bash
Hello World!
PDFNet is running in demo mode.
PackageV2: base
```
{% endcode %}
3. Go to the **Documents** > **NewApryseProject** folder using the file manager.
4. Verify the blank `output.pdf` file was generated programmatically using the Apryse Server SDK. The folder structure looks similar to:
{% code lineNumbers="true" %}
```
NewApryseProject/
├── bin/
├── obj/
├── NewApryseProject.csproj
├── output.pdf
└── Program.cs
```
{% endcode %}
{% endtab %}
{% endtabs %}
## **Get started video**
Get started with the Apryse Server SDK and .NET on Windows by watching this 4-minute video.
{% embed url="" %}
Get started with .NET and the Apryse Server SDK on Windows
{% endembed %}
## Next Steps
UsageGuidesSamplesAPI docs
---
# Agent Instructions
This documentation is published with GitBook. GitBook is the documentation platform designed so that both humans and AI agents can read, navigate, and reason over technical content effectively. Learn more at gitbook.com.
## Querying This Documentation
If you need additional information that is not directly available in this page, you can query the documentation dynamically by asking a question.
Perform an HTTP GET request on the current page URL with the `ask` query parameter, and the optional `goal` query parameter:
```
GET https://docs.apryse.com/core/get-started/frameworks/dotnetcore.md?ask=&goal=
```
`ask` is the immediate question: it should be specific, self-contained, and written in natural language.
`goal` is optional and describes the broader end goal you are ultimately trying to accomplish on behalf of the user. GitBook uses it to tailor the answer towards what is most useful for that goal.
The response will contain a direct answer to the question and relevant excerpts and sources from the documentation.
Use this mechanism when the answer is not explicitly present in the current page, you need clarification or additional context, or you want to retrieve related documentation sections.