GettingStarted |
PDFNet SDK for UWP
Creating a UWP App Using PDFNet SDK
Using a PDFViewCtrl to Display Documents
Adding Text Selection, Form Filling, and More
Using the PDFNetException class
The PDFNet SDK is a full featured library for working with PDF documents. It allows the creation, editing, maintaining and viewing of PDF documents. This tutorial will get you started using the PDFNet SDK for to create a basic PDFViewer (similar to PDFWiewCtrlDemo that comes with the solution). The PDFViewCtrl can be configured to work for many different purposes, including being the center-piece of a PDF document viewer or editor.
This tutorial assumes that you have access to Windows 10.0 and Visual Studio 2015 installed. It also assumes that you have installed the appropriate kits to develop UWP apps. We will be using C# to create a basic document viewer using the PDFViewCtrl. This tutorial was written using Visual Studio 2015, version 14.0.25123.00 Update 2.
Installing PDFNet for UWP is very simple. We do this by executing the VSIX installer located in side the Lib folder. Simply follow the instructions.
If you already have a version of PDFNet for UWP installed, you might get an error message stating "This extension is already installed to all applicable products." This might happen if you get a custom build to replace the official release. If this is the case, you can uninstall the old version by, in Visual Studio 2015, opening Tools -> Extensions and Updates. Under the menu Installed -> All, you should be able to find PDFNet for UWP. Select it and click Uninstall.
1. Create a new project in Visual Studio 2015. We will be using C# and create a blank app to keep things simple. We will be calling the App PDFNetSample. Under Templates, select Visual C#, Windows, Universal and then select Blank App. In the dialog to select Platform Versions, simply click OK.
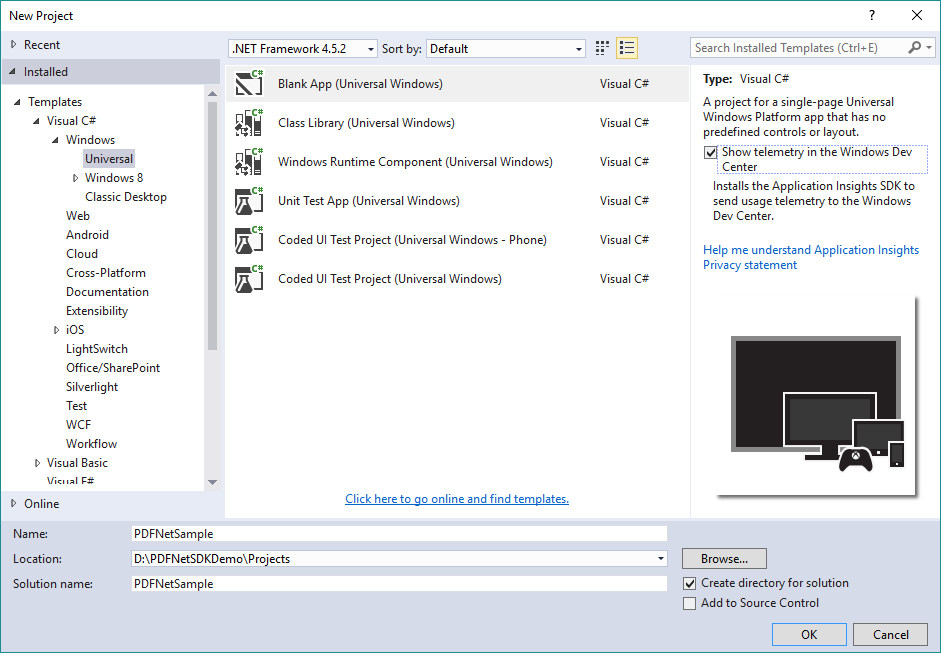
Figure 1: Creating an empty project
2. Now, we need to add a reference to the PDFNet SDK. Note that we need to ensure the build architecture of the project is not "Any CPU", because we can't use it in projects that include native code. In this case, we will use x86. Click on Build -> Configuration Manager and, if it is "Any CPU", change the active solution platform to x86.
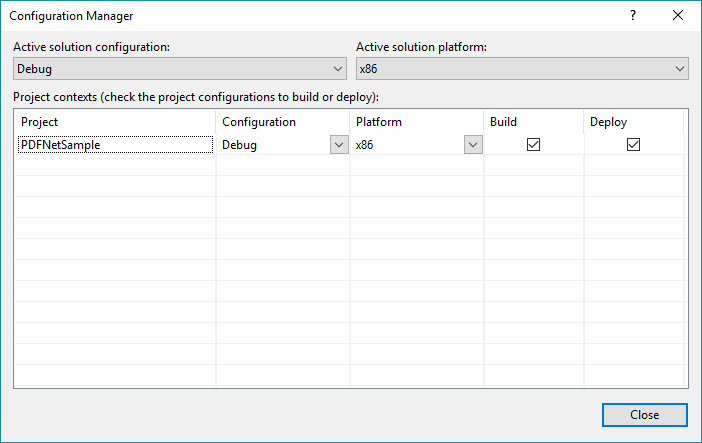
Figure 2: Build architecture
Next, find the references in the Solution Explorer, right click and select "Add Reference…". In the dialog, select Universal Windows -> Extensions and check the box next to PDFNet SDK for UWP. This reference will work for any build architecture (though not with "Any CPU"). To make sure everything works, try building the project.
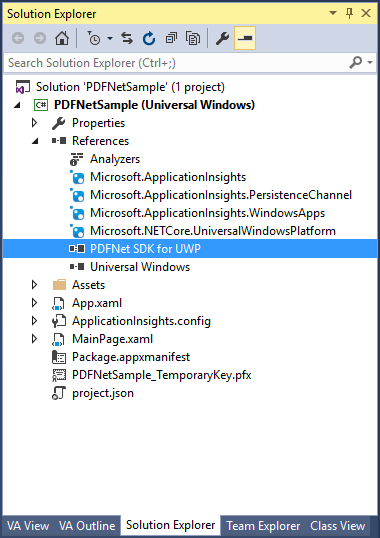
Figure 3: Adding a reference to the PDFNet SDK
1. Now that the project is set up, let us add a PDFViewCtrl as the main feature of the project. First, we need to set up the page to contain the PDFViewCtrl. We want to add a main viewing area for the PDFViewCtrl, and an area at the bottom where we can later add in some options. Open up “MainPage.xaml” and find the Grid element. Add some row definitions as follows:
<Grid Background="{StaticResource ApplicationPageBackgroundThemeBrush}">
  <Grid.RowDefinitions>
    <RowDefinition Height="*"/>
    <RowDefinition Height="Auto"/>
  </Grid.RowDefinitions>
</Grid>
The second row will be used for our options bar, while the first row will use whatever space is left to display the PDFViewCtrl.
To this Grid, let's add a Border which will host the PDFViewCtrl and then a stack panel with a button to open a document.
<Grid Background="{StaticResource ApplicationPageBackgroundThemeBrush}">
  <Grid.RowDefinitions>
    <RowDefinition Height="*"/>
    <RowDefinition Height="Auto"/>
  </Grid.RowDefinitions>

  <Border x:Name="PDFViewBorder" Grid.Row="0"/>

  <StackPanel Grid.Row="1" Orientation="Horizontal" HorizontalAlignment="Right" Margin="5">
    <Button x:Name="OpenButton">Open</Button>
  </StackPanel>
</Grid>
2. Now, we want to add the PDFViewCtrl to the app. We do this in “MainPage.xaml.cs”. Open up “MainPage.xaml.cs” and add a member variable that references a PDFViewCtrl.
public sealed partial class MainPage : Page
{
    pdftron.PDF.PDFViewCtrl MyPDFViewCtrl;
    ...
Next, we need to initialize PDFNet and create a PDFViewCtrl, so let's do this in the constructor of the MainPage. We also need to make the PDFViewCtrl the child of the PDFViewBorder.
public MainPage()
{
    this.InitializeComponent();
    pdftron.PDFNet.Initialize("your_key");
    MyPDFViewCtrl = new pdftron.PDF.PDFViewCtrl();
    PDFViewBorder.Child = MyPDFViewCtrl;
}
3. We also have to add a handler for the Open button. Let's do that in MainPage's constructor after we have created a PDFViewCtrl.
public MainPage()
{
    this.InitializeComponent();
    pdftron.PDFNet.Initialize("your_key");
    MyPDFViewCtrl = new pdftron.PDF.PDFViewCtrl();
    PDFViewBorder.Child = MyPDFViewCtrl;
    OpenButton.Click += OpenButton_Click;
}

void OpenButton_Click(object sender, RoutedEventArgs e)
{
    throw new NotImplementedException();
}
Inside this click function, we need to open a Document. First, let's include two new namespaces that we need for the file picker and for the storage file.
using Windows.Storage;
using Windows.Storage.Pickers;
Also, OpenButton_Click needs to be async in order to handle some of the asynchronous API's needed here. So, replace the old OpenButton_Click with the following:
async void OpenButton_Click(object sender, RoutedEventArgs e)
{
    // Get a file from the file picker.
    FileOpenPicker fileOpenPicker = new FileOpenPicker();
    fileOpenPicker.ViewMode = PickerViewMode.List;
    fileOpenPicker.FileTypeFilter.Add(".pdf");
    StorageFile file = await fileOpenPicker.PickSingleFileAsync();

    // Create a PDFDocument and use it as the source for the PDFViewCtrl
    if (file != null)
    {
        Windows.Storage.Streams.IRandomAccessStream stream = await
            file.OpenAsync(FileAccessMode.ReadWrite);
        pdftron.PDF.PDFDoc doc = new pdftron.PDF.PDFDoc(stream);
        MyPDFViewCtrl.SetDoc(doc);
    }
}
Build and launch the app and we should now have a very basic PDF document viewer.
Do note that in Windows 8.1, the file picker works differently. Please see this guide for how to use file pickers in Windows Phone 8.1: https://msdn.microsoft.com/en-us/library/windows/apps/dn642086(v=vs.105).aspx
1. This basic viewer doesn't support, for example, text selection out of the box. For this, we will need the tools that come with the package. First, we will add a new reference to the tools library. The tools library is shipped as part of the samples that come with the SDK. We can include the tools project in this solution.
In the solution explorer, right click on the PDFNetSample solution and select Add -> Existing Project... Navigate to the folder where the PDFNet package was unzipped, Open the Samples Folder and then the PDFViewCtrlTools_VS2015 Folder. Inside here you should find PDFViewCtrlTools_VS2015.csproj. Select it and select Open.
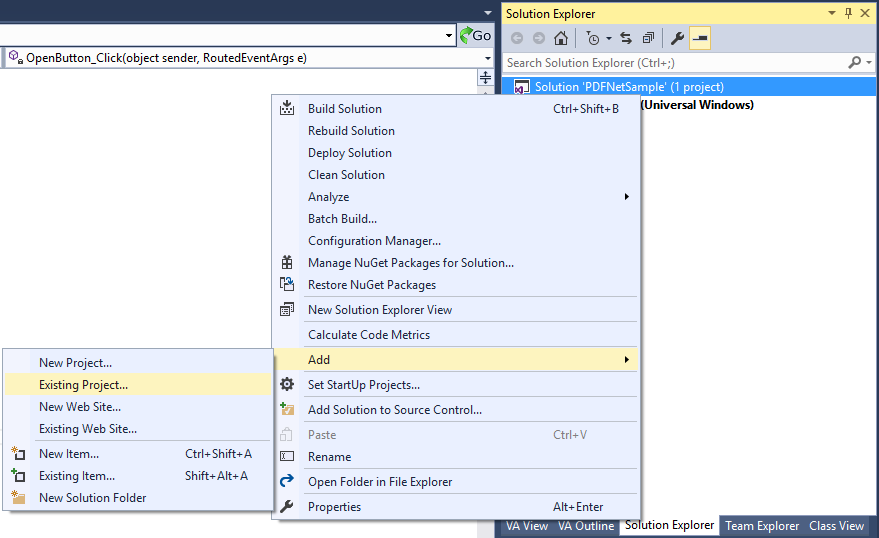
Figure 4: Adding the PDFViewCtrlTools Project to the solution
2. Now, we want to add this project as a reference used by PDFNetSample. We can do this in a similar way to how we added PDFNet for Windows Universal Apps. In the solution exporer, in the PDFNetSample project, right click on References and select "Add Reference..." In the dialog, select Project -> Solution and find PDFViewCtrlTools_VS2015 in the list. Select it and add it by clicking OK.
3. Now that we have the library, we need to create a ToolManager and attach the PDFViewCtrl to it. Declare another member variable in MainPage.xaml.cs next to MyPDFViewCtrl.
pdftron.PDF.PDFViewCtrl MyPDFViewCtrl;
pdftron.PDF.Tools.ToolManager MyToolManager;
Inside the constructor for MainPage we now add one more call where we initialize the ToolManager.
public MainPage()
{
    this.InitializeComponent();
    pdftron.PDFNet.Initialize("your_key");
    MyPDFViewCtrl = new pdftron.PDF.PDFViewCtrl();
    PDFViewBorder.Child = MyPDFViewCtrl;
    MyToolManager = new pdftron.PDF.Tools.ToolManager(MyPDFViewCtrl);
    OpenButton.Click += OpenButton_Click;
}
This is all you need for text selection to work. The tools support many other operations, such as creating and adding basic shapes to the PDF document and editing form fields.
PDFNet SDK for UWP supports printing. The library handles all the hard work, you simply have to tell it to register and what options you would like to be available.
1. First, we have to add a PDFPrintManager. Declare another member variable in MainPage.xaml.cs next to MyToolManager.
pdftron.PDF.PDFViewCtrl MyPDFViewCtrl;
pdftron.PDF.Tools.ToolManager MyToolManager;
pdftron.PDF.PDFPrintManager MyPrintManager;
The PDFPrintManager is a singleton, so let's grab it at the bottom of MainPage's constructor, under OpenButton.Click.
MyPrintManager = pdftron.PDF.PDFPrintManager.GetInstance();
2. Now, we need to add localized string options. Because the printer options are handled by the library, it needs to provide the option of localization. Inside the Lib folder there is a folder called strings that contains the string resources for American English (en-US).
Right click on PDFNetSample, select Add -> New Folder. Name this folder strings. The right click on the strings folder, again select Add -> New Folder. Name this folder en-US. From the downloaded package, go to the folder Lib -> strings -> en-US and drag the file Printing.resw into the en-US folder you created in the Sample project.
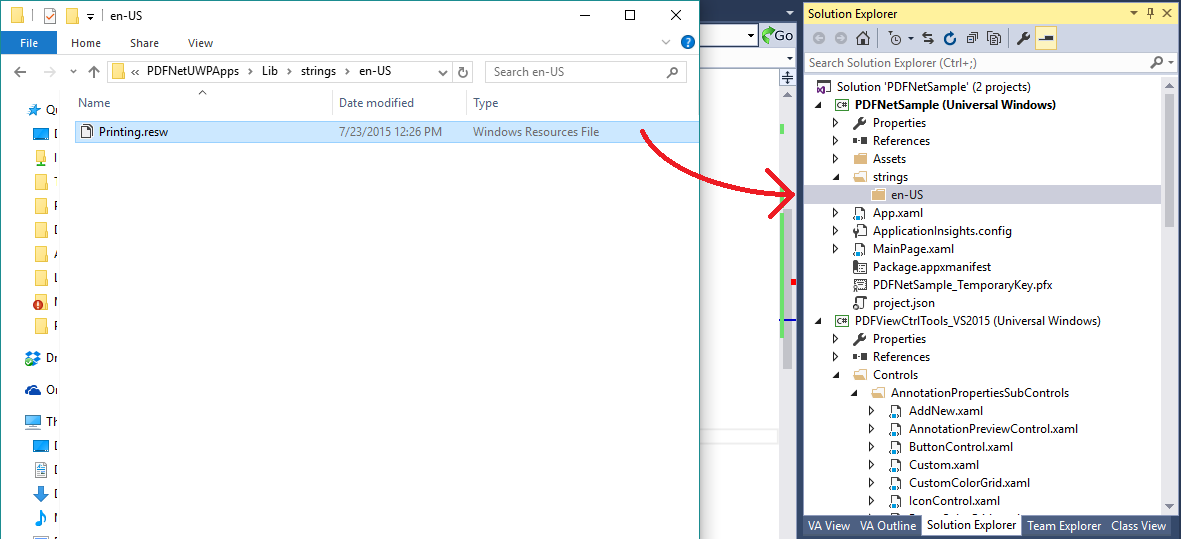
Figure 5: Adding localized strings to the project for Printing.
Once done, your solution explorer should show look as follows.
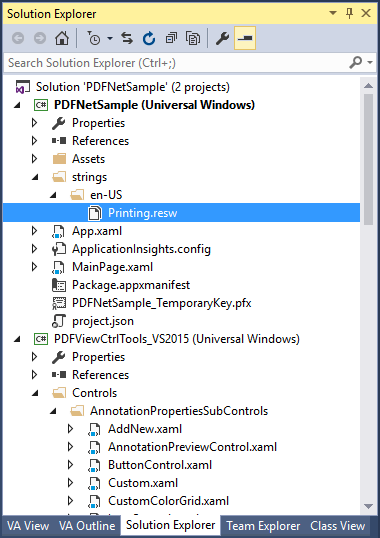
Figure 6: Solution explorer with localized strings.
Also, we need to tell the PDFPrintManager where to find this resource. In the constructor for MainPage, we can add the following two lines of code below where the PDFPrintManager is initialized.
Windows.ApplicationModel.Resources.ResourceLoader loader = Windows.ApplicationModel.Resources.ResourceLoader.GetForCurrentView("Printing");
MyPrintManager.SetResourceLoader(loader);
3. Now that the PDFPrintManager has the resources to display the correct options, we can go on and add some options to it. Let's add the 2 standard options of orientation and paper size. We can also add the user option for page range. This can be done by adding the following lines at the bottom of MainPage's Constructor.
MyPrintManager.AddStandardPrintOption(Windows.Graphics.Printing.StandardPrintTaskOptions.MediaSize);
MyPrintManager.AddStandardPrintOption(Windows.Graphics.Printing.StandardPrintTaskOptions.Orientation);

MyPrintManager.AddUserOptionPageRange();
4. Finally, we need to register for printing. Normally, this would be done in a Page's OnNavigatedTo and OnNavigatedFrom functions, but in this case, we want the title of the print page to match the document, also, we only want printing to be available when a document is open. So, instead we register for printing each time we open a document (and unregister when we close one). Inside OpenButton_Click, inside the if statement (file != null) we will first unregister printing and then register for it at the end with the new document.
Edit the code as follows:
if (file != null)
{
    MyPrintManager.UnRegisterForPrintingContract();

    Windows.Storage.Streams.IRandomAccessStream stream = await file.OpenAsync(FileAccessMode.ReadWrite);
    pdftron.PDF.PDFDoc doc = new pdftron.PDF.PDFDoc(stream);
    MyPDFViewCtrl.SetDoc(doc);

    MyPrintManager.RegisterForPrintingContract(doc, doc.GetDocInfo().GetTitle());
}
Note that calling PDFPrintManager.UnRegisterForPrintingContract() is safe because it will not unregister if it is not already registered.
The next step is to add a print button to the sample. Until we have opened a document, we want it to be disabled. Let's add it next to the Open button as follows:
  <StackPanel Grid.Row="1" Orientation="Horizontal" HorizontalAlignment="Right" Margin="5">
      <Button x:Name="OpenButton">Open</Button>
      <Button x:Name="PrintButton" IsEnabled="False">Print</Button>
  </StackPanel>
We need to add a click handler, similar to the Open button. So, just below where we register for the open button click, let's register for the print button's click event. And let's put the handler under OpenButton_Click.
public MainPage() { this.InitializeComponent(); pdftron.PDFNet.Initialize("your_key"); MyPDFViewCtrl = new pdftron.PDF.PDFViewCtrl(); PDFViewBorder.Child = MyPDFViewCtrl; OpenButton.Click += OpenButton_Click; PrintButton.Click += PrintButton_Click; ... } async void OpenButton_Click(object sender, RoutedEventArgs e) { ... } void PrintButton_Click(object sender, RoutedEventArgs e) { throw new NotImplementedException(); }We need to add a click handler, similar to the Open button. So, just below where we register for the open button click, let's register for the print button's click event and let's put the handler under OpenButton_Click.
async void PrintButton_Click(object sender, RoutedEventArgs e) { // only print if we're wide enough. if (Window.Current.Bounds.Width >= 500) { await Windows.Graphics.Printing.PrintManager.ShowPrintUIAsync(); } }We also need to enable the print button when a document is opened, so let's enable it when we Register for the printing contract and disable it when we unregister. In OpenButton_click, edit it as follows:
if (file != null) { MyPrintManager.UnRegisterForPrintingContract(); PrintButton.IsEnabled = false; Windows.Storage.Streams.IRandomAccessStream stream = await file.OpenAsync(FileAccessMode.ReadWrite); pdftron.PDF.PDFDoc doc = new pdftron.PDF.PDFDoc(stream); MyPDFViewCtrl.SetDoc(doc); MyPrintManager.RegisterForPrintingContract(doc, doc.GetDocInfo().GetTitle()); PrintButton.IsEnabled = true; }At this point, printing should be added to the sample.
This tutorial has only covered how to create a very basic viewer. The PDFViewCtrl demo contains more advanced features, including modifying the look of the PDFViewCtrl depending on the current orientation of the device; various page presentation modes, such as single-page continuous or two-pages facing; the use of text search; and opening of password protected documents. Please refer to PDFViewCtrlDemo as a guide to using these features. The PDFViewCtrl demo also demonstrate additional uses of the tools library.
This section shows MainPage.xaml and MainPage.xaml.cs in their entirety.
<Page
    x:Class="PDFNetSample.MainPage"
    xmlns="http://schemas.microsoft.com/winfx/2006/xaml/presentation"
    xmlns:x="http://schemas.microsoft.com/winfx/2006/xaml"
    xmlns:local="using:PDFNetSample"
    xmlns:d="http://schemas.microsoft.com/expression/blend/2008"
    xmlns:mc="http://schemas.openxmlformats.org/markup-compatibility/2006"
    mc:Ignorable="d">

    <Grid Background="{ThemeResource ApplicationPageBackgroundThemeBrush}">
        <Grid.RowDefinitions>
            <RowDefinition Height="*"/>
            <RowDefinition Height="Auto"/>
        </Grid.RowDefinitions>

        <Border x:Name="PDFViewBorder" Grid.Row="0"/>

        <StackPanel Grid.Row="1" Orientation="Horizontal" HorizontalAlignment="Right" Margin="5">
            <Button x:Name="OpenButton">Open</Button>
            <Button x:Name="PrintButton" IsEnabled="False">Print</Button>
        </StackPanel>
    </Grid>
</Page>
using System;
using System.Collections.Generic;
using System.IO;
using System.Linq;
using System.Runtime.InteropServices.WindowsRuntime;
using Windows.Foundation;
using Windows.Foundation.Collections;
using Windows.Storage;
using Windows.Storage.Pickers;
using Windows.UI.Xaml;
using Windows.UI.Xaml.Controls;
using Windows.UI.Xaml.Controls.Primitives;
using Windows.UI.Xaml.Data;
using Windows.UI.Xaml.Input;
using Windows.UI.Xaml.Media;
using Windows.UI.Xaml.Navigation;

// The Blank Page item template is documented at http://go.microsoft.com/fwlink/?LinkId=402352&clcid=0x409

namespace PDFNetSample
{
    /// <summary>
    /// An empty page that can be used on its own or navigated to within a Frame.
    /// </summary>
    public sealed partial class MainPage : Page
    {
        pdftron.PDF.PDFViewCtrl MyPDFViewCtrl;
        pdftron.PDF.Tools.ToolManager MyToolManager;
        pdftron.PDF.PDFPrintManager MyPrintManager;

        public MainPage()
        {
            this.InitializeComponent();
            pdftron.PDFNet.Initialize("your_key");
            MyPDFViewCtrl = new pdftron.PDF.PDFViewCtrl();
            PDFViewBorder.Child = MyPDFViewCtrl;
            MyToolManager = new pdftron.PDF.Tools.ToolManager(MyPDFViewCtrl);
            OpenButton.Click += OpenButton_Click;
            PrintButton.Click += PrintButton_Click;

            MyPrintManager = pdftron.PDF.PDFPrintManager.GetInstance();

            Windows.ApplicationModel.Resources.ResourceLoader loader = Windows.ApplicationModel.Resources.ResourceLoader.GetForCurrentView("Printing");
            MyPrintManager.SetResourceLoader(loader);

            MyPrintManager.AddStandardPrintOption(Windows.Graphics.Printing.StandardPrintTaskOptions.MediaSize);
            MyPrintManager.AddStandardPrintOption(Windows.Graphics.Printing.StandardPrintTaskOptions.Orientation);

            MyPrintManager.AddUserOptionPageRange();
        }

        async void OpenButton_Click(object sender, RoutedEventArgs e)
        {
            FileOpenPicker fileOpenPicker = new FileOpenPicker();
            fileOpenPicker.ViewMode = PickerViewMode.List;
            fileOpenPicker.FileTypeFilter.Add(".pdf");
            StorageFile file = await fileOpenPicker.PickSingleFileAsync();

            // Create a PDFDocument and use it as the source for the PDFViewCtrl
            if (file != null)
            {
                MyPrintManager.UnRegisterForPrintingContract();
                PrintButton.IsEnabled = false;

                Windows.Storage.Streams.IRandomAccessStream stream = await file.OpenAsync(FileAccessMode.ReadWrite);
                pdftron.PDF.PDFDoc doc = new pdftron.PDF.PDFDoc(stream);
                MyPDFViewCtrl.SetDoc(doc);

                MyPrintManager.RegisterForPrintingContract(doc, doc.GetDocInfo().GetTitle());
                PrintButton.IsEnabled = true;
            }
        }
        async void PrintButton_Click(object sender, RoutedEventArgs e)
        {
            // only print if we're wide enough.
            if (Window.Current.Bounds.Width >= 500)
            {
                await Windows.Graphics.Printing.PrintManager.ShowPrintUIAsync();
            }
        }
    }
}
Creating a custom tool to use with the PDFViewCtrl is fairly straight forward. There are several tools implemented in the PDFViewCtrlTools project already. These tools can be used as a base for many other tools or as a reference for a new tool. In order to create your own tool, we suggest looking at the PDFViewCtrlTools project.
When creating a new tool, there are a few important elements that needs to be handled.
Events raised on the PDFViewCtrl.
Preventing the PDFViewCtrl from handling the input.
Knowing when to lock the document.
Converting between different coordinate spaces.
We will also take a quick look at the tool loop in the ToolManager class, to better understand how that is used.
1. First, we need to handle the events of the PDFViewCtrl. This is easily done by subscribing to the events using standard syntax. The standard events to subscribe to are PointerPressed, PointerMoved, and PointerReleased. However, additional events, such as PointerCancelled and PointerCaptureLost are also important.
2. Preventing the PDFViewCtrl from handling the input is best done when the pointer is pressed. You will receive the PointerPressed event, at which point you can call PDFViewCtrl.SetZoomEnabled(false) and PDFViewCtrl.SetScrollEnabled(false). Remember to call the same two functions but with True on the PointerReleased event.
Once the user starts to manipulate the PDFViewCtrl, especially with touch, such as a scrolling or pinching, the event chain will be taken away from the UI thread to be handled internally by the Control itself. This is standard proceduce for controls like the ScrollViewer or FlipView in Windows Store Apps. This allows the events to be processed in a background thread, and it keeps the UI thread responsive. Once the PDFViewCtrl starts to scroll, you will not be able to get any pointer or Manipulation events until it has come to a rest.
3. It is important to lock the document whenever you read any information from it. PDFNet provides two types of locks. A read lock which allows for concurrent reading, as well as a write lock which grants the process exclusive access to the PDFDoc. The write lock is only necessary when modifying information in the document, such as when pushing back annotations or changing their appearance. Please see the PDFViewCtrlTools project to learn how and when to use these locks.
4. When working with the PDFViewCtrl, there are three spaces to be aware of. There is a Screen space, which is a coordinate system relative to the PDFViewCtrl itself. The point 0, 0 is in the PDFViewCtrl's top left corner. There is a page space, which is the coordinate system relative to a particular page. PDF page coordinates start with 0, 0 in the bottom left corner, unless rotated. Note that the page's CropBox, which is the region visible in the PDFViewCtrl, doesn't always start at 0, 0 though. And finally there is the space of the Canvas that you can get from calling PDFViewCtrl.GetAnnotationCanvas(). This canvas is the minimum bounding rectangle (starting with 0, 0 in the top left) around all the pages in the current scrollable region (for example, at very low zoom levels, the x-coordinate 0 might be close to the center of the PDFViewCtrl). You can use PDFViewCtrl.ConvAnnotationCanvasPtToScreenPt and PDFViewCtrl.ConvScreenPtToAnnotationCanvasPt to convert between PDFViewCtrl and AnnotationCanvas coordinates. Note that the PDFViewCtrl has an internal concept of a canvas which is different from this canvas. Therefore, PDFViewCtrl.ConvPagePtToCanvasPt will not actually work on the Canvas from GetAnnotationCanvas.
When capturing input, you usually deal with Canvas or Screen coordinates. For example, inside the PointerPressed handler, Windows.Foundation.Point downPoint = e.GetCurrentPoint(mPDFView).Position will give you a point in Screen space. When pushing back an annotation, this has to be converted to Page space of the page you want to add the annotation to. You can convert between these spaces with the help of the PDFViewCtrl. For example, int pgNumber = PDFViewCtrl.GetPageNumberFromScreenPoint(double x, double y) will give you the page that you would be touching if x, y was the point of your finger in screen space. Then, calling PDFViewCtrl.ConvScreenPtToPagePt(DoubleRef px, DoubleRef py, int pgNumber) will give you what point this is in page space. These conversions are used thoughout the tools library. Also, the base Tool class contains some convenience functions to perform these conversions on full rectangles (pdftron.PDF.Rect).
5. In the PDFViewCtrlTools project, the ToolManager is the only class that directly subscribes to the PDFViewCtrl's events. This provides a centralized location to managed the different tools. The ToolManager forwards the event to various tools, inside a loop. The reason for this loop is that it allows a tool to process an event, decide if another tool should be handling it, and then let the ToolManager know that another type of tool should be getting the event. This is done by changing the next tool mode to that of the tool that should be processing the event.
For example, the Pan tool will, when a Tapped event occurs, examine the contents of the point where the tap occurred. If the tap happened on a link, it will set the mNextToolMode to ToolType.e_link_action. Once the pan tool returns, the ToolManager will notice that the NextToolMode is different from the current ToolMode, it will create a LinkAction tool, and then call the Tapped handler on that tool. The link tool will then read the link and exacute the associated action.
Starting with PDFNet SDK 6.2.0-BETA for Windows Store apps, it is now possible to get more useful error messages when PDFNet throws exceptions.
Due to limitations of the COM API boundary, only System.Exception could be passed from the PDFNet SDK to the consuming code. This limited the errors to those that were already defined and prevented custom information to be attached.
To overcome this, PDFNet SDK for UWP has a new class; pdfnet.Common.PDFNetException that can be created with an HResult from a System.Exception and will be able to display the information relevant to the error that caused the Exception.
The following code snippet shows an example in how to use the new PDFNetException class:
string errText = "NONE";
try
{
    pdftron.PDF.PDFDoc doc = new pdftron.PDF.PDFDoc("not_valid");
}
catch (Exception ex)
{
    pdftron.Common.PDFNetException pdfNetEx = new pdftron.Common.PDFNetException(ex.HResult);
  if (pdfNetEx.IsPDFNetException)
    {
    errText = string.Format("Exeption at line {0} in file {1}", pdfNetEx.LineNumber, pdfNetEx.FileName);
      errText += Environment.NewLine;
      errText += string.Format("Message: {0}", pdfNetEx.Message);
  }
  else
  {
    errText = ex.ToString();
  }
}
MessageDialog errorDialog = new MessageDialog(errText);
await errorDialog.ShowAsync();
This will show what the error message is, and the line and file in which it happened.
This information will be very valuable to us if PDFNet throws an unexpected Exception. If you encounter an Exception while working with the PDFNet SDK for UWP, it is a good idea to include the full error from PDFNetException.ToString() with the description of the problem to sent to our support team.