Product:
Install Apryse WebViewer in Appian
Welcome to the Apryse installation guide for the WebViewer Component in Appian. This guide will help you install a free trial of WebViewer into Appian. It will show you how to install the WebViewer Component Plugin and Connected System Plugin in Appian. When your evaluation is done, you can purchase a license key to remove the watermark from all documents and deploy to a production environment.
Your free trial includes unlimited trial usage and support from solution engineers.
License Key Required
The trial of Apryse SDK requires a trial license key, which is provided in the box titled "License Key". A commercial license key is required for use in a production environment. Please contact sales to purchase a commercial key or if you need any other license key assistance.
Keep your license keys confidential.
License keys are uniquely generated. Please make sure that it is not publicly available (e.g. in your public GitHub).
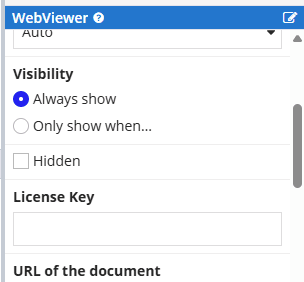
License Key
Apryse collects some data regarding your usage of the SDK for product improvement.
If you wish to continue without data collection, contact us and we will email you a no-tracking trial key for you to get started.
Get Started
You can view our most recent webinar on YouTube or follow installation steps shown below.
Prerequisites
- Appian Community Edition or other Appian environment
- Access to Admin Center to install Plugins from Appian AppMarket
To test the solution, you can follow step-by-step help on setting up an Appian Community Cloud instance.
Installation Steps
Deploy Components to your Appian Environment
- Log in to your Appian environment where you want to evaluate WebViewer.
- Navigate to
Admin Consolefrom the waffle menu in the top right. - Click
Plug-insin the left-hand navigation underSYSTEM. The Plug-ins page will show a list of installed plug-ins. - Click
ADD PLUG-INSunder the search text box. - Search for
Apryse. You should see (2) search results, one for Component Plugin and the other for Connected Systems Plugin. You will need to install ** both ** plugins for the solution to work. To install a plugin, click on its name. - Click on
DEPLOYin the bottom right (this may take a couple of minutes).
Connected System Plugin (CSP) Setup
- Navigate to
Appian Designerfrom the waffle menu in the top right. - Select your Appian App or create a new one.
- Click on
BUILDmode in the Appian Designer from the left panel. This is the second option from the top. - Click
Connected Systemfrom theNEWdrop-down button to create a new connected system. - Search in the text box or scroll to find the Apryse Connected System and select it.
- Enter your desired Appian username as a text string (ex.
user@email.com) in theUpload Document as a Userrequired field. This is the user that will be used to interact with documents. Please ensure they have the correct permissions to do so. - Optionally specify a chunk size as a number (defaults to 32768016 bytes) in the
File Download Chunk Sizerequired field. This will allow for loading files larger than your Appian allotted memory heap size, by chunking files into multiple parts and combining chunks when saving or loading files. - Click on
CREATEto create the connected system. - Click
Constantfrom theNEWdrop-down button to add a constant for the Connected System Plugin (CSP). Name your constant, selectConnected Systemfrom theTypedrop-down, and pass your Connected System Plugin (CSP) to theValuetextbox. - Click on
CREATEto add the constant pointing to the connected system.
Component Plugin (CP) Setup
- Navigate to
Appian Designerfrom the waffle menu in the top right. - Select your Appian App where you have added your Connected System Plugin (CSP) and constant.
- Click on
BUILDmode in the Appian Designer from the left panel. This is the second option from the top. - From the
NEWdrop-down button, selectInterfaceor open an existing page where you want to add WebViewer. - While in
DESIGN MODEfor a page, search in the component palette text box on the left, or scroll through to find the Apryse Component Plugin. - Drag and drop the Component Plugin (CP) on to the page at your desired location.
- Scroll down While in the
COMPONENT CONFIGURATIONpanel on the right hand side while the WebViewer component is selected. - Provide your connected system
Constantcreated in Step 10 of Connected System Plugin (CSP) to theDocument Access Connected Systemparameter (you will be able to type to search for your constant name, then select it).
Input Your License Key
The WebViewer license key can be inputted two ways: the connected systems or directly in the component. Both work the same way, and it depends on how you want to control access to the license.
For example, setting it directly in the component property could allow designers of an interface to see the key or even output from a constant. You could then opt to set it in the connected systems instead, and prevent other users from access its properties.

Setting the key in the connected systems
Entering the license key via the component property
Did you find this helpful?
Trial setup questions?
Ask experts on DiscordNeed other help?
Contact SupportPricing or product questions?
Contact Sales