Product:
Get started integrating Apryse iOS SDK
Welcome to Apryse. This guide will help you integrate a free trial of the Apryse iOS SDK into your Xcode projects for iOS applications. You can either integrate Apryse frameworks automatically using Swift Package Manager, CocoaPods, or install them manually by downloading the SDK. Pick whichever your option you prefer, but integrating with Swift Package Manager is the recommended approach. Your free trial includes unlimited trial usage and support from solution engineers.
CocoaPods Integration for iOS
Prerequisites
No trial license key required.
The trial of Apryse Mobile SDK does not require a trial key. A commercial license key is required for use in a production environment. Please contact sales to purchase a commercial key or if you need any other license key assistance.
Keep your license keys confidential.
License keys are uniquely generated. Please make sure that it is not publicly available (e.g. in your public GitHub).
Integrating Apryse SDK for your iOS application
Framework format
The default CocoaPods integration uses .xcframeworks. If you wish to use the older .framework format, you can remove the xcframeworks path component from the podspec URLs throughout this guide.
This guide will use the latest versions of PDFNet.xcframework and Tools.xcframework. To do this, modify your PodFile to include the PDFTron and PDFTronTools pods:
Ruby
Then run pod install in your project directory. You should be able to use the PDFNet and Tools libraries after this process.
You can find out more about other integration options for Apryse SDK with CocoaPods.
Add Required Permissions
Apryse uses a select number AppStore permissions to allow certain functionality such as adding image stamps and detecting the Apple Pencil. Your app's plist must include the following keys (with whatever description is appropriate for your app), or it will be rejected from the AppStore.
XML
Initialize Apryse
Initialize Apryse before you use any Apryse related classes or methods. This only needs to be done once.
The best practice to do this is to use the optional application:willFinishLaunchingWithOptions: method in the AppDelegate class found in either the AppDelegate.swift or AppDelegate.m file in the left pane depending on your choice of language:
While you are trialing Apryse, you can pass any string to the initialize method. A string that is not a license key will enable demo mode, where all pages are lightly watermarked.
You can now use Apryse SDK to view, annotate and edit documents.
More Integration Options
You have several options for adding the Apryse iOS SDK to your project with CocoaPods. The standard way to install the SDK, which is used above in this guide, is to use the latest official release version. It is also possible to "pin" the Apryse pods to a specific version of the SDK using the full version number of the release. The following subsections outline these different options.
The PDFNet.xcframework and Tools.xcframework libraries are distributed as separate pods.
Latest
For the latest official release version of the PDFNet.xcframework and Tools.xcframework libraries, add the following to your Podfile:
Ruby
Then, run pod install.
When a new official version of the SDK is released, you can easily update the Apryse pods with the pod update command without having to modify your Podfile.
Specific
For a specific release of the PDFNet.xcframework and Tools.xcframework libraries, add the following to your Podfile:
Ruby
Legacy
The legacy "pdfnet" and "pdfnet-no-tools" pods are no longer recommended for new projects due to incompatibilities with specific setups. These pods are deprecated and while they are still made available for new releases of the SDK, migrating to the new "pdftron" and "pdftron-tools" pods should be done when possible. Note, the legacy "pdfnet" pod is used for the React Native wrapper.
Then, run pod install.
Note: CocoaPods distributes the dynamic frameworks only. If you wish to use the static frameworks, you will have to integrate it manually.
Next step
Swift Package Manager Integration for iOS
No trial license key required.
The trial of Apryse Mobile SDK does not require a trial key. A commercial license key is required for use in a production environment. Please contact sales to purchase a commercial key or if you need any other license key assistance.
Keep your license keys confidential.
License keys are uniquely generated. Please make sure that it is not publicly available (e.g. in your public GitHub).
Integrating Apryse SDK for your iOS application
Apple has information on using Swift Package Manager, which you may review for topics not covered in this guide.
Apryse is available as a Swift Package from the following URL:
sh
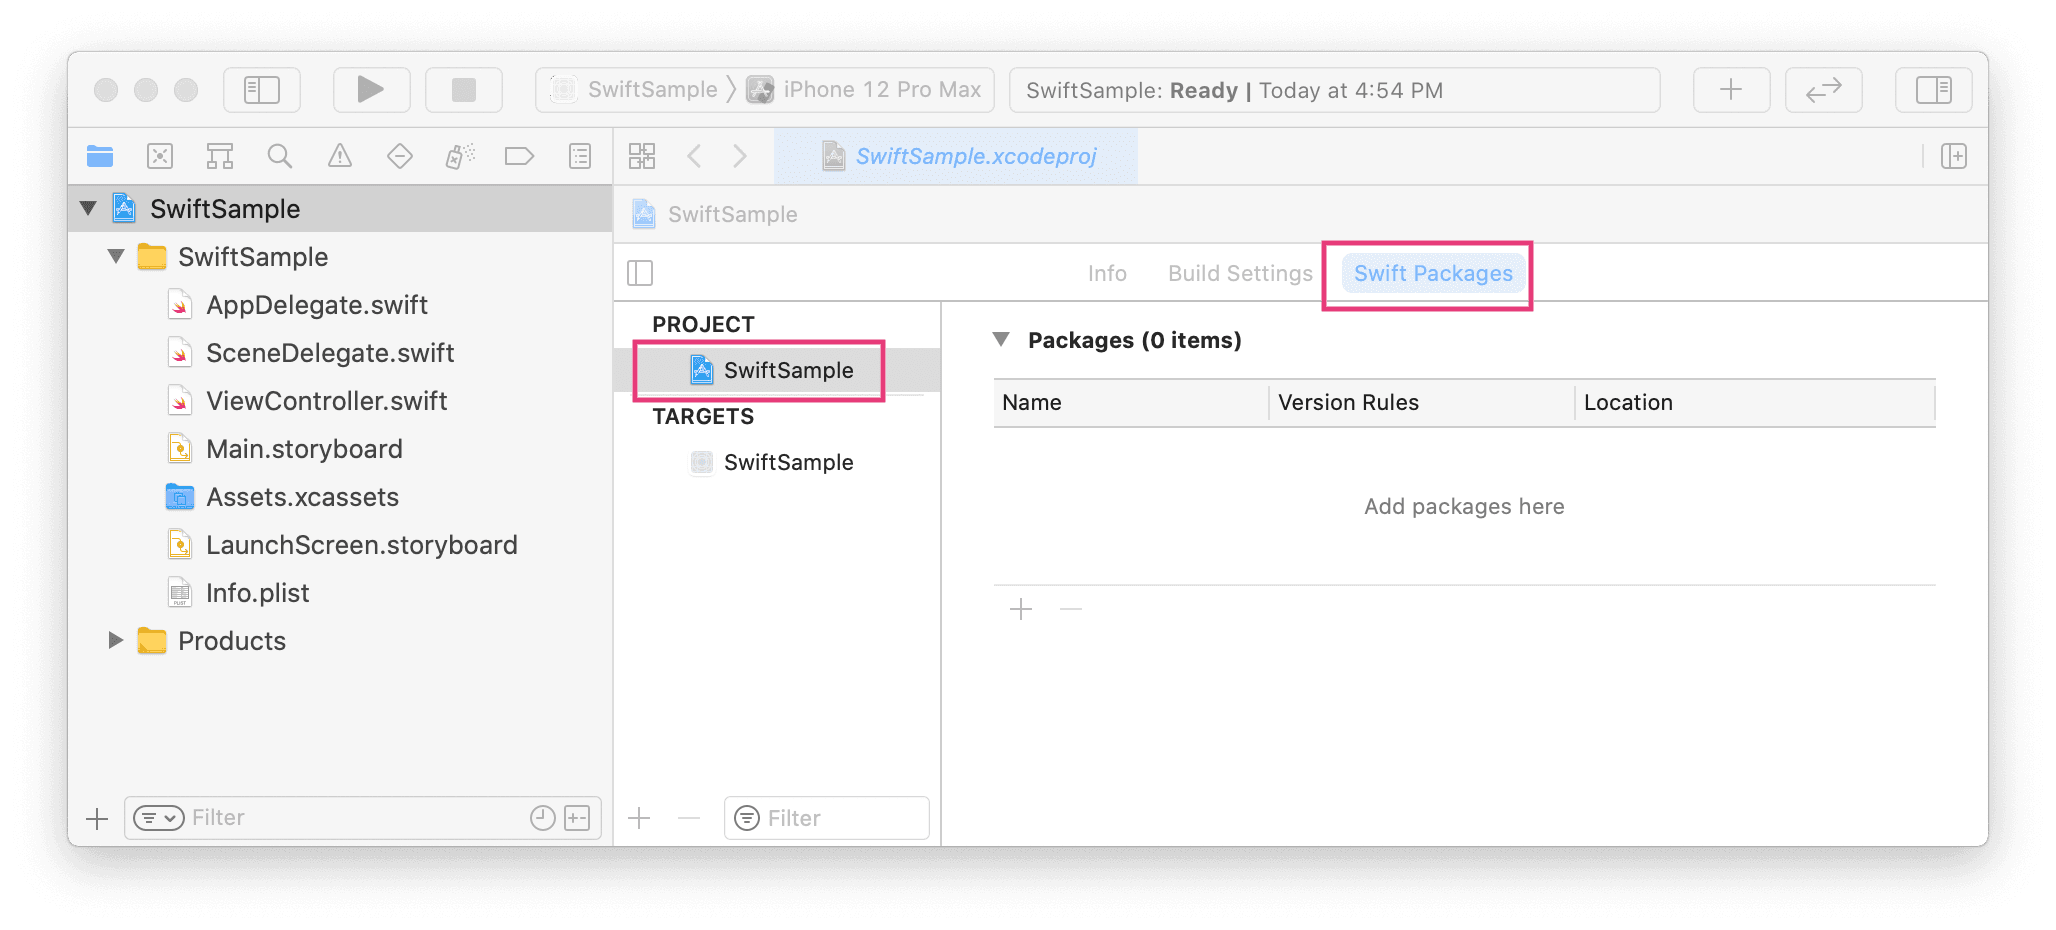
To include it, open your project's Swift Package Manager pane:

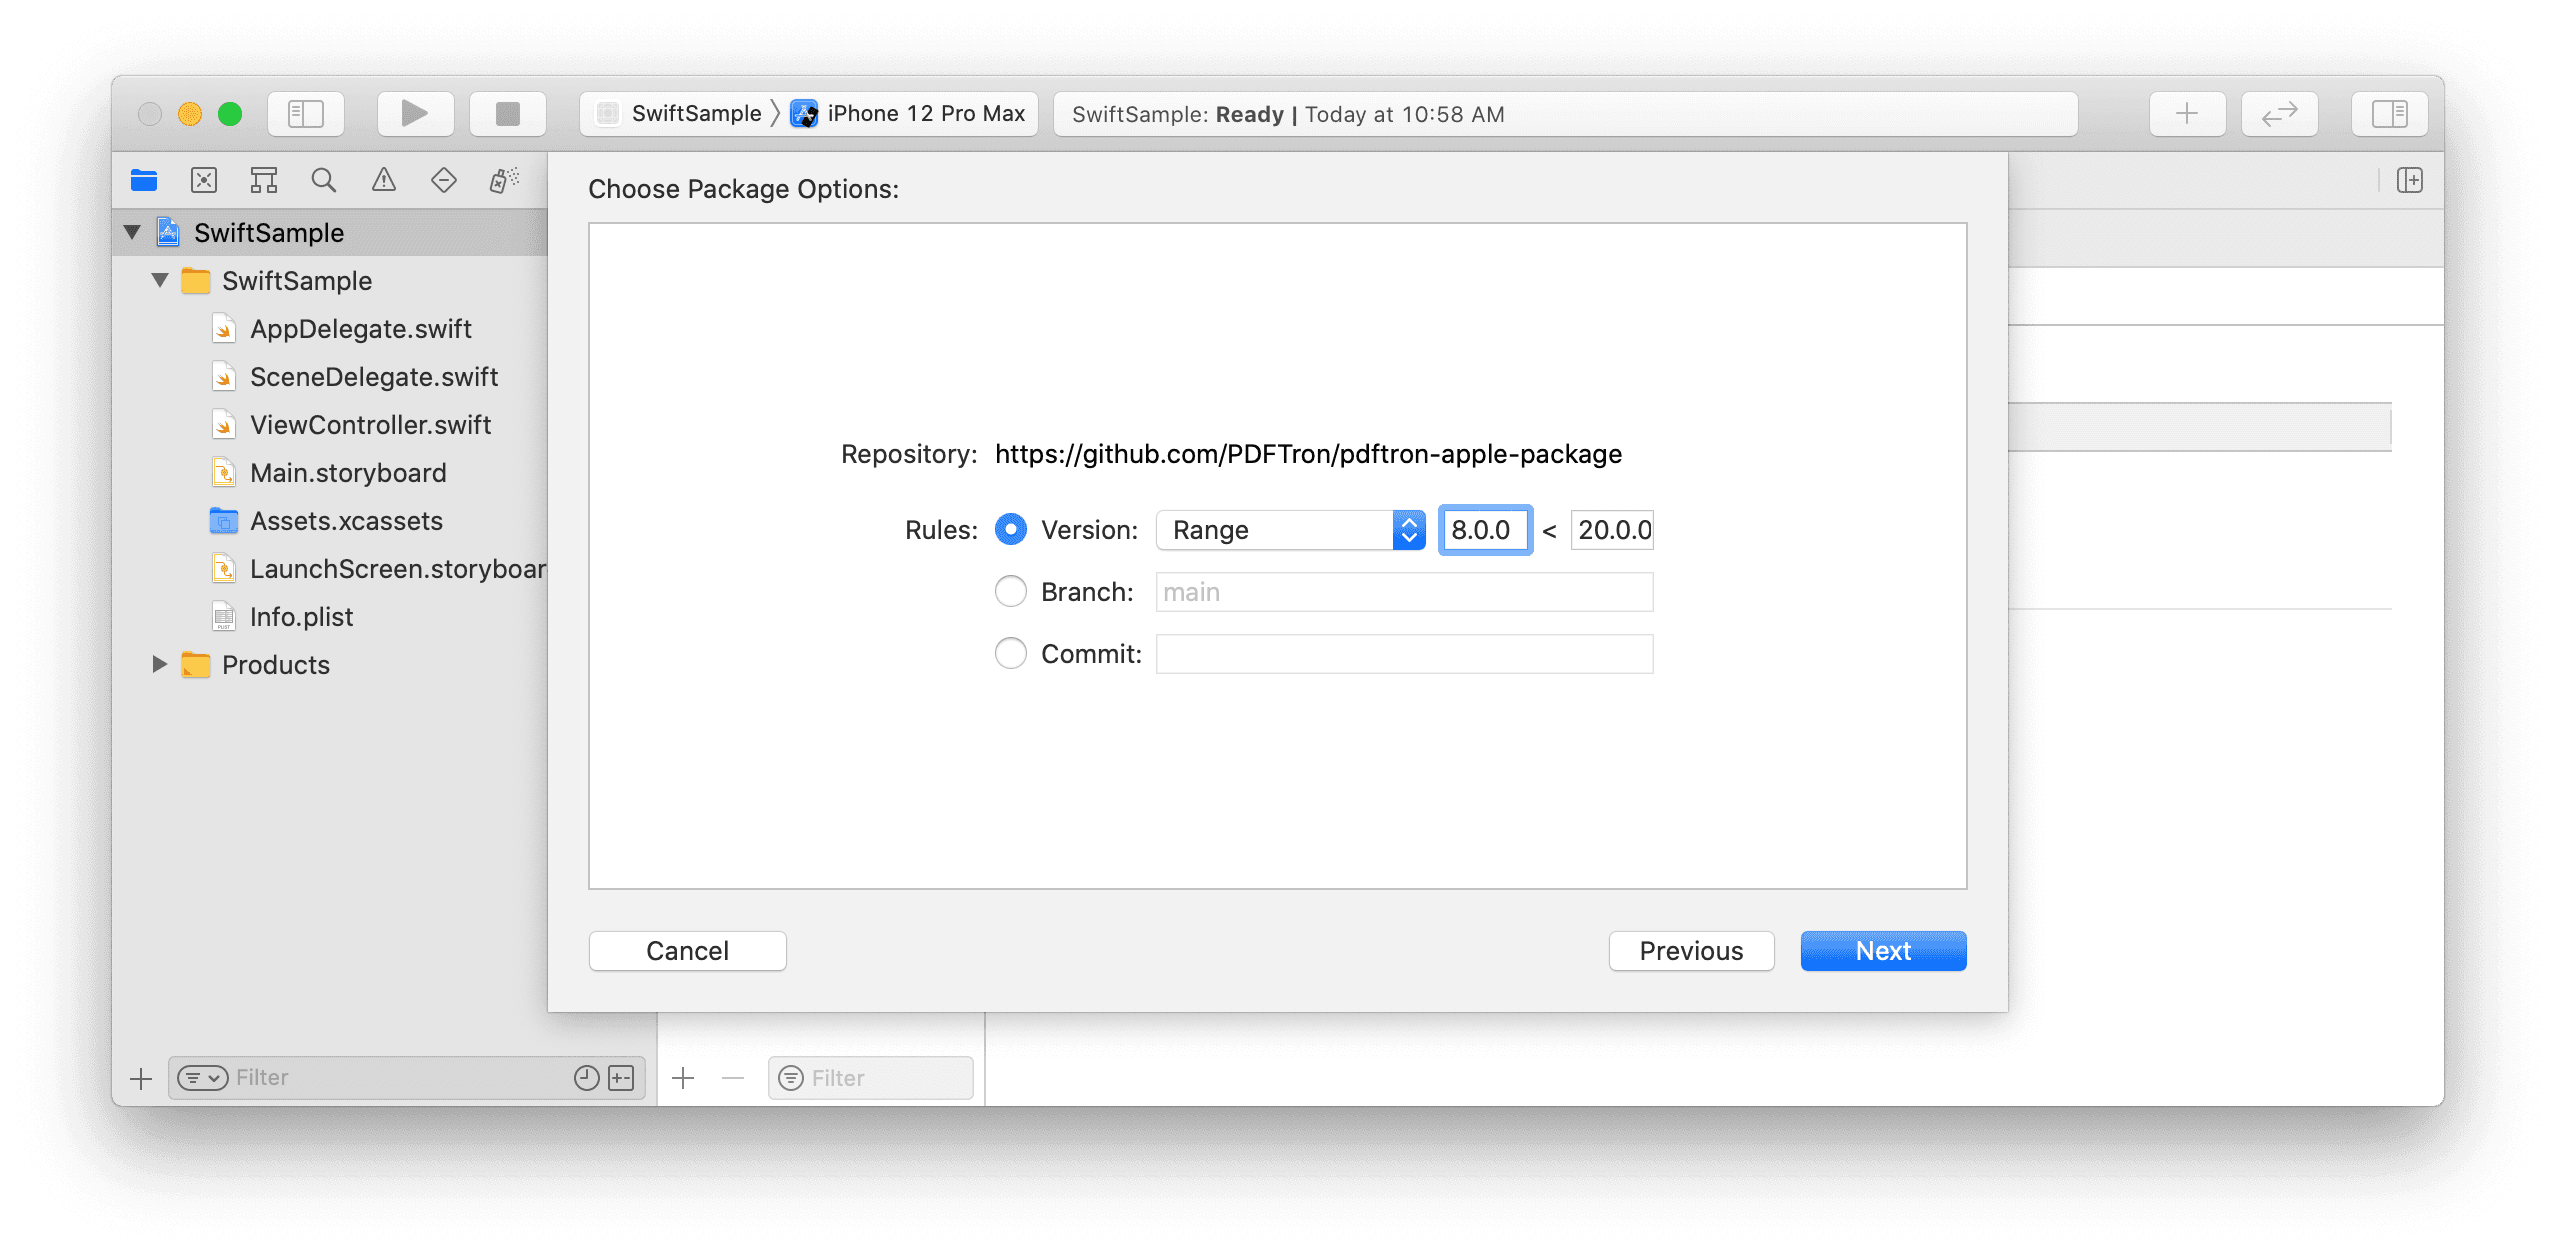
Enter the github link to the package. Add a high maximum version number to ensure you are always up-to-date. Apryse versioning does not strictly follow a semantic versioning system. (We very rarely make changes that break public APIs.)

Add Required Permissions
Apryse uses a select number AppStore permissions to allow certain functionality such as adding image stamps and detecting the Apple Pencil. Your app's plist must include the following keys (with whatever description is appropriate for your app), or it will be rejected from the AppStore.
XML
Initialize Apryse
You only need to explicitly initialize Apryse when you have purchased a license key.
Initialize Apryse before you use any Apryse related classes or methods. This only needs to be done once.
The best practice to do this is to use the optional application:willFinishLaunchingWithOptions: method in the AppDelegate class found in either the AppDelegate.swift or AppDelegate.m file in the left pane depending on your choice of language:
While you are trialing Apryse, you can pass any string to the initialize method. A string that is not a license key will enable demo mode, where all pages are lightly watermarked.
You can now use Apryse SDK to view, annotate and edit documents.
Note: SPM distributes the dynamic .xcframework only. If you wish to use the .framework, you will need to use CocoaPods or Manual integration. If you wish to use the static framework, you will have to integrate it manually.
Next step
Manually integrating iOS PDF library
Prerequisites
- Apryse iOS SDK
Download the SDK
sh
No trial license key required.
The trial of Apryse Mobile SDK does not require a trial key. A commercial license key is required for use in a production environment. Please contact sales to purchase a commercial key or if you need any other license key assistance.
Keep your license keys confidential.
License keys are uniquely generated. Please make sure that it is not publicly available (e.g. in your public GitHub).
Setup
- Create a new Xcode Project. Call it
pdfhello. For the purposes of this guide, select a view scene application. - From your
PDFNet.dmgdownload, copy the/Lib/folder intopdfhello/.
Integrating Apryse SDK for your iOS application
- Select the project in the left pane and go to the
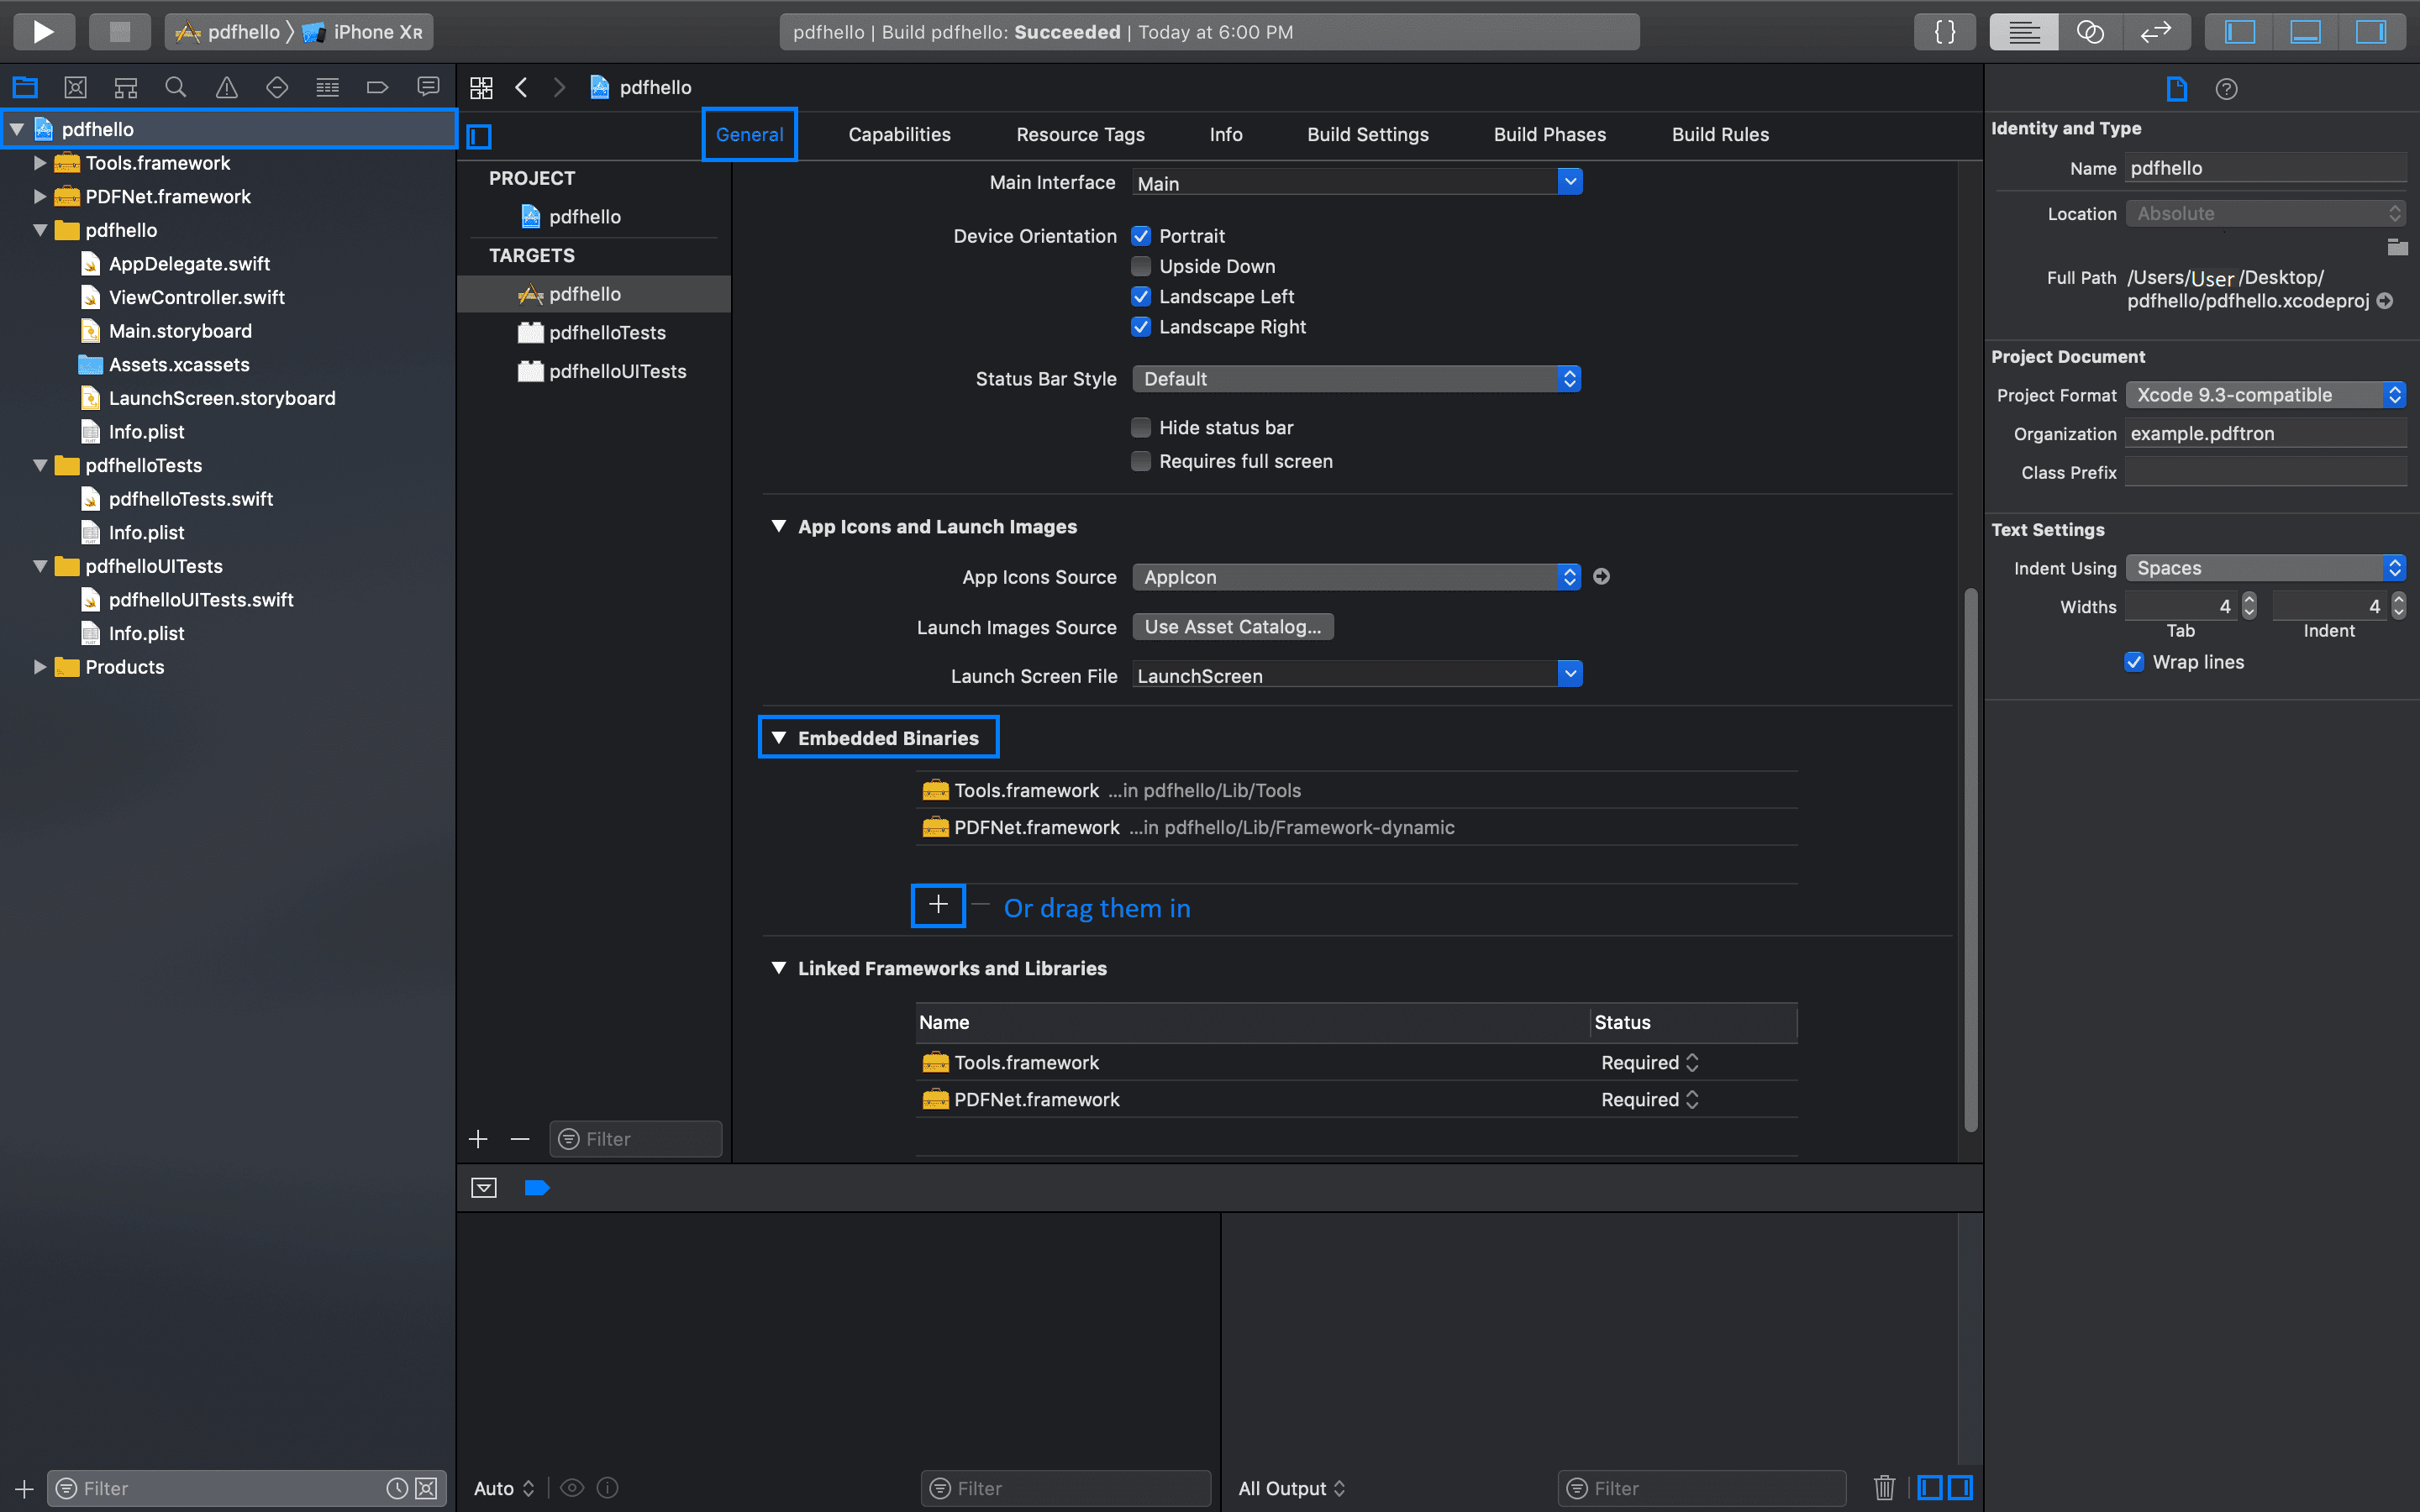
Generaltab. Scroll down to find theEmbedded Binariessection. Here, addLib/Tools/Tools.frameworkandLib/Framework-dynamic/PDFNet.frameworkfrom theLib/folder you copied into your project. You can do this by dragging them in from Finder or by clicking the+sign to browse your files.

- Go to the
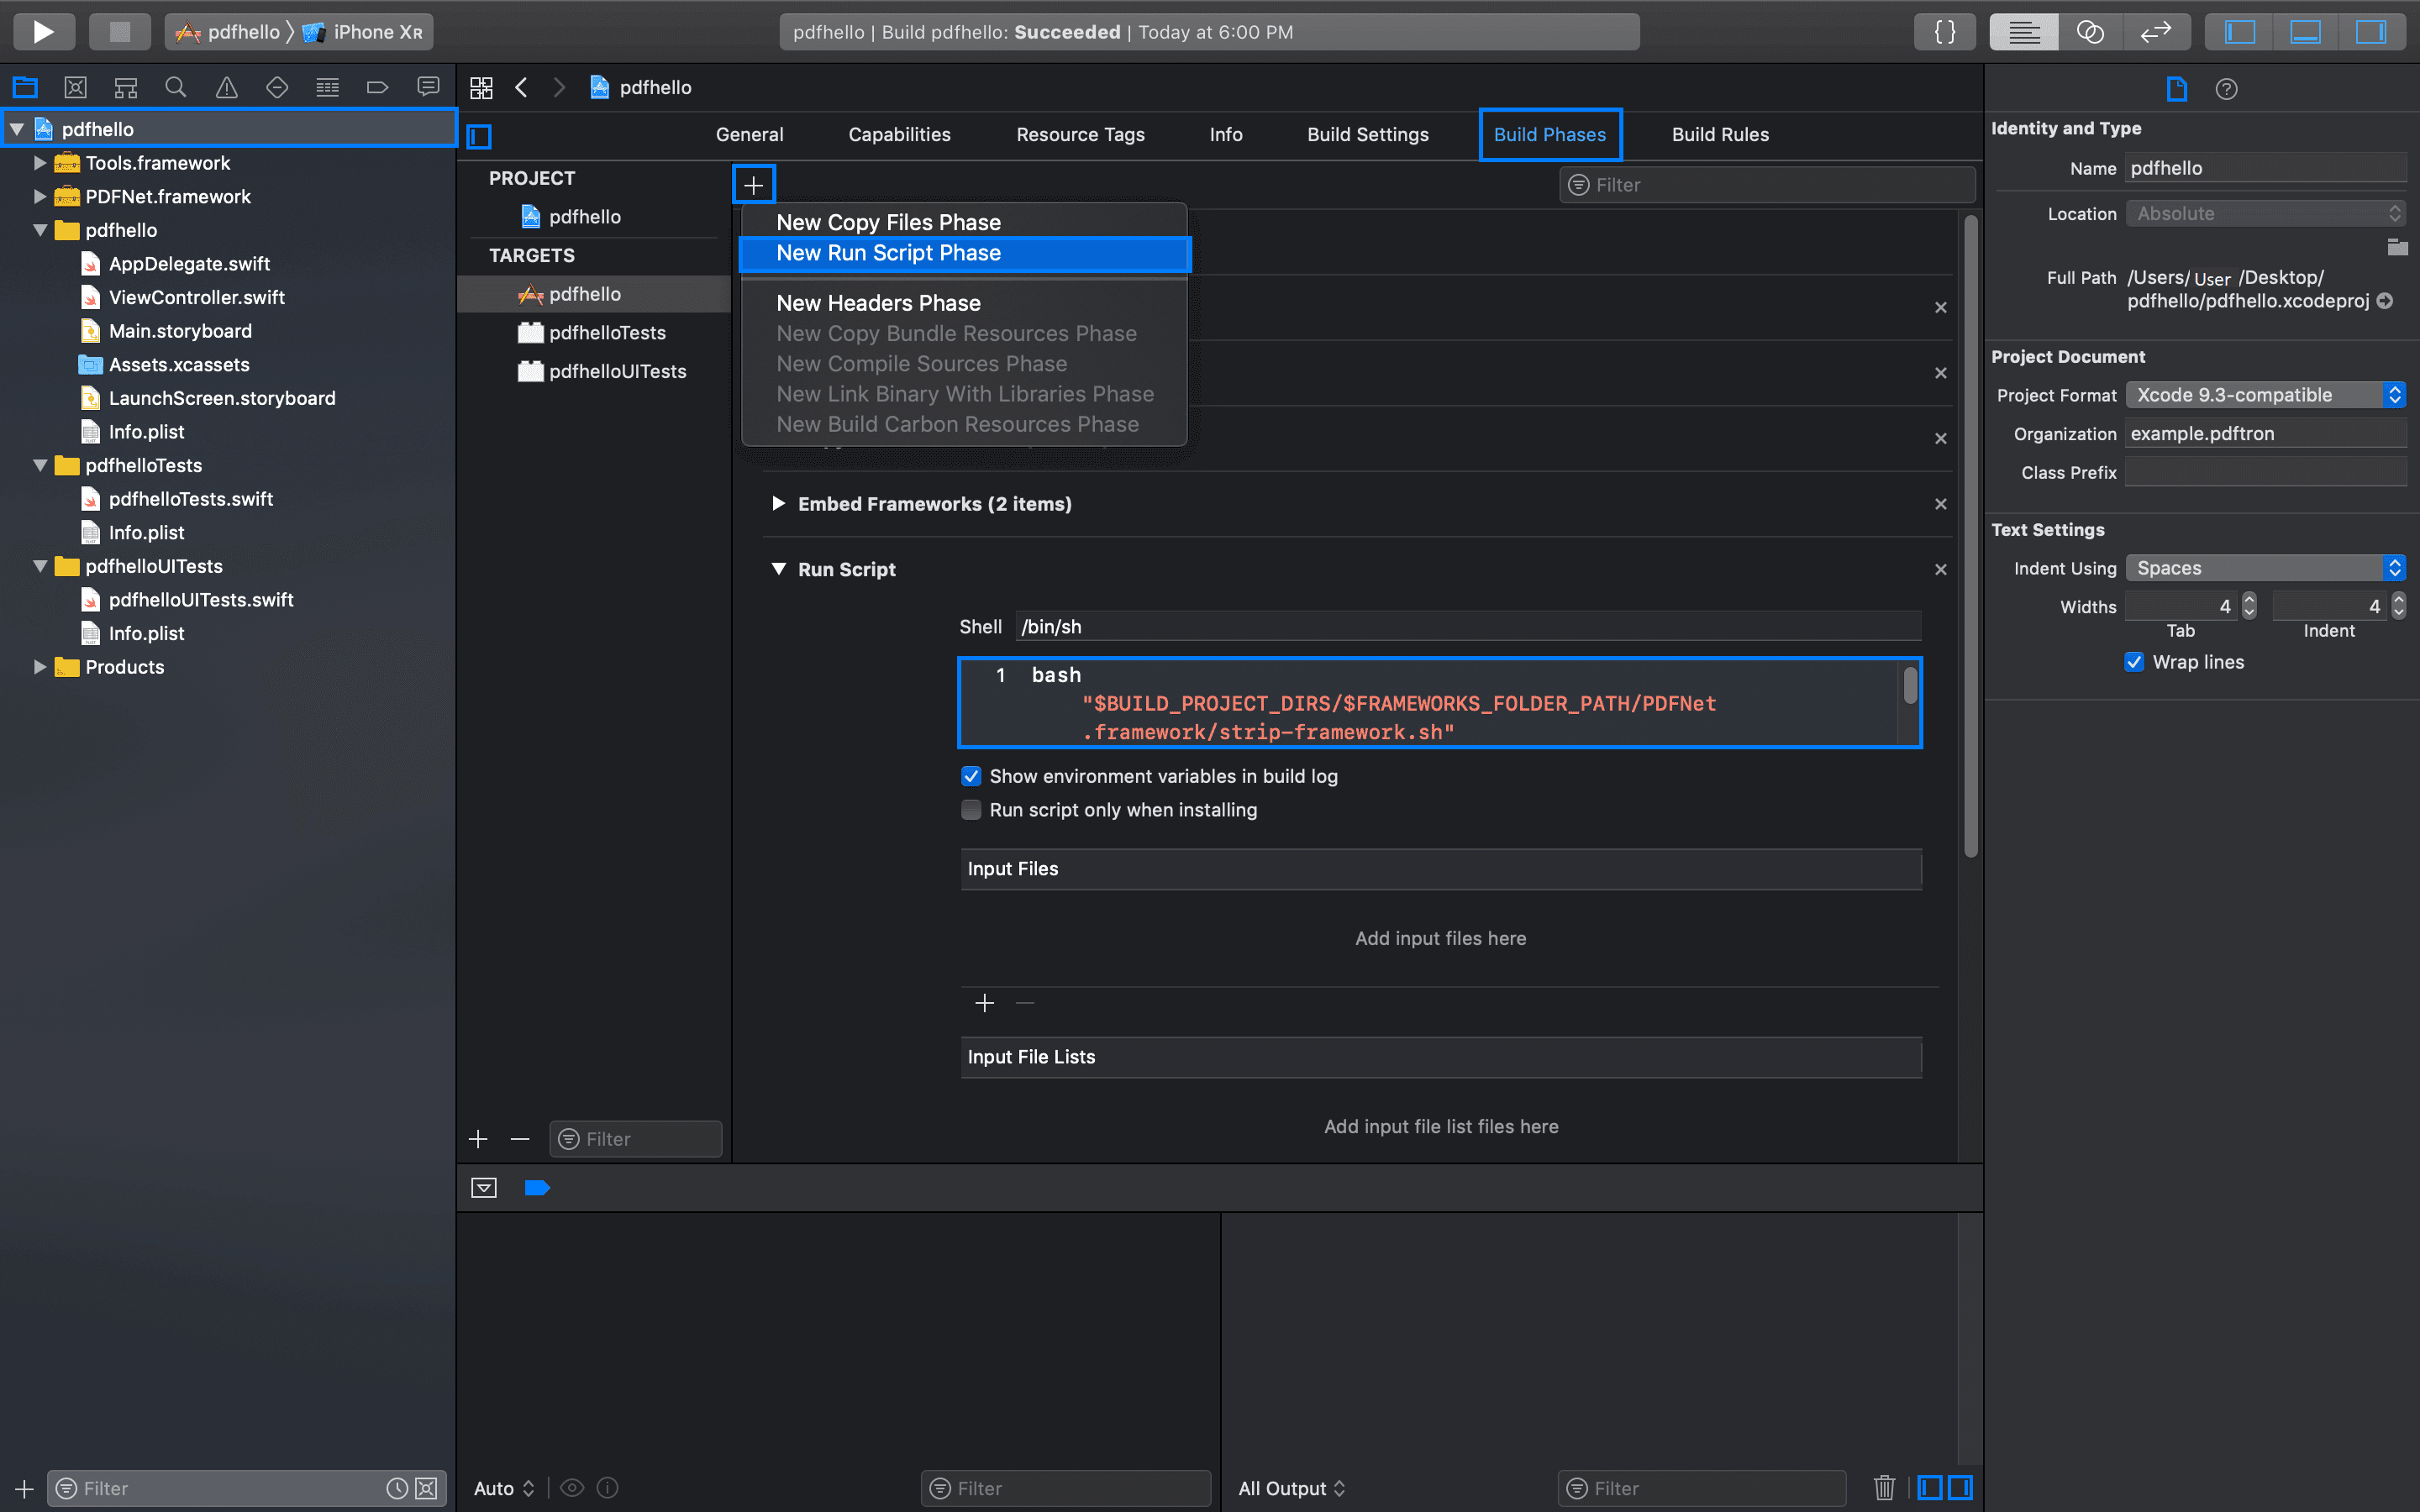
Build Phasestab and click on the+button to add aNew Run Script Phase. Copy and paste the following into the shell command:This will ensure invalid slices are striped from the framework before being submitted to the app store (a longstanding Xcode bug).
Bash

Add Required Permissions
Apryse uses a select number AppStore permissions to allow certain functionality such as adding image stamps and detecting the Apple Pencil. Your app's plist must include the following keys (with whatever description is appropriate for your app), or it will be rejected from the AppStore.
XML
Initialize Apryse
Initialize Apryse before you use any Apryse related classes or methods. This only needs to be done once.
The best practice to do this is to use the optional application:willFinishLaunchingWithOptions: method in the AppDelegate class found in either the AppDelegate.swift or AppDelegate.m file in the left pane depending on your choice of language:
While you are trialing Apryse, you can pass any string to the initialize method. A string that is not a license key will enable demo mode, where all pages are lightly watermarked.
Next step
Did you find this helpful?
Trial setup questions?
Ask experts on DiscordNeed other help?
Contact SupportPricing or product questions?
Contact Sales