Product:
Get Started with the Apryse Server SDK .NET PDF Library Integration
The Apryse Server SDK is cross-platform and supported on Windows, Linux, and macOS. The base package is robust, allowing you to programmatically do the following with PDFs:
Additional functionality
If you’re looking for additional capabilities, we offer add-on packages, such as Smart Data Extraction, and add-on modules, such as Office Conversion. For a complete list of add-ons, refer to the following:
Solutions and benefits
Using the Server SDK allows you to build server-side document processing solutions at scale without relying on client devices or cloud APIs. Since the Server runs entirely on-premises (or in your private cloud), you can ensure security and compliance with full control over access, storage, and encryption. You can also easily integrate with web apps, backend systems, document management systems, and content workflows.
Steps & samples
This guide walks you through steps to work through samples we give you, create a project, and integrate the Apryse Server SDK free trial into your project. We’ll use a .NET Core project as our example project throughout this guide. By the end, you’ll have run through at least one sample, created a project, and built an "Apryse Hello World" within your application.
Get started video
Get started with the Apryse Server SDK on the Windows platform via the following video. If you wish, you may skip this section and follow the steps below to get started.
Get started video for Apryse Server SDK on the Windows platform
To get started, choose your preferred platform from the tabs below.
Windows .NET PDF Library integration
You'll get started with our samples to see the output you can create when you integrate the Apryse Server SDK into your application. You'll also create a project and integrate the Server SDK into your application, using the Windows platform.
Prerequisites
Before you start:
- Install Visual Studio 2022 to write, build, test, and deploy your application.
- Install .NET 9 or .NET 8 SDK to build your application.
- Download Apryse’s .NET PDF Library for Windows zip file: Apryse Server SDK 64-bit.
- Get your Apryse trial key.
License Key
Apryse collects some data regarding your usage of the SDK for product improvement.
If you wish to continue without data collection, contact us and we will email you a no-tracking trial key for you to get started.
Run Apryse SDK in production.
A commercial license key is required for use in a production environment. Contact sales by filling out our licensing form if you want to purchase a commercial license key.
Keep your commercial license key confidential.
License keys are uniquely generated and strictly confidential. Don't publish or store them in any public location, including public GitHub repositories.
1. Run a PDFNet sample project
In this section, you can download and run the OfficeToPDFTest PDFNet sample module, which demonstrates the SDK's document-conversion capabilities. Upon successful completion, you can convert a DOCX document to a PDF file while leveraging the MS Office-to-PDF conversion API. You can use this module as a reference implementation when integrating similar document-conversion functionality into your own applications. By running the sample, you can quickly:
- Verify the capabilities.
- Understand how to interact with the MS Office to PDF Conversion API.
- Use it as a reference for integrating similar functionality into your own application.
- Download the PDFNetC64.zip file.
- Extract the
PDFNetC64.zipfile to the following location (replaceYourNamewith your user name) or another location, if you prefer:C:\Users\YourName\PDFNET_BASE\PDFNetC64\Samples\
For this guide’s instructions, we used the location above. - Open the Windows command line and navigate to the
CSas follows, replacingYourNamewith your user name, then press Enter:
shell
4. From the project directory, on the command line, enter the following, then press Enter.
shell
When you run the dotnet run command, the sample code loads an Office document, converts the Office document to PDF, saves the resulting PDF, and outputs status messages to the console. For more details, you can look at additional OfficeToPDF sample code and the Convert MS Office (Word, Excel, PowerPoint) to PDF overview.
5. Navigate to: C:\Users\YourName\PDFNET_BASE\PDFNetC64\Samples\TestFiles\Output. You will see three output PDF files (Fishermen.pdf, the_rime_of_the_ancient_mariner.pdf, and the factsheet_Arabic.pdf):

Go to the Windows file explorer and navigate to the new PDF files you just converted.
6. Open the PDF files to see the converted output. You have successfully run the OfficeToPDFTest conversion sample!
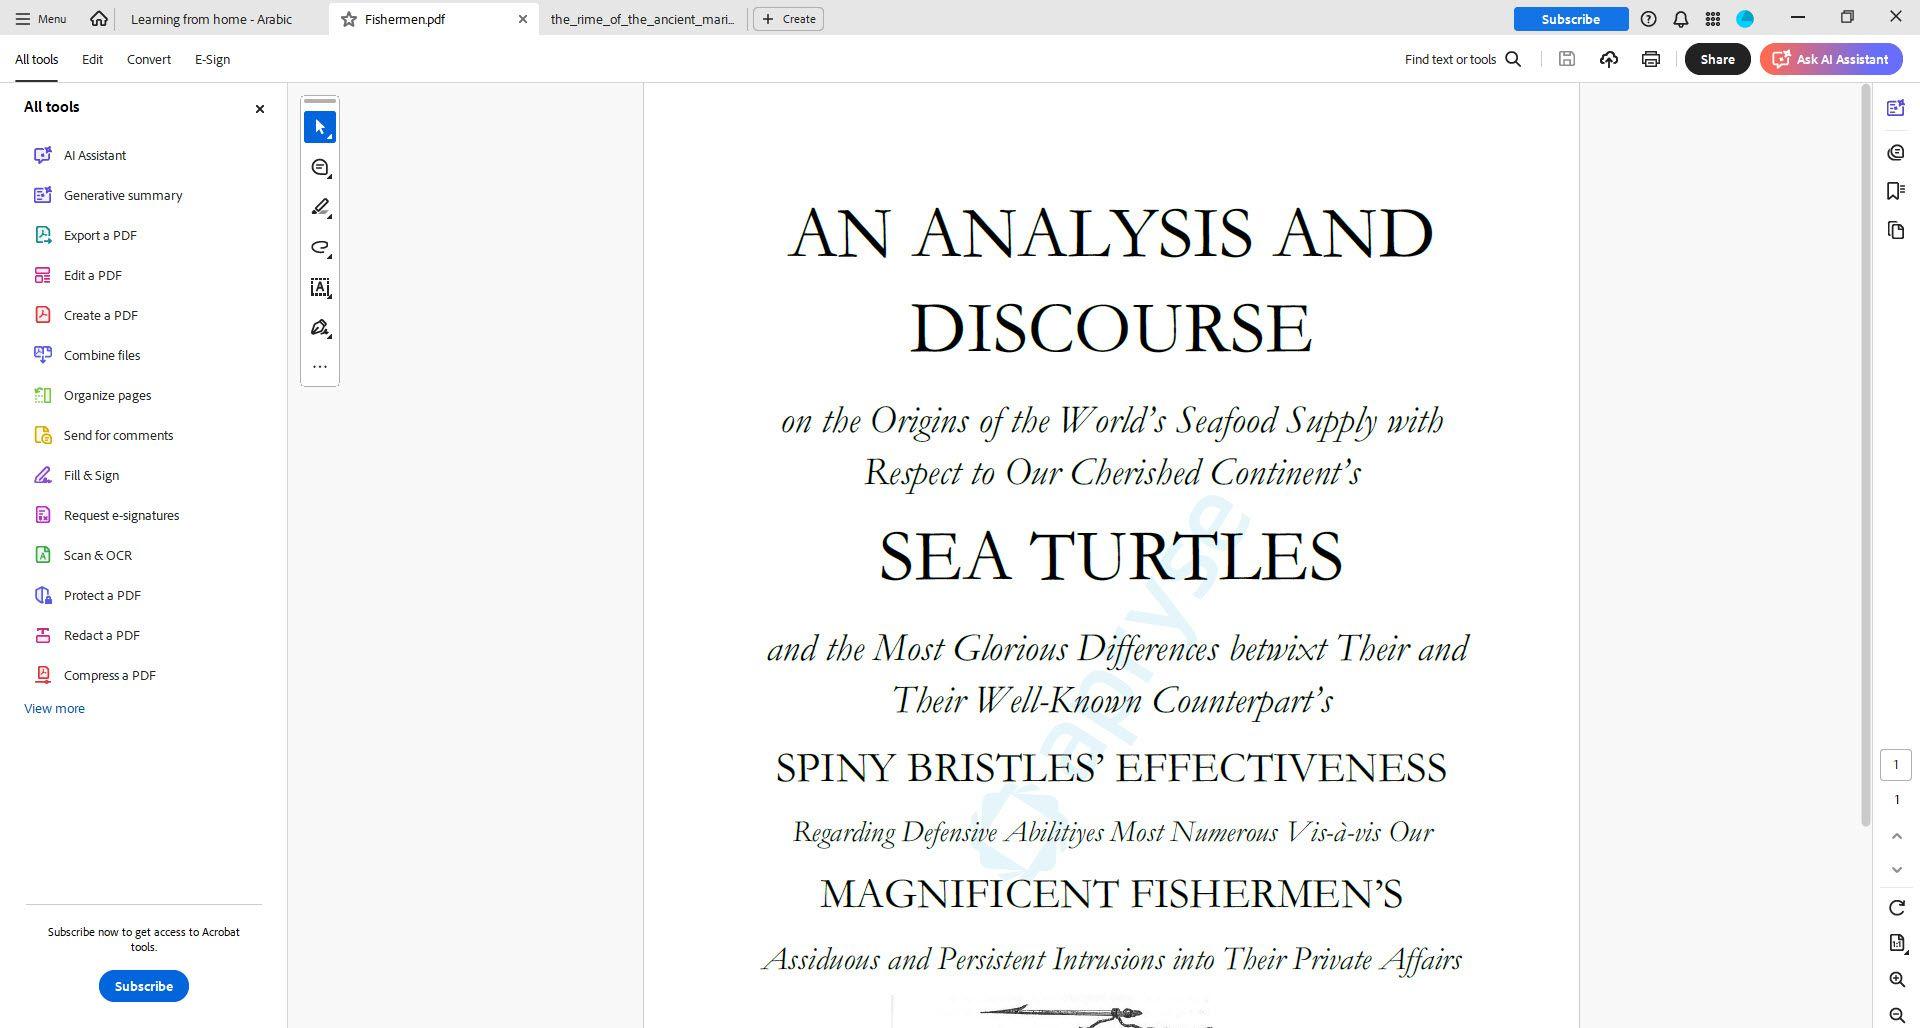
Open the PDF files to see the converted output.
2. Create a new PDFNet .NET project
This section provides steps to create a simple .NET project that uses the Apryse SDK and the PDFNet library to programmatically generate a blank PDF document. With these steps, you can learn how to set up your environment, import the required libraries, and run a script that produces a valid PDF file—all without manual intervention. This example provides a practical foundation for more advanced document‑generation workflows.
- Open Visual Studio.
- Select Create a new project to create a new console app, then click Next.
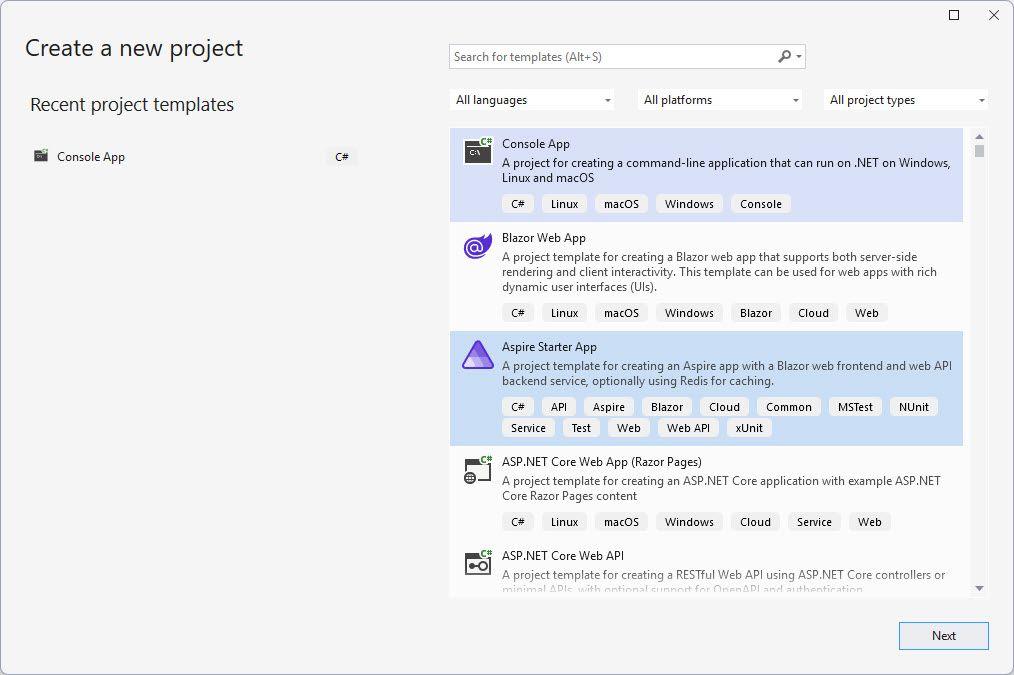
Create a new project in Visual Studio.
3. In the Project name field, enter a name for your project.
4. Under Location, enter the file location where you want the project to be created, then click Next.
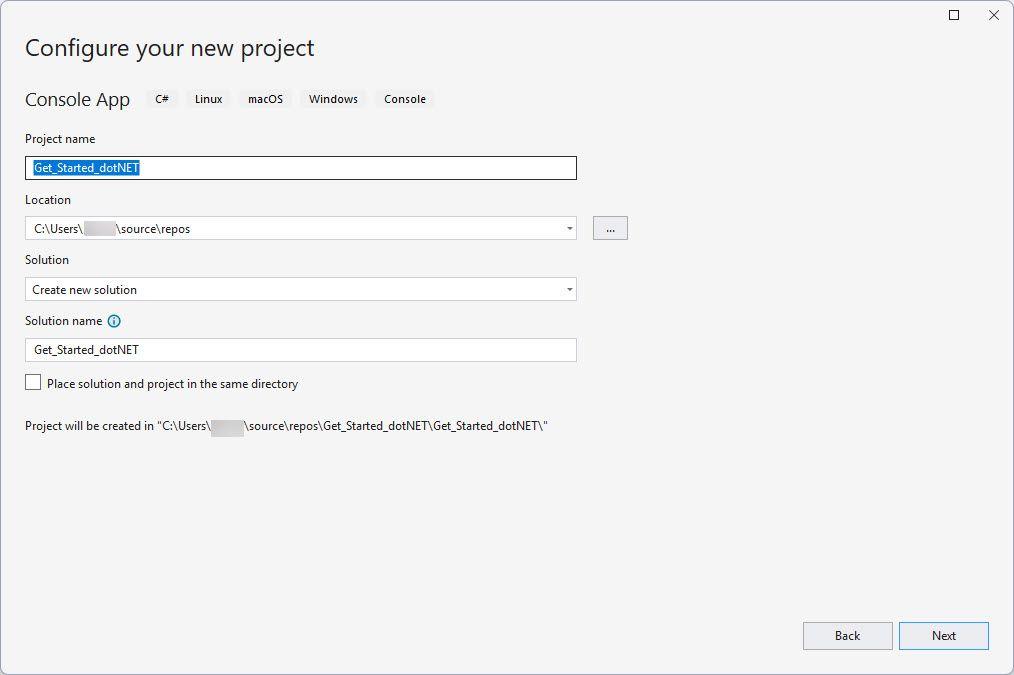
Add a project name and location where you want the project to be saved.
Note the file location of the project you just entered - you will need it later in section 3. Integrate the Apryse Server SDK into your application below.
5. In the Framework drop-down menu, click on the version you want to use (for example .NET 8), then click Create.
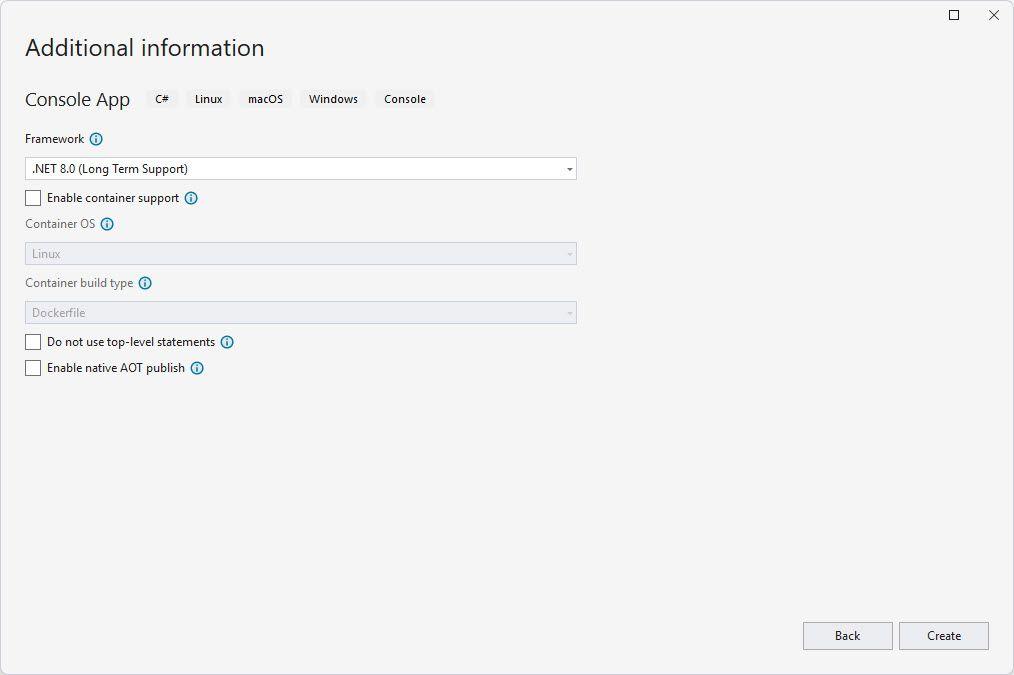
Choose the version of the .NET Framework you will be using.
A default app scaffolds where you can run and debug it.
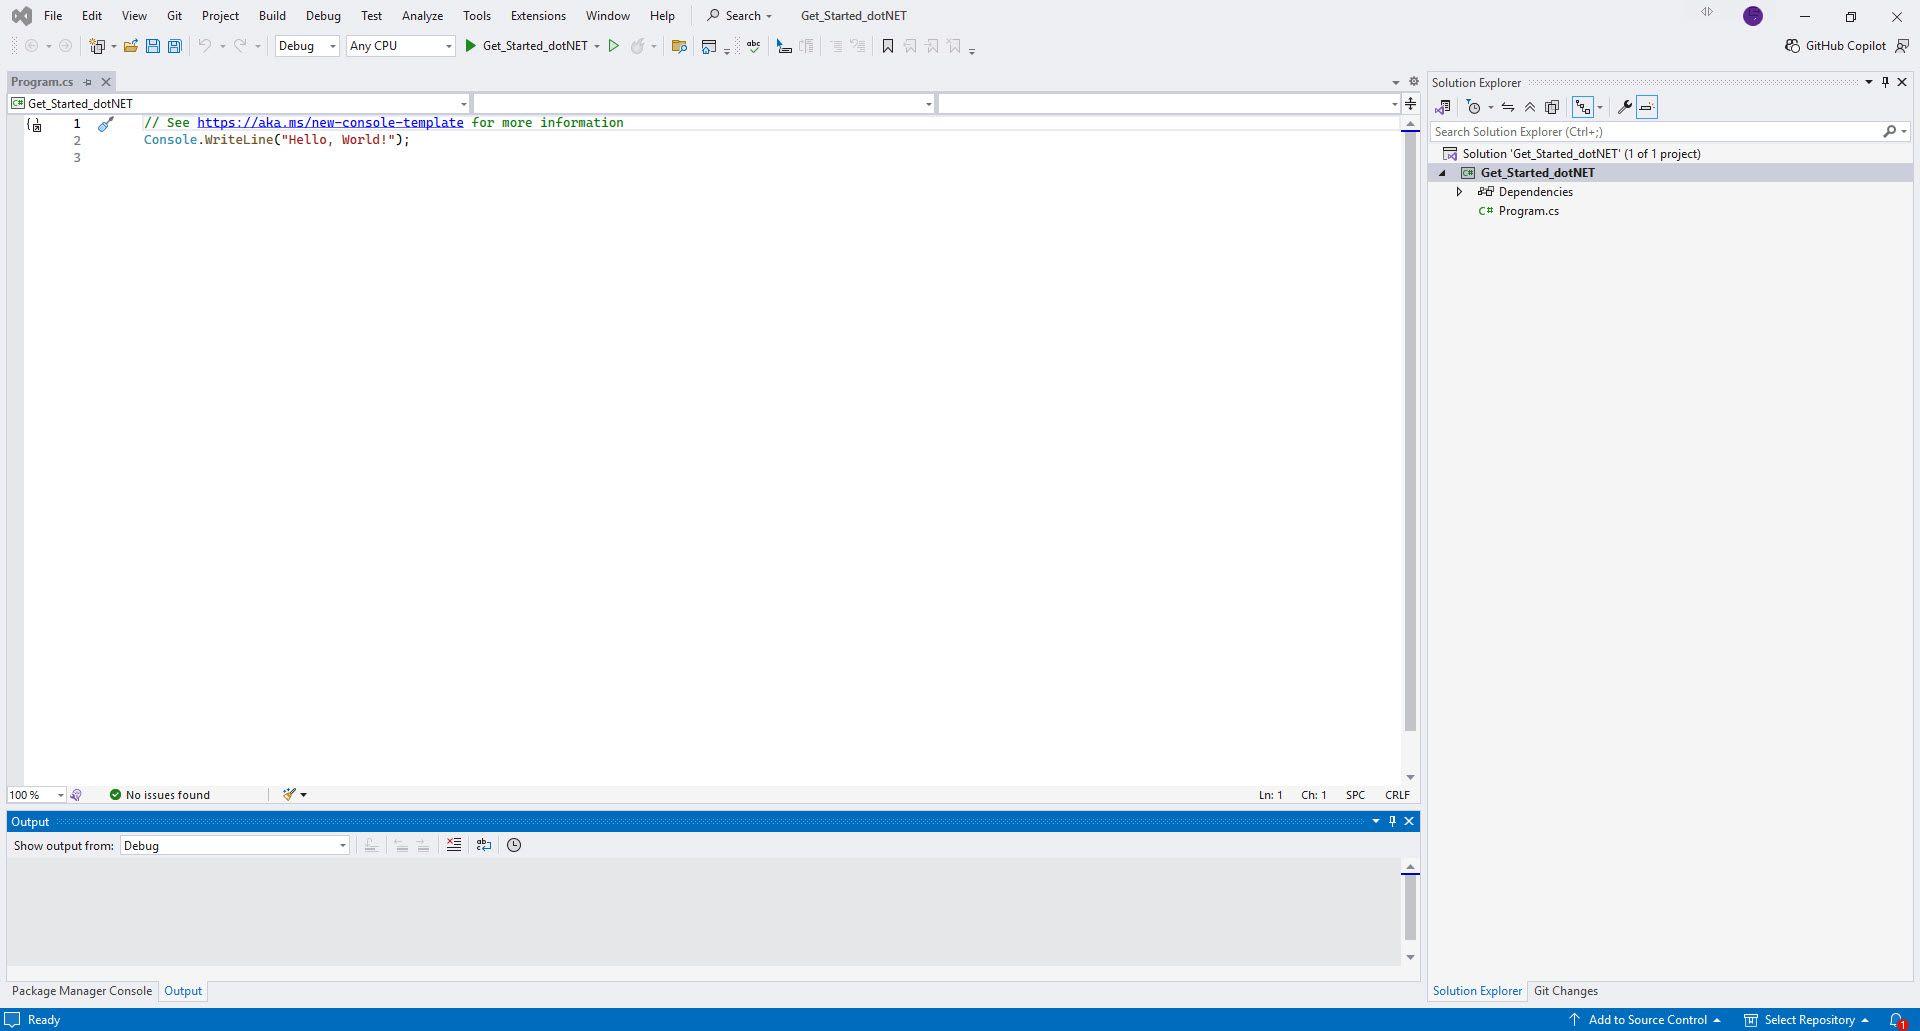
Your default app is created so you can run and debug your project.
3. Integrate the Apryse Server SDK into your application
- In Visual Studio, from the Tools menu, select NuGet Package Manager, then select Manage NuGet Packages for Solution.
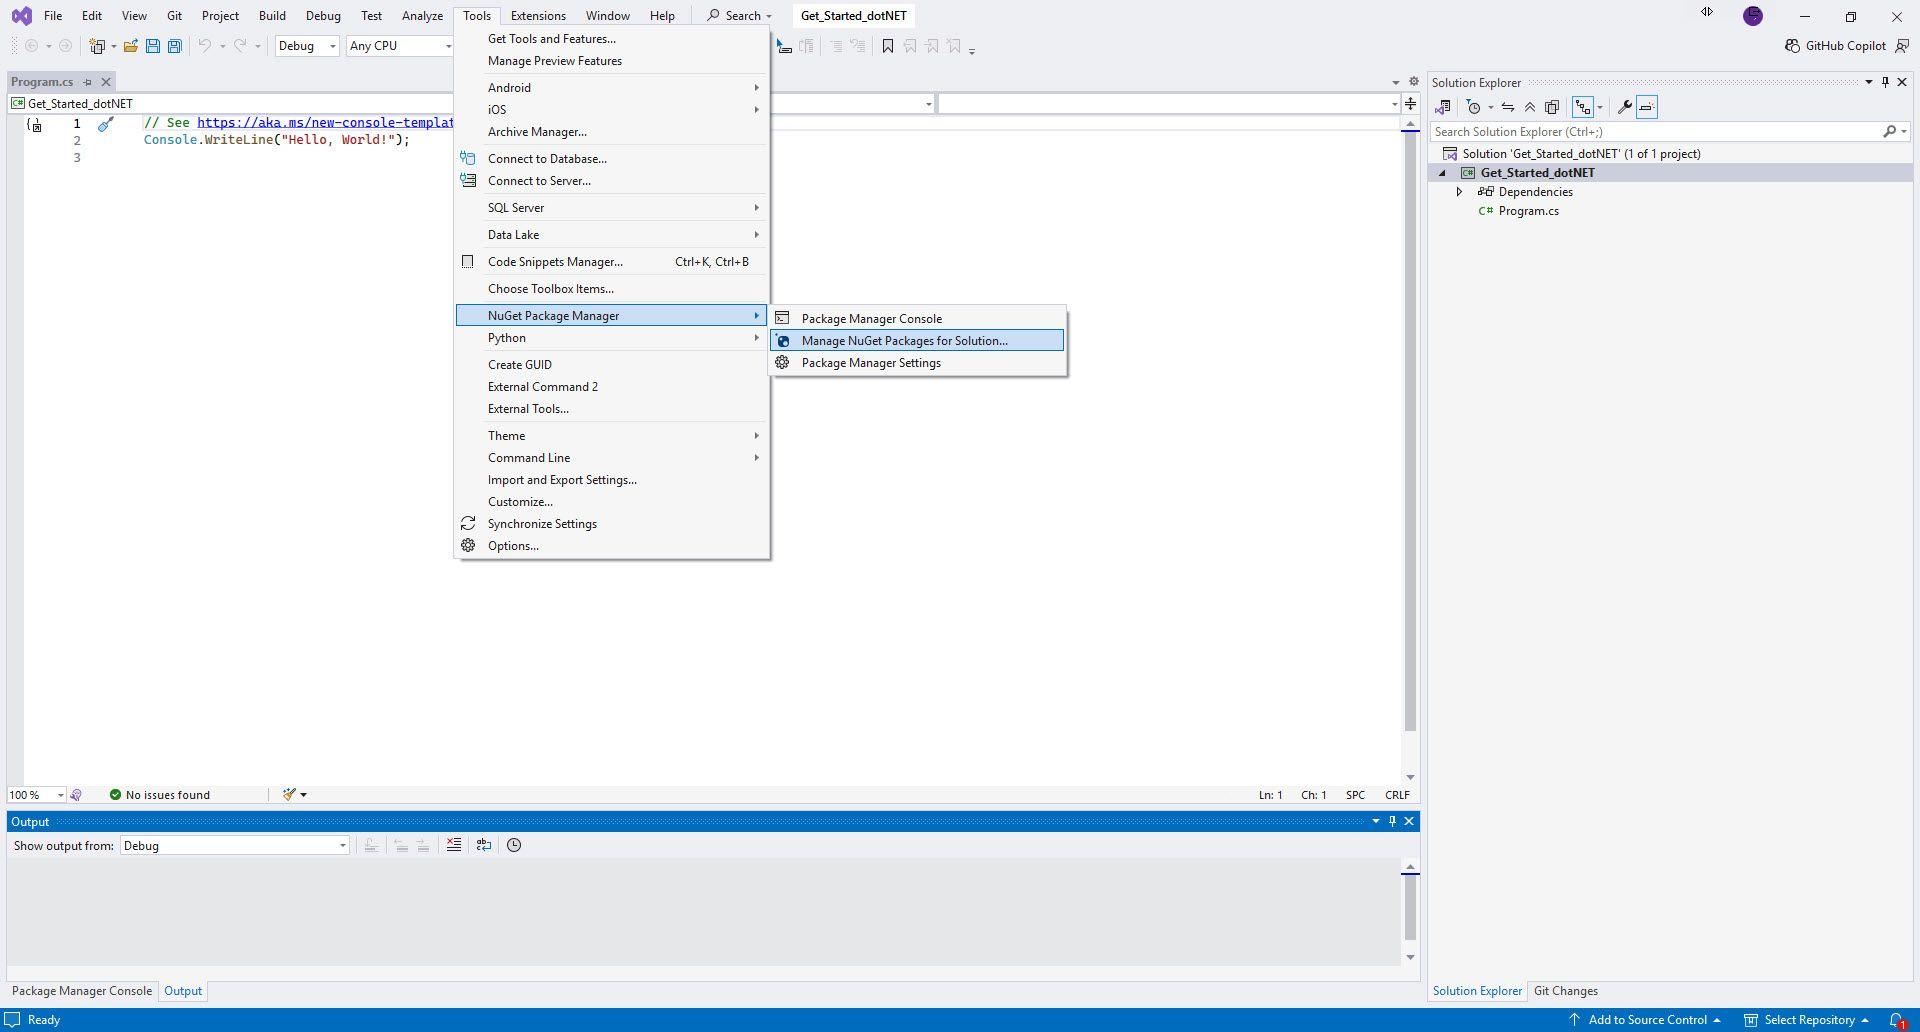
Access the NuGet Package Manager.
2. Under the Browse tab, in the Search field, enter Apryse, then click Enter. This will show you the various libraries that Apryse has published.
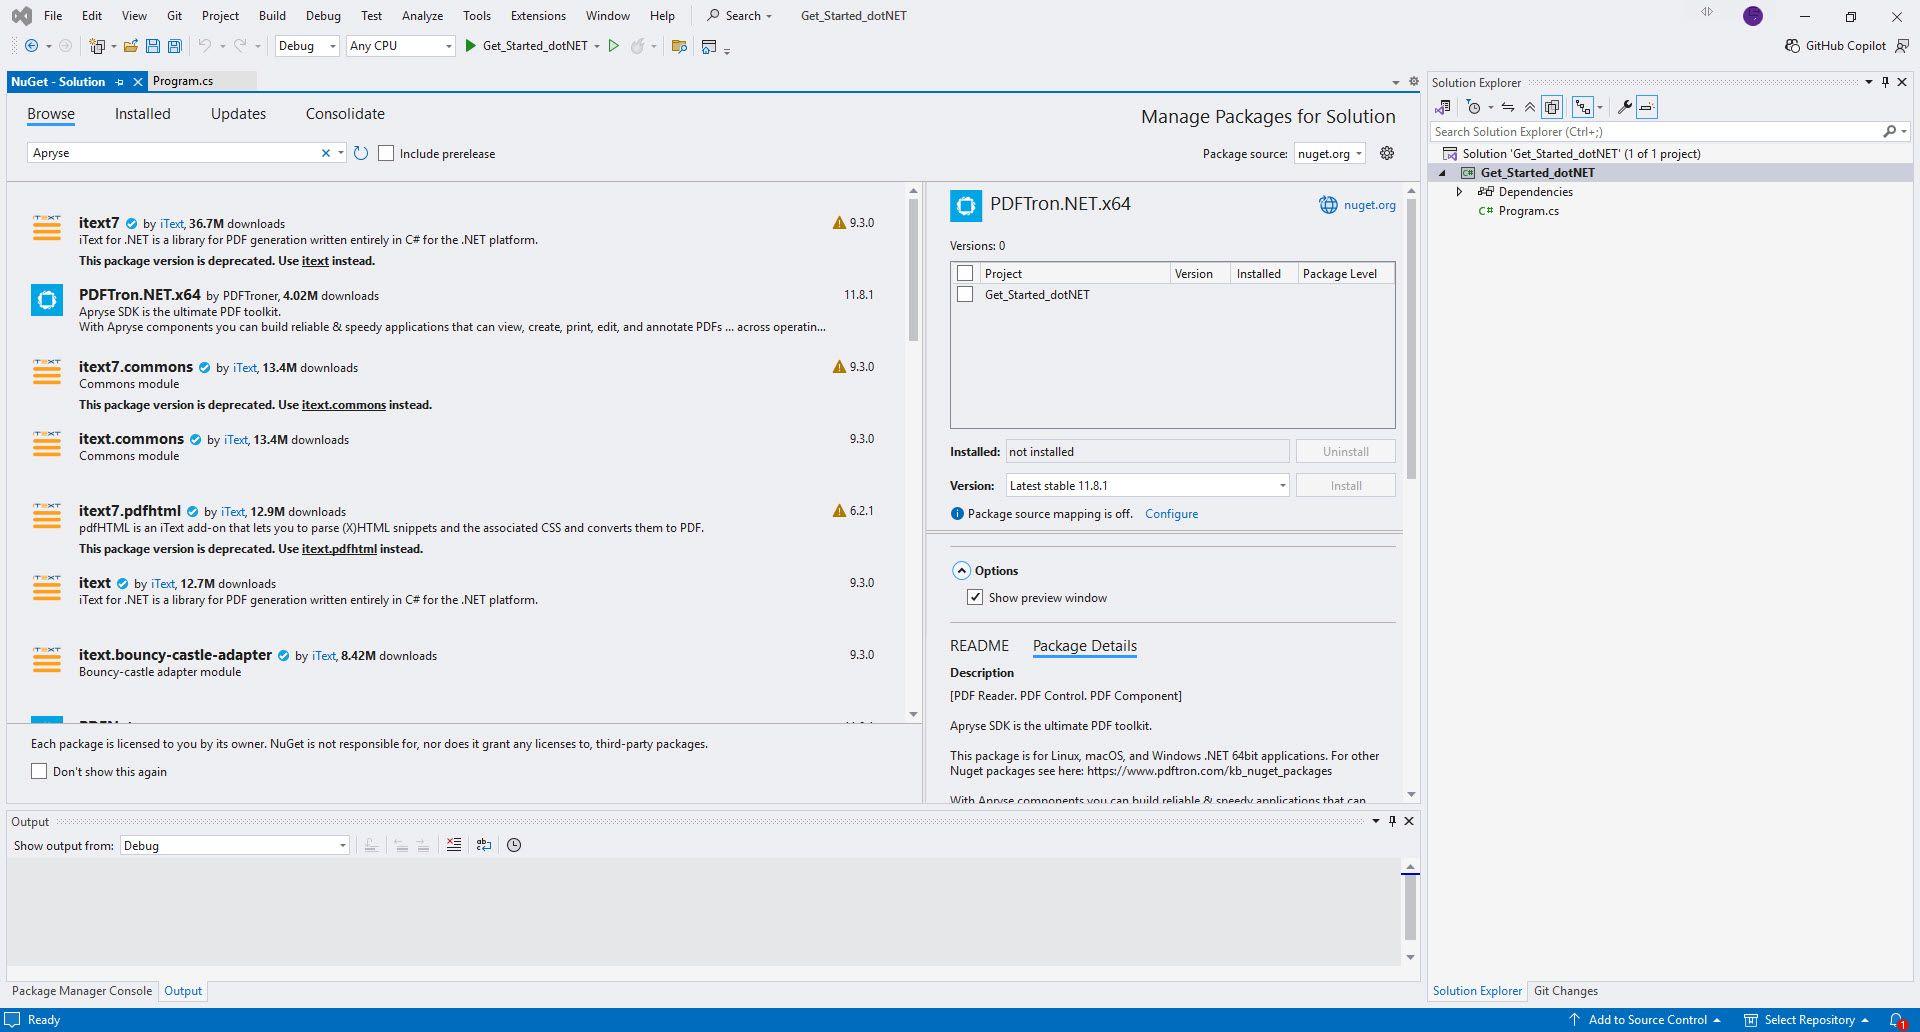
Search for the libraries that Apryse has published.
3. In the search results, select PDFTron.NET.x64.
4. In the Versions pane, select Project and GetStarted_DotNET, then click Install.
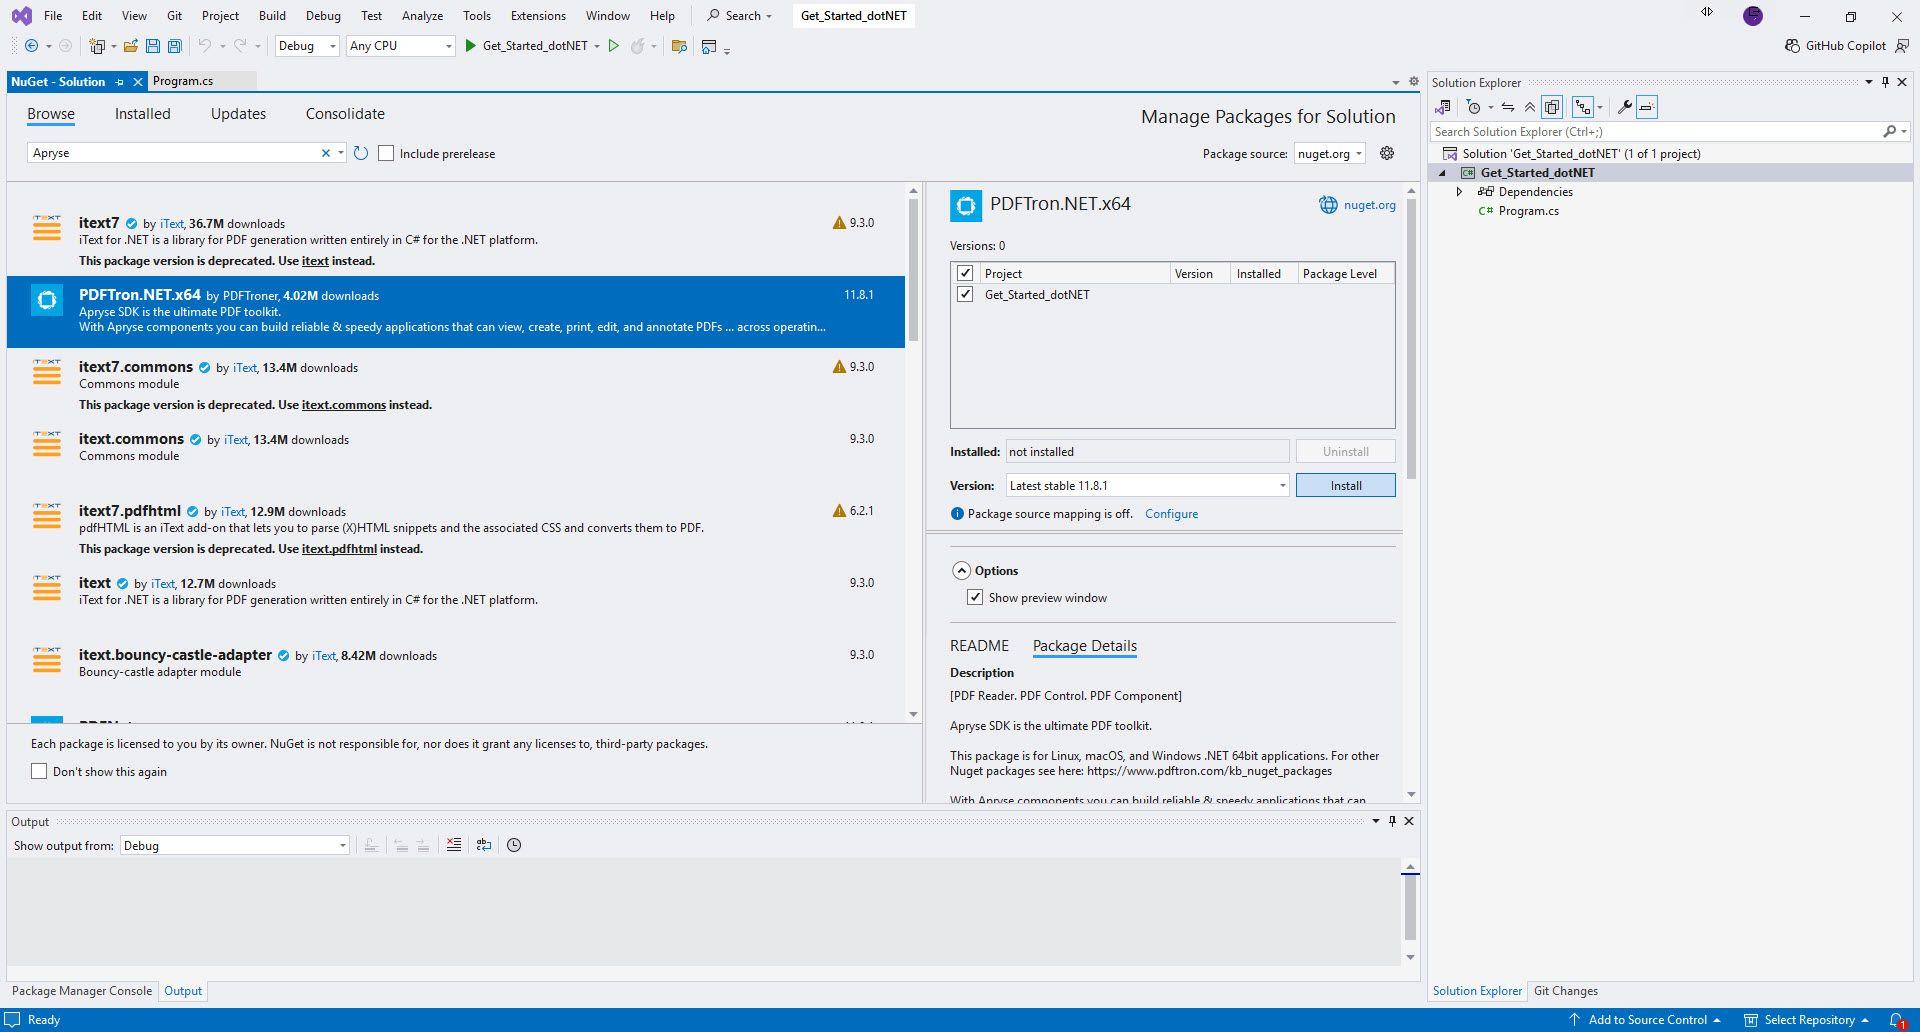
Select the GetStarted_DotNET project to install.
5. In the Preview Changes dialog, click Apply to add it to your project.
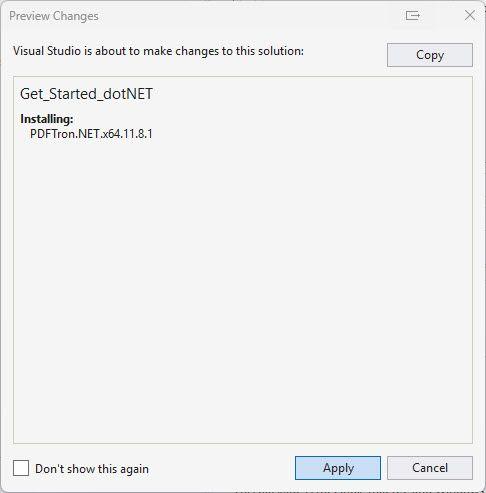
When you click Apply the changes will be made to your solution.
6. Once it’s been added, in the Output pane, you will see that it’s Finished:

When you see Finished in the Output pane, the solution has been updated.
4. Initialize PDFNet
- Copy the following code, click on the Program.cs tab under the Main Visual Studio toolbar, and paste it in
Line 1of theProgram.csfile:
C#
2. Scroll down to the line containing PDFNet.Initialize(“YOUR_PDFTRON_LICENSE_KEY”); and replace the words in quotes with the copy of your trial license key. If you’re logged in to Apryse.com, your license key will automatically replace YOUR_PDFTRON_LICENSE_KEY in the code below.
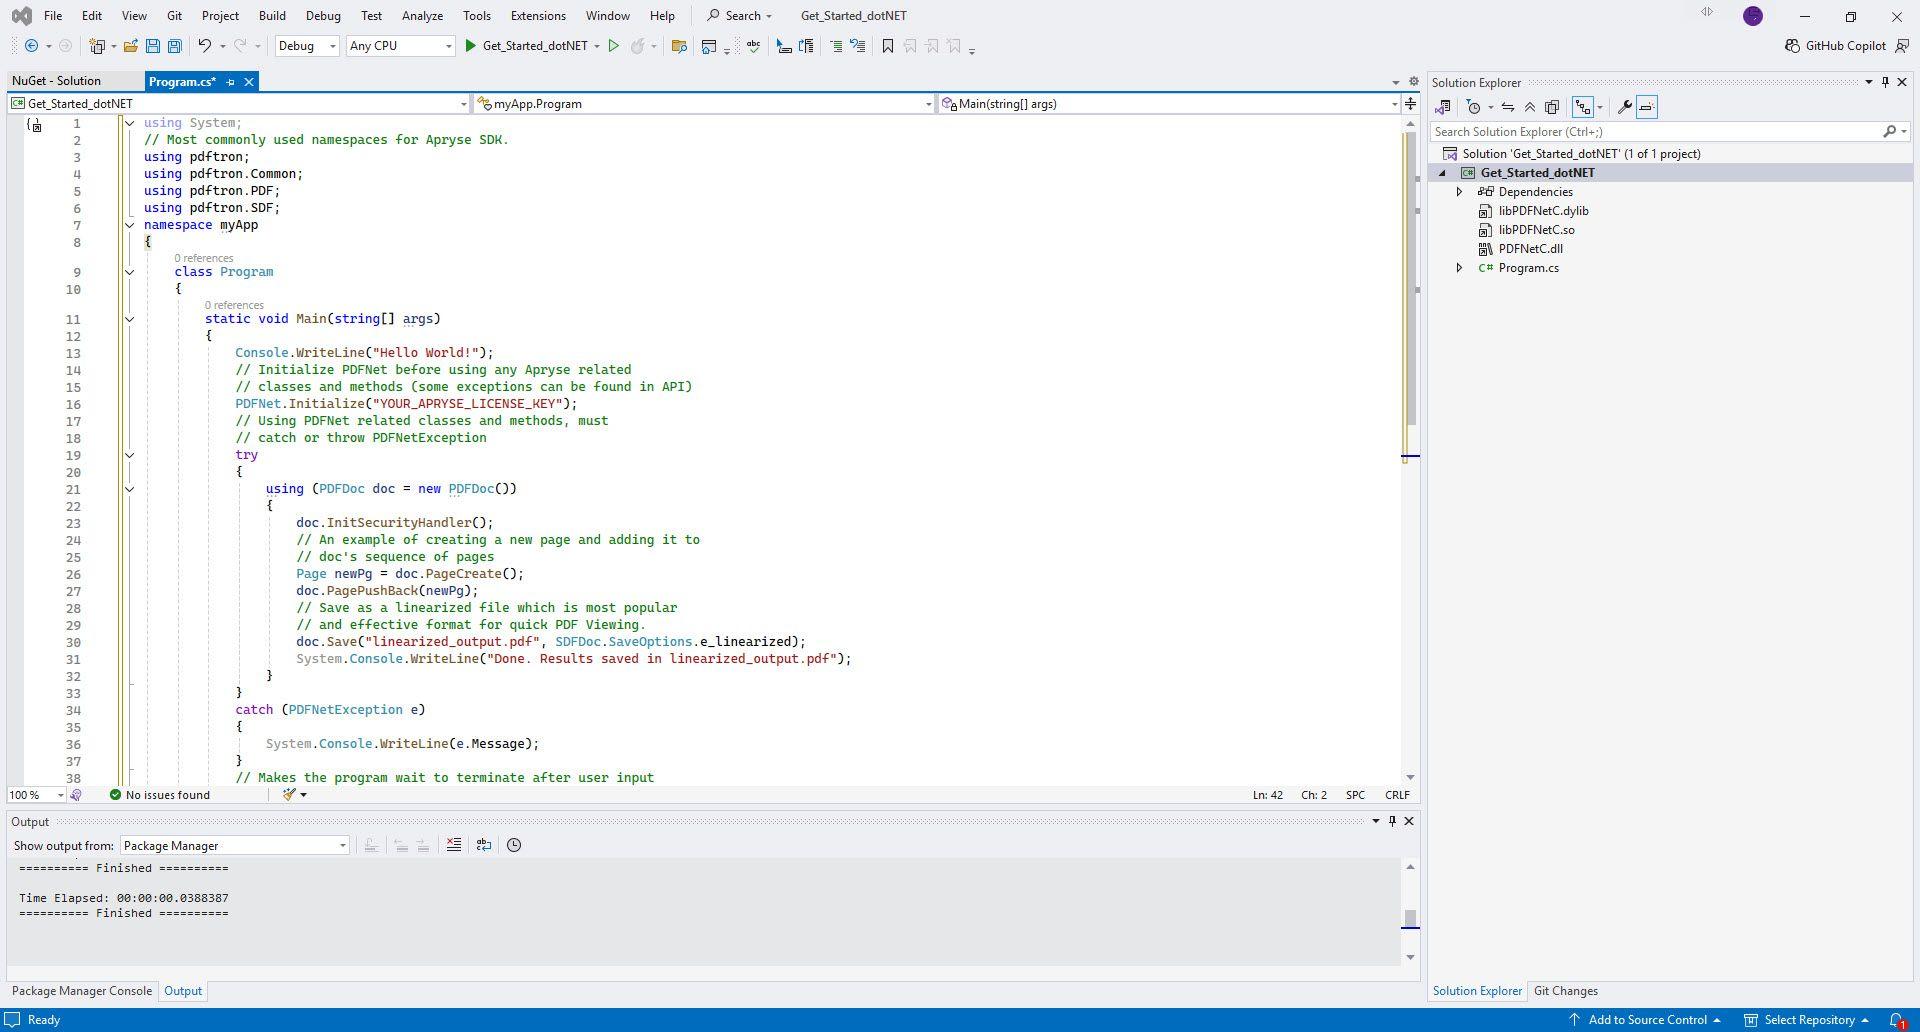
Add your license key.
3. Click GetStarted_DotNET on the Visual Studio Main toolbar to run the code. The Windows command line will open and you will see:
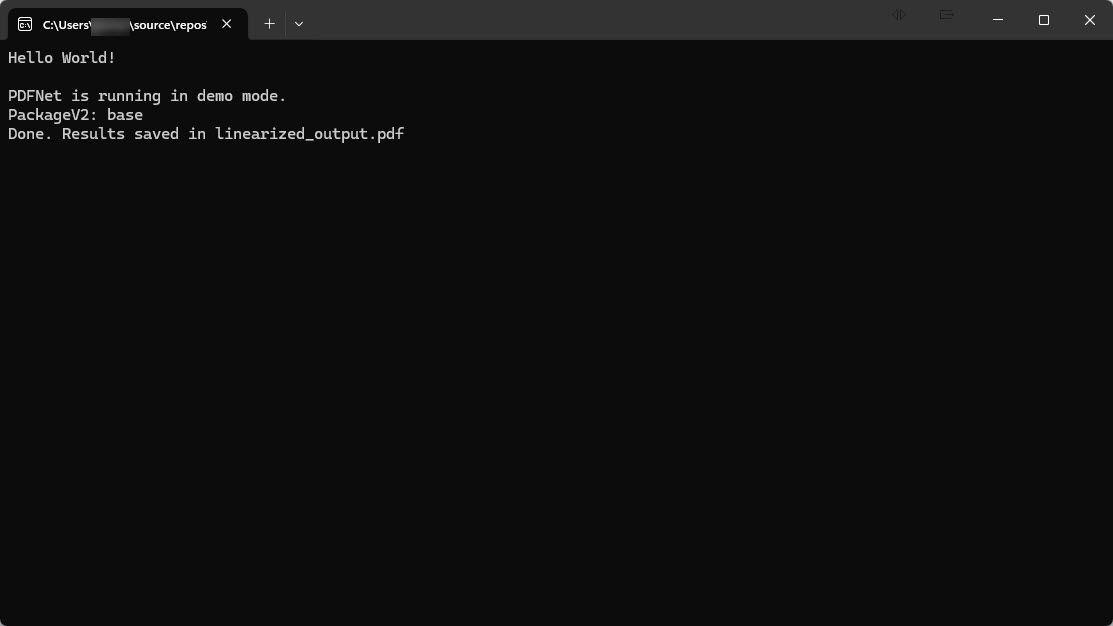
The Windows command line opens and you see Hello World!
Once you click GetStarted_DotNET above, the code initializes the Apryse Server SDK in the .NET environment, creates the sample PDF document, and performs basic PDF operations such as reading document information, extracting text, and saving output. The code also demonstrates essential API usage for tasks like loading documents and manipulating pages.
4. Exit out of the command line and navigate in File Explorer to the Windows folder where the PDF file has been saved (this is the location you specified in step 2 of the 1. Create a new project section above).
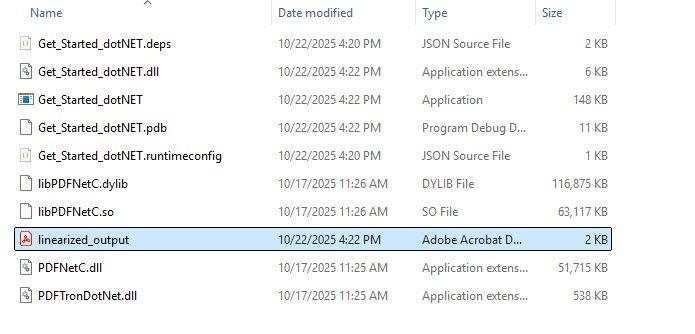
Navigate to the location of the PDF file you created.
5. Open the linearized_output.pdf which you created by integrating the Apryse Server SDK!
Now that you have successfully run the OfficeToPDFTest sample and integrated the Apryse Server SDK .NET PDF Library into your application, you can try out 50+ samples depending on your needs.
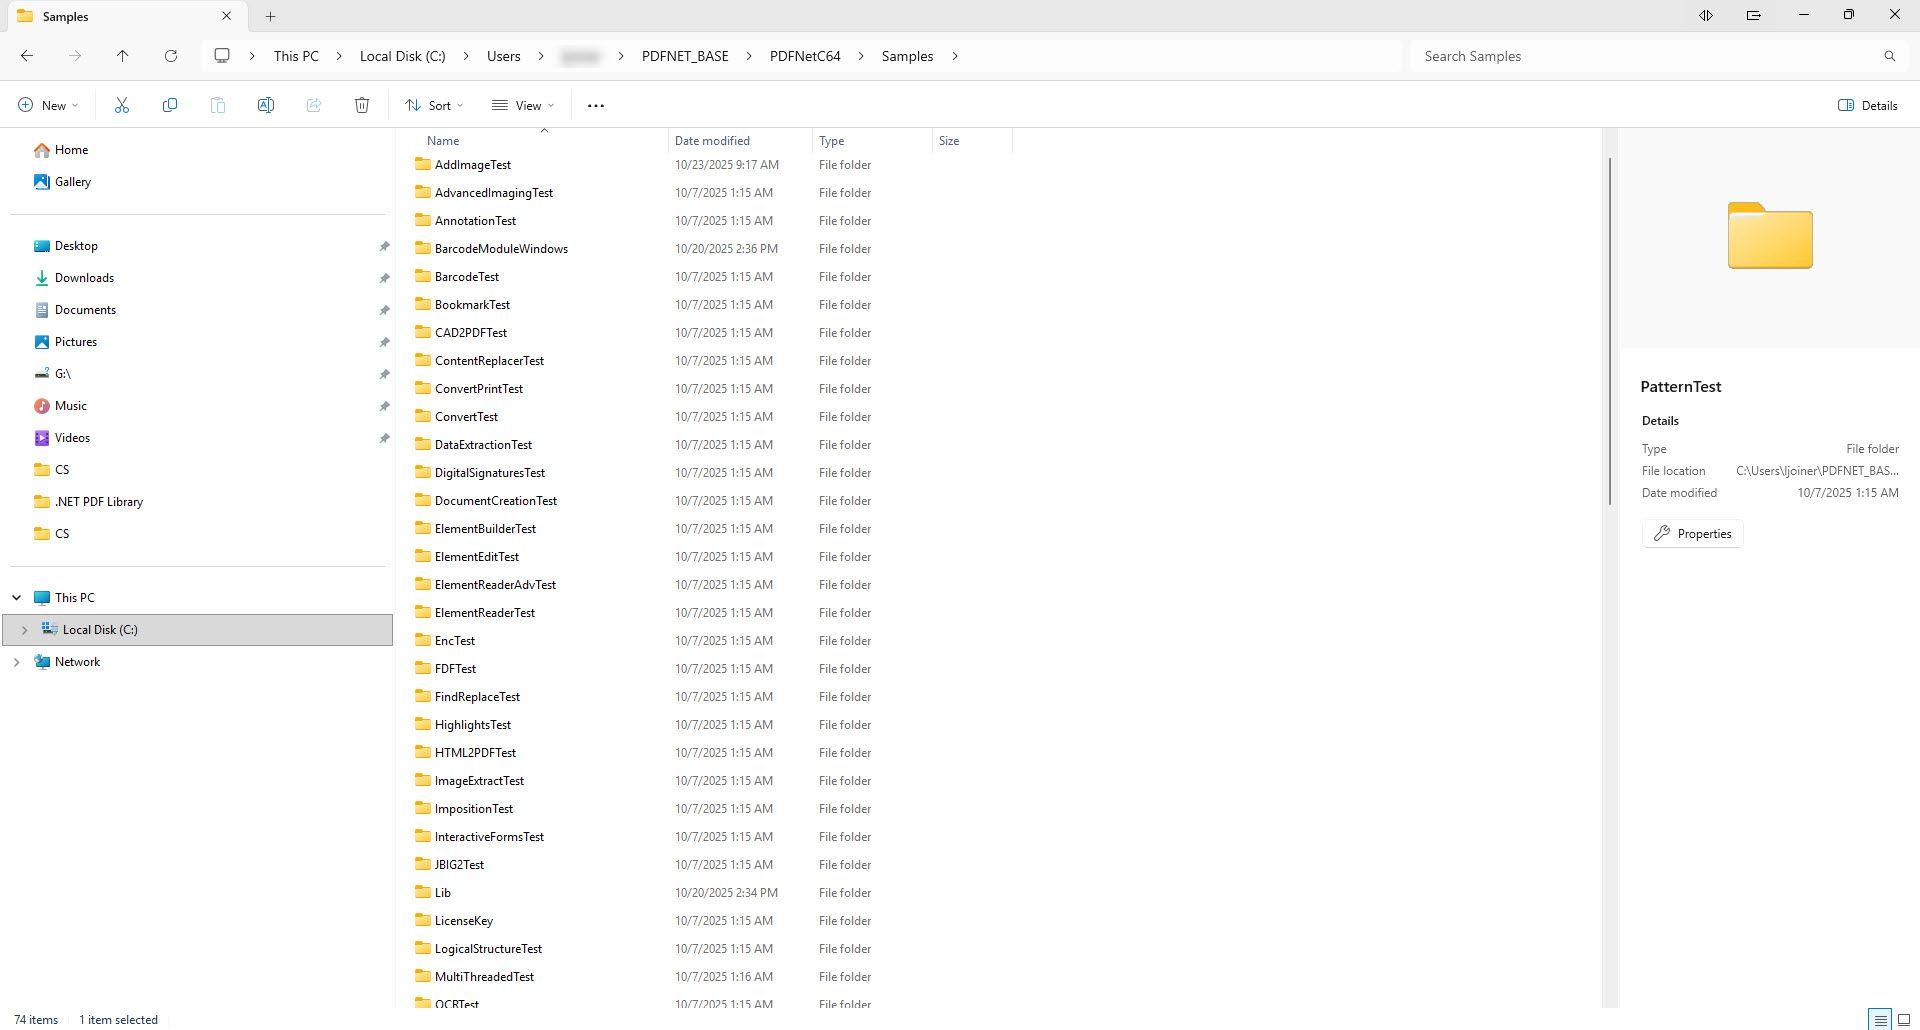
Based on your needs, you can browse over 50 samples to try.
6. To try additional samples, go to section 2. Run a sample > step 3 above and choose another sample to run.
This guide will help you set up Apryse SDK serverless Azure functions. Your free trial includes unlimited trial usage and support from solution engineers.
Prerequisites
Initial setup
In this particular guide, we will demonstrate how to set up an Azure function to use Apryse SDK.
First, create an Azure function using this guide.
Next, edit your csproj to include PDFNetC.dll and reference PDFTronDotNet.dll from the download package.
Integrate into your application
Once you have followed the initial setup instructions, you can begin calling Apryse SDK APIs in your Azure function source. For example:
C#
Run Sample Code
You can update C# script of your Azure function project with the following code or download the source code from our github repository. This snippet shows how to process a request sent from a client to convert an office document to PDF and send the output to client.
C#
The last step is to publish your Azure function and have it running and its url ready. Make sure to set Settings/Configuration/General settings/Platform to 64-bit in Azure portal.
Testing
In order to use this Azure function to convert an office document to PDF, the client needs to post a REST API request to the server. The request must include json data structured as in C# code above.
Python
Upon receiving a client's request, a response will be sent back to the client including the base64 encoded pdf output using the same json structure. All the client needs to do now is decode the encoded data into pdf. That's it!
You can access the sample python code on Github. After cloning the repository and installing necessary packages, please refer to /client/README.txt for detailed instructions. Navigate to the client folder, run the following command, and see the reponse to client's request in the console and check the output in the output folder:
sh
The client will send a REST API request to convert /input/simple-word_2007.docx to pdf and the server will send back the encoded data, which will then be saved as pdf in the output folder.
You can experiment with your own office document by putting it inside input folder:
sh
We have shown how to set an Azure function using Apryse SDK. You can now experiment making your own functions, URLs, and can fully utilize Apryse SDK. If your have any questions, please don't hesitate to contact us!
Linux .NET PDF library integration
You'll get started with our samples to see the output you can create when you integrate the Apryse Server SDK into your application. You'll also create a project and integrate the Server SDK into your application, using the Linux platform.
Prerequisites
Before you start:
- Install Visual Studio Code (or your preferred application) to write, edit, and debug source code.
- Install .NET on Linux to build your application. You may also need to install .NET SDK.
- Additional resources
- Download Apryse’s .NET PDF Library for Linux tarball file. See our Linux developer download section for the file you need based on your processor (ARM, AMD, Intel).
- Get your Apryse trial key.
License Key
Apryse collects some data regarding your usage of the SDK for product improvement.
If you wish to continue without data collection, contact us and we will email you a no-tracking trial key for you to get started.
Run Apryse SDK in production.
A commercial license key is required for use in a production environment. Contact sales by filling out our licensing form if you want to purchase a commercial license key.
Keep your commercial license key confidential.
License keys are uniquely generated and strictly confidential. Don't publish or store them in any public location, including public GitHub repositories.
1. Run a PDFNet sample project
In this section, you can download and run the OfficeToPDFTest PDFNet sample module, which demonstrates the SDK's document-conversion capabilities. Upon successful completion, you can convert a DOCX document to a PDF file while leveraging the MS Office-to-PDF conversion API. You can use this module as a reference implementation when integrating similar document-conversion functionality into your own applications. By running the sample, you can quickly:
- Verify the capabilities.
- Understand how to interact with the MS Office to Conversion PDF API.
- Use it as a reference for integrating similar functionality into your own application.
- Download the tarball file for Linux suitable for your processor. For this guide, we'll use the Linux Intel file.
- Use your Linux file explorer to navigate to the Downloads folder, right-click on the
tar.gztarball file, then select Extract to...
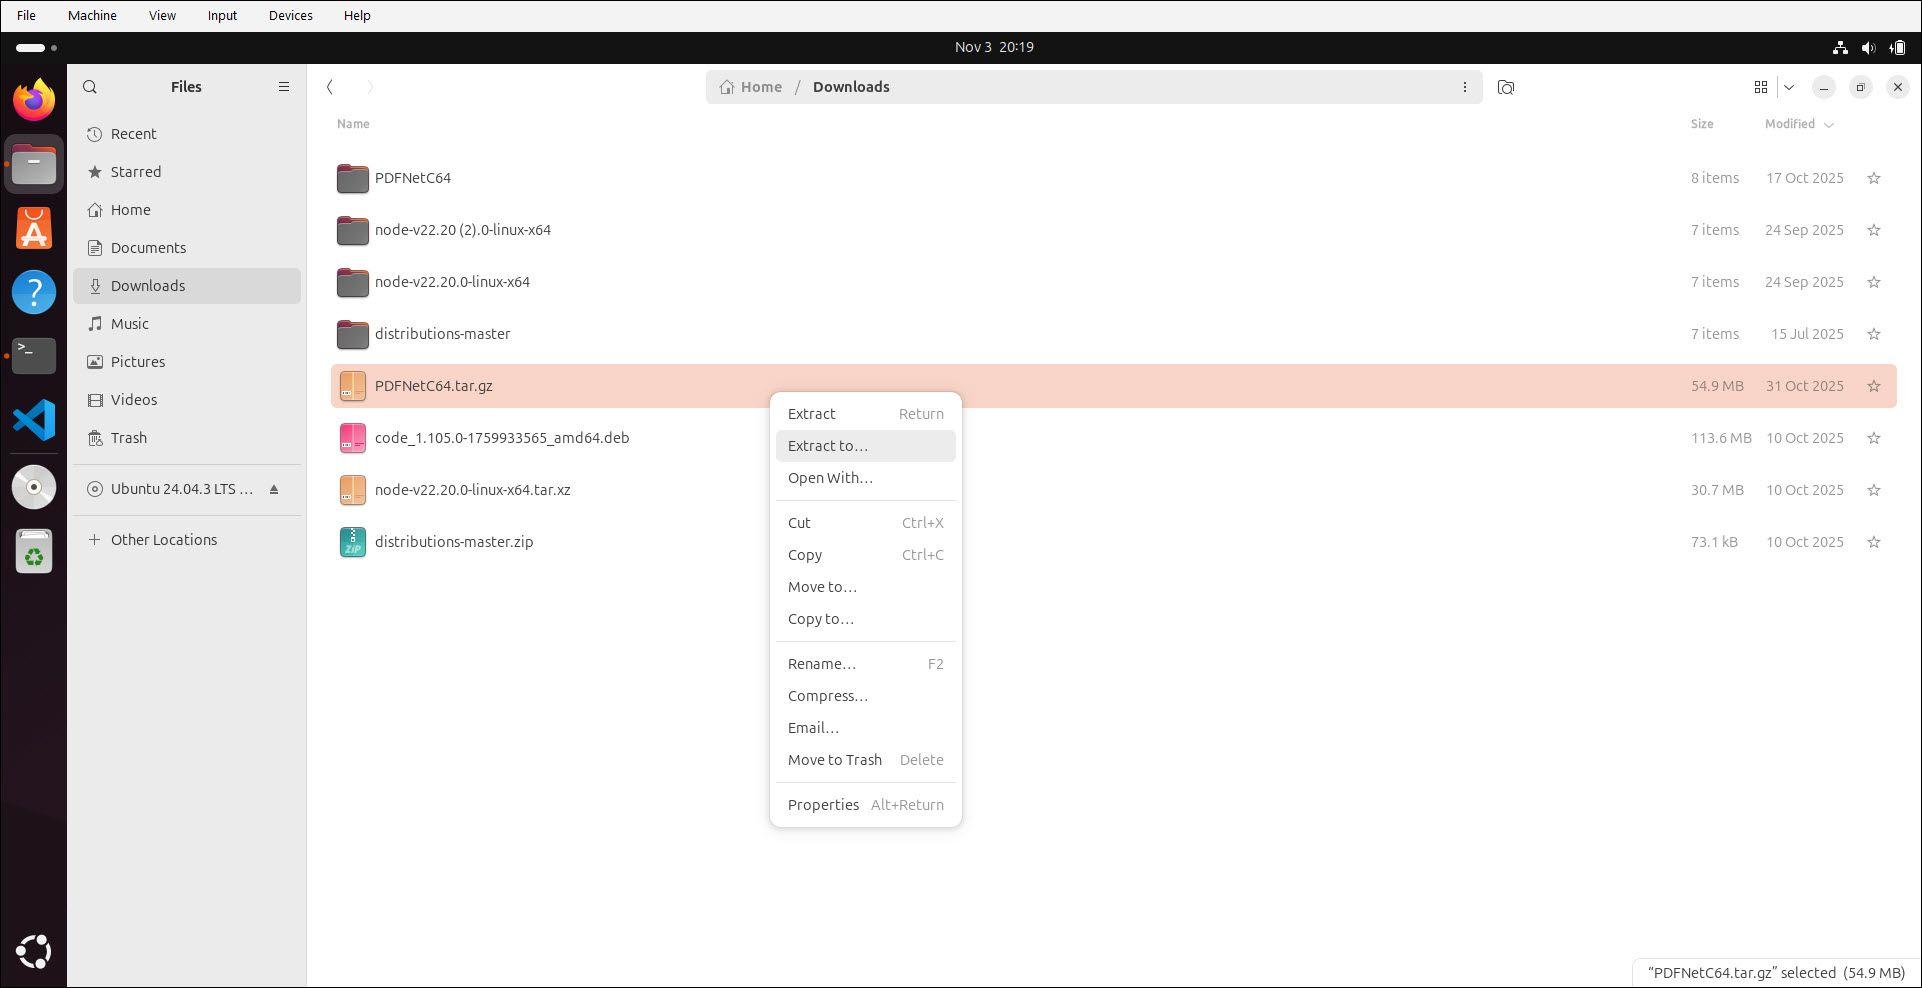
Navigate to and extract the tarball file.
3. Select Home, New Folder, then enter ApryseSamples, and click Create to create a new folder to extract the tarball file into for running the samples. You can create a folder at a different location if you prefer, but for this guide’s instructions, we used the location and name above.
The ApryseSamples folder is created and the tarball is extracted to the folder.
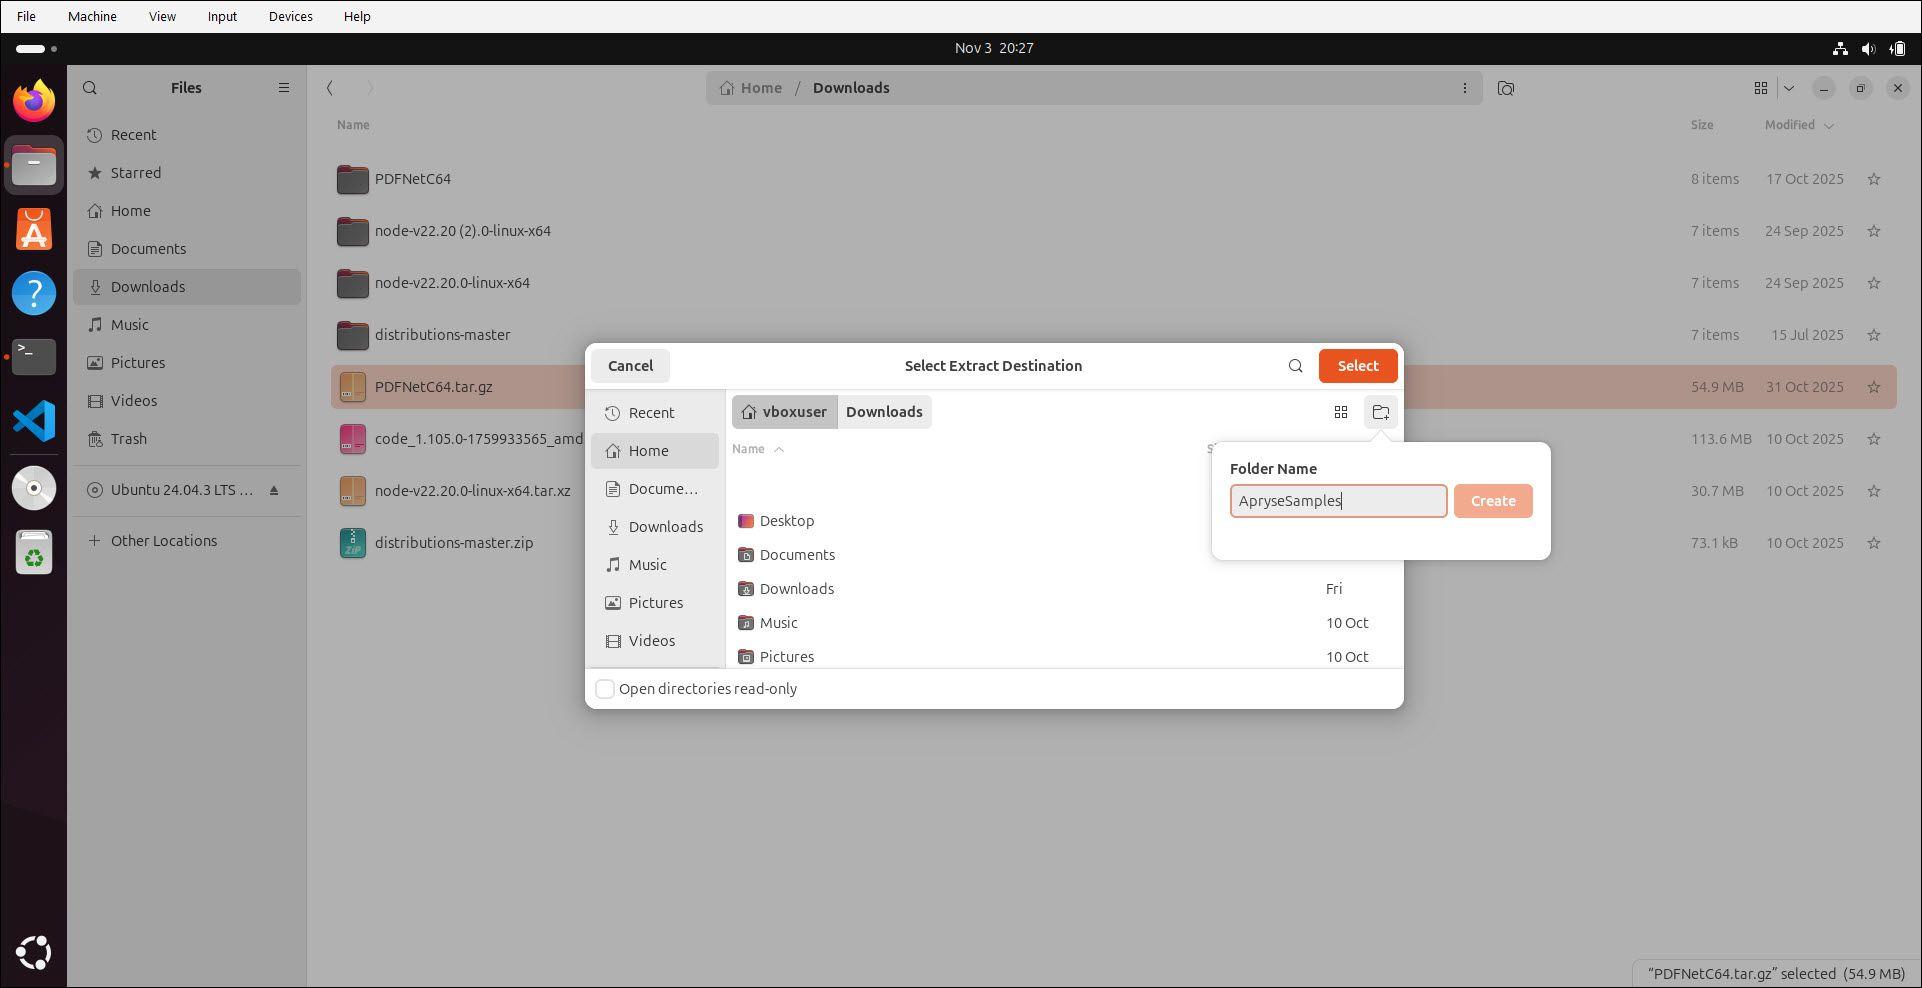
Create a new folder for running the samples.
4. Navigate to: /Home/ApryseSamples/PDFNetC64/Samples/LicenseKey/CS/LicenseKey.cs and double-click to open so you can add your license key to the LicenseKey.cs file before running the sample.
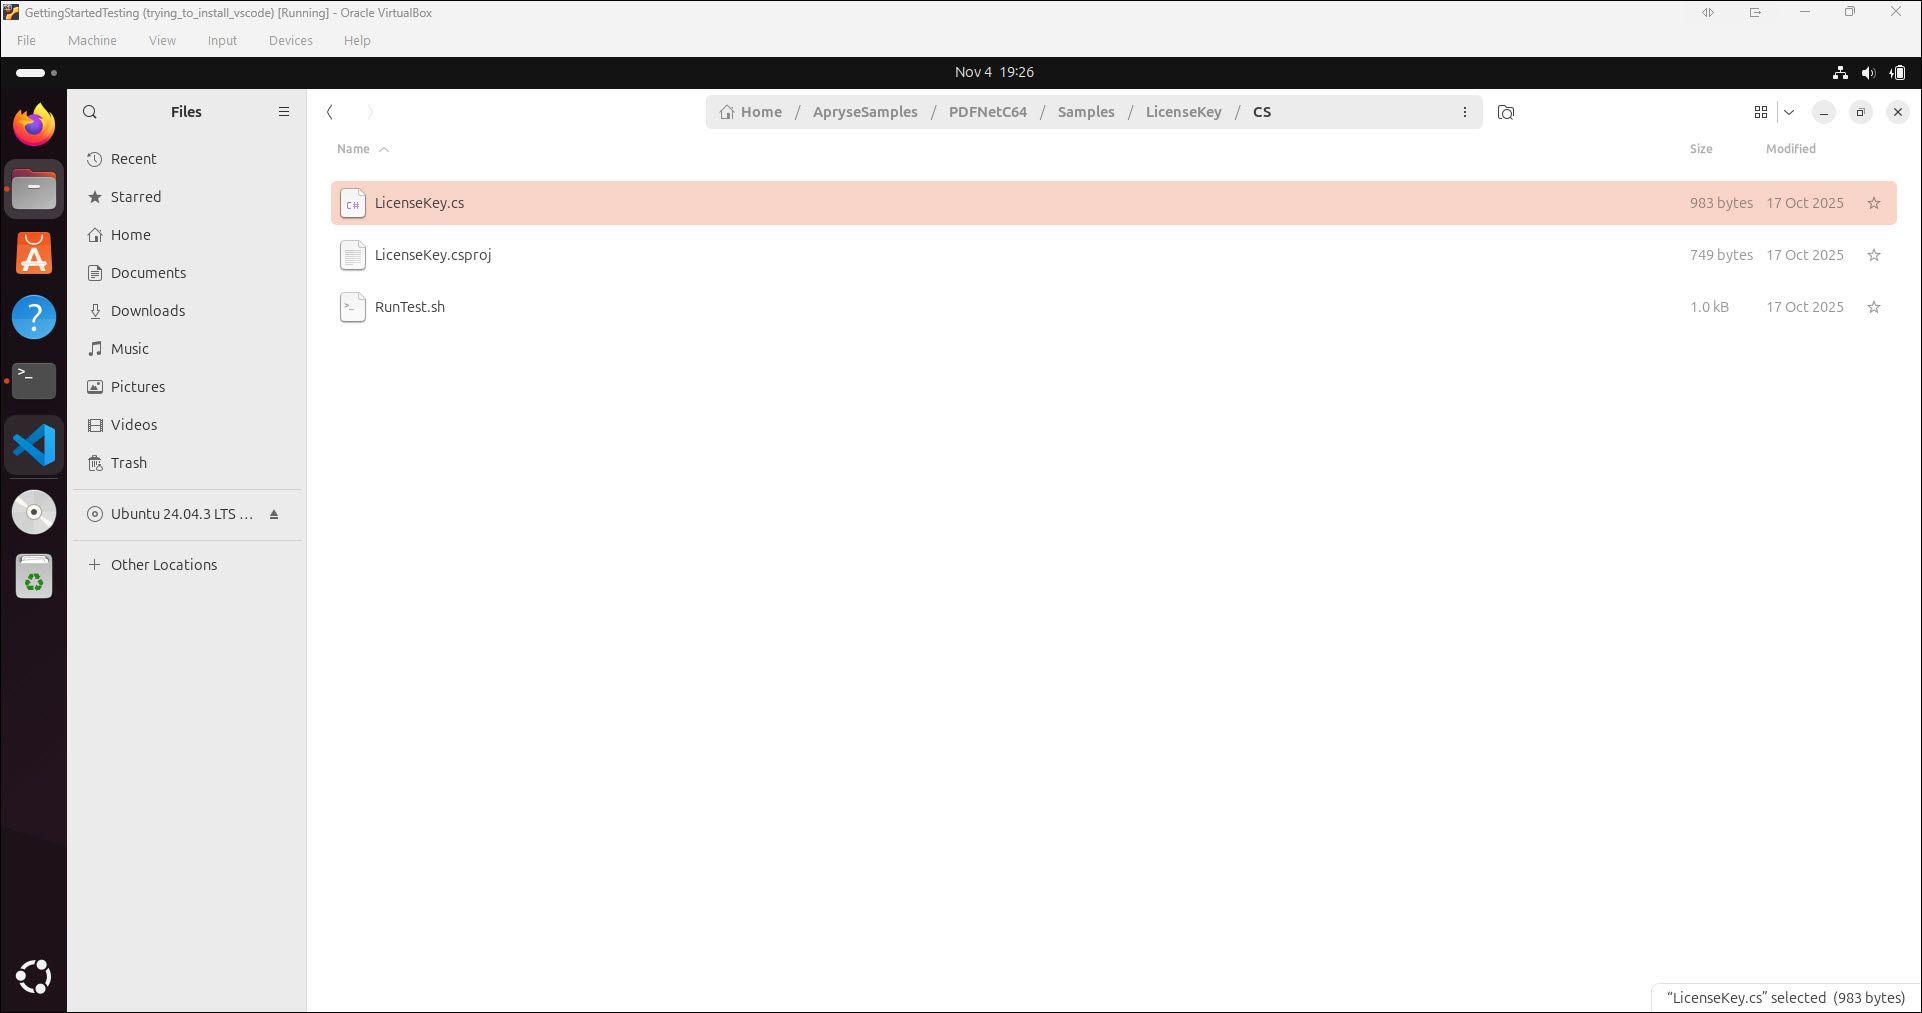
Add your license key.
5. Scroll down to the line containing private static string key = “YOUR_PDFTRON_LICENSE_KEY”; and replace the words in quotes with the copy of your trial license key. Do not change any other information in this file.
6. Save your changes and close the file.
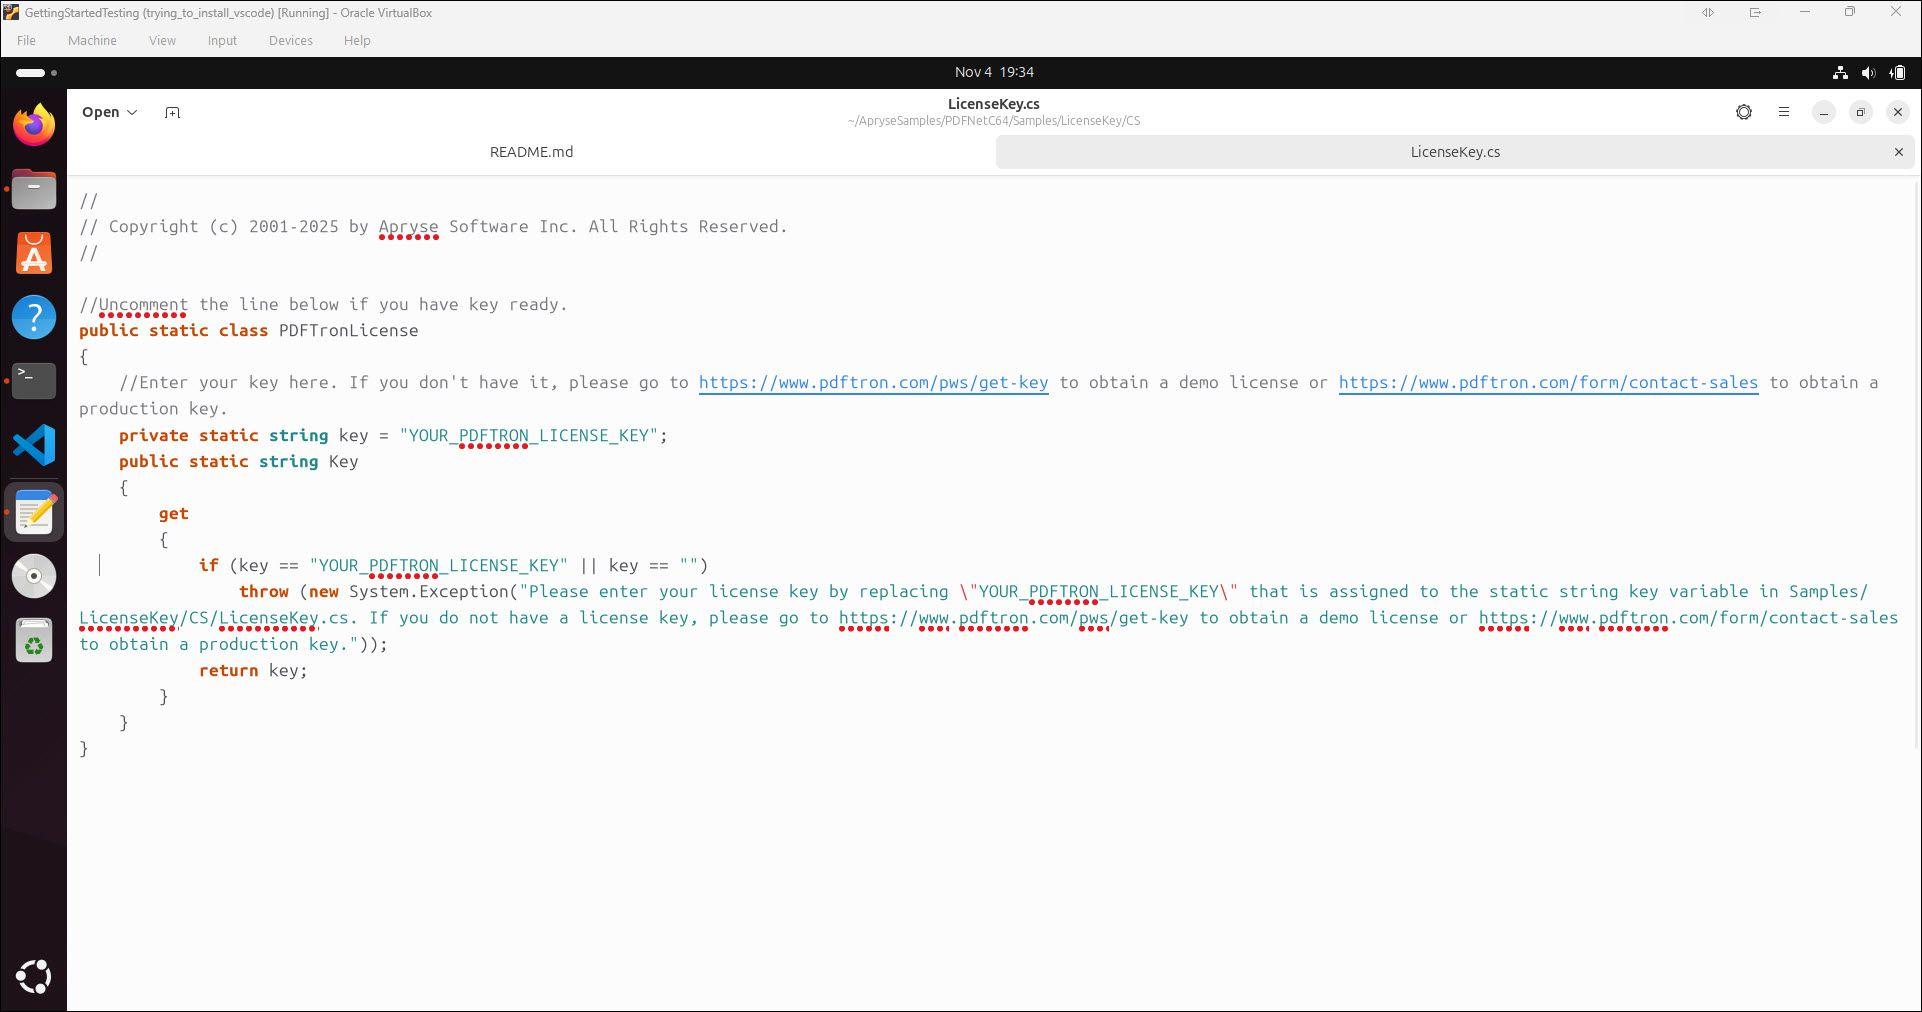
Add your trial license key to the LicenseKey.cs file.
7. To run the sample, navigate to the folder you created in step 3 above, /Home/ApryseSamples/PDFNetC64/Samples/OfficeToPDFTest/CS, right-click on the CS folder, then select Open in Terminal.
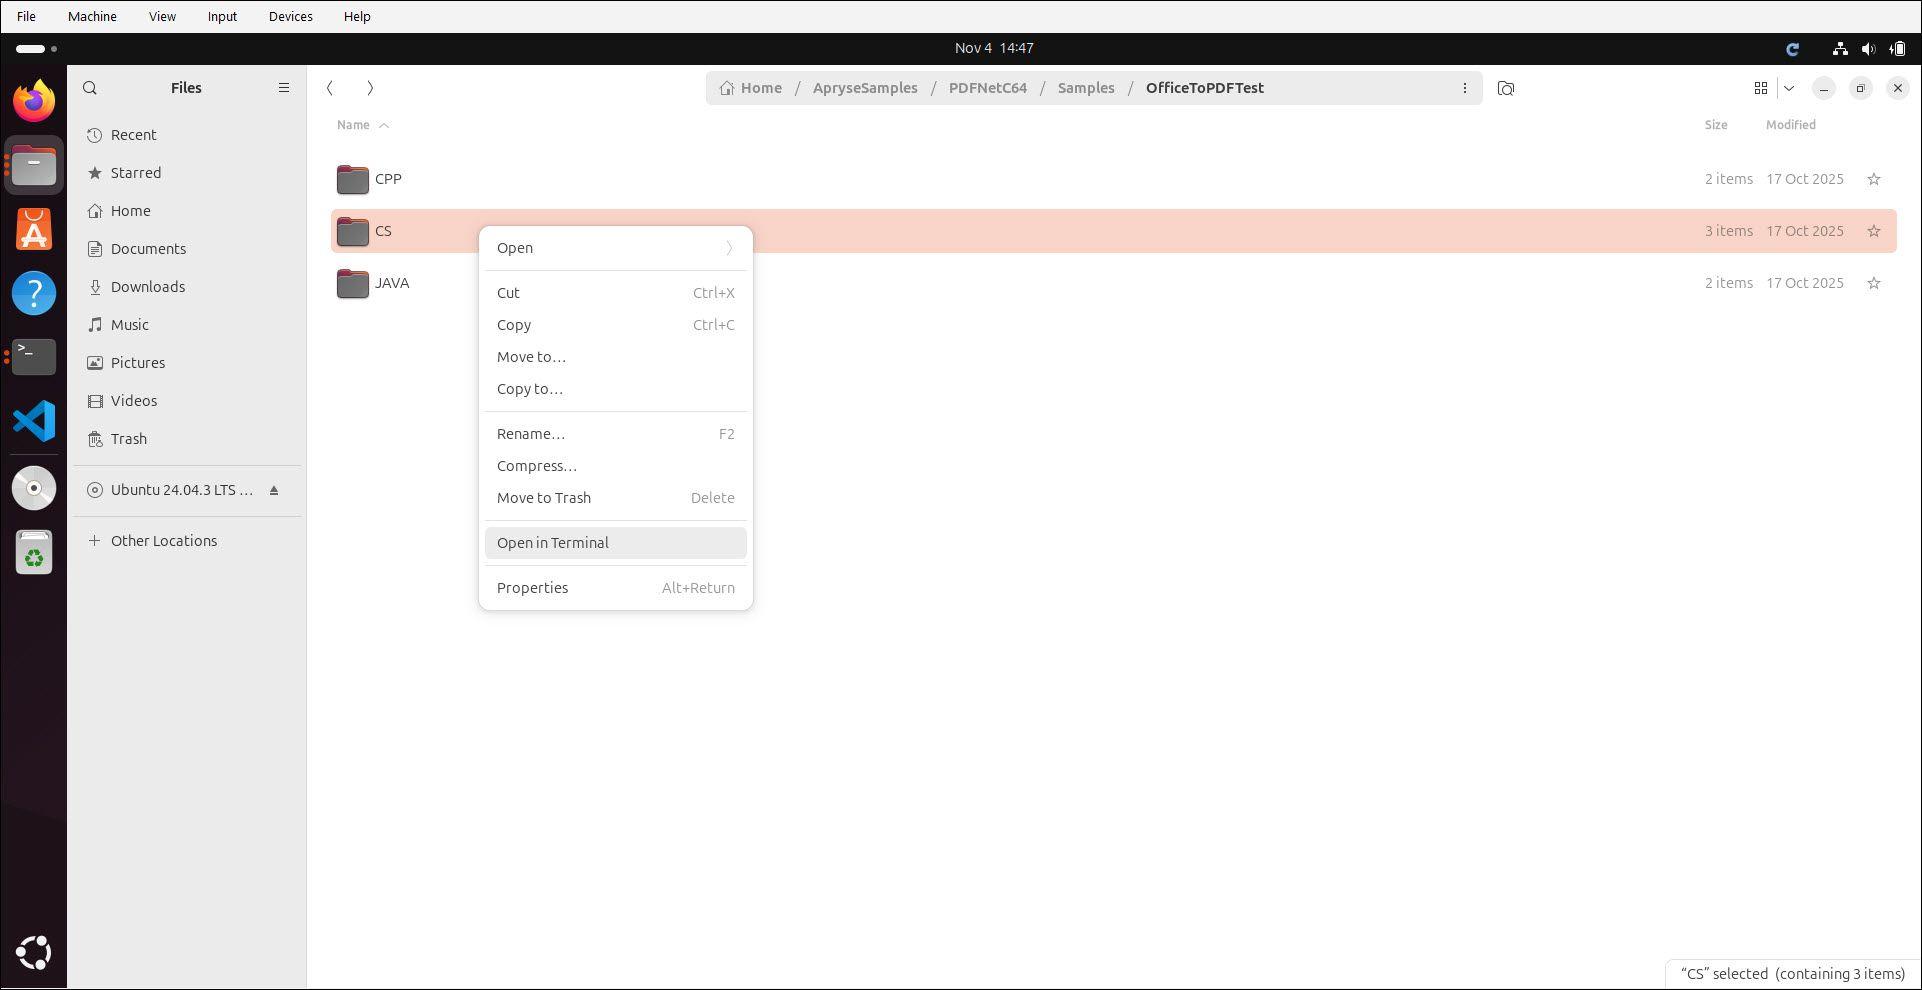
Run the sample.
8. The Linux terminal opens the OfficeToPDFTest sample. From the project directory, on the command line, enter the following, then press Enter.
sh
When you run the sh RunTest.sh command, the sample code loads an Office document, converts the Office document to PDF, saves the resulting PDF, and outputs status messages to the console. For more details, you can look at additional OfficeToPDFsample code and the Convert MS Office (Word, Excel, PowerPoint) to PDF overview.
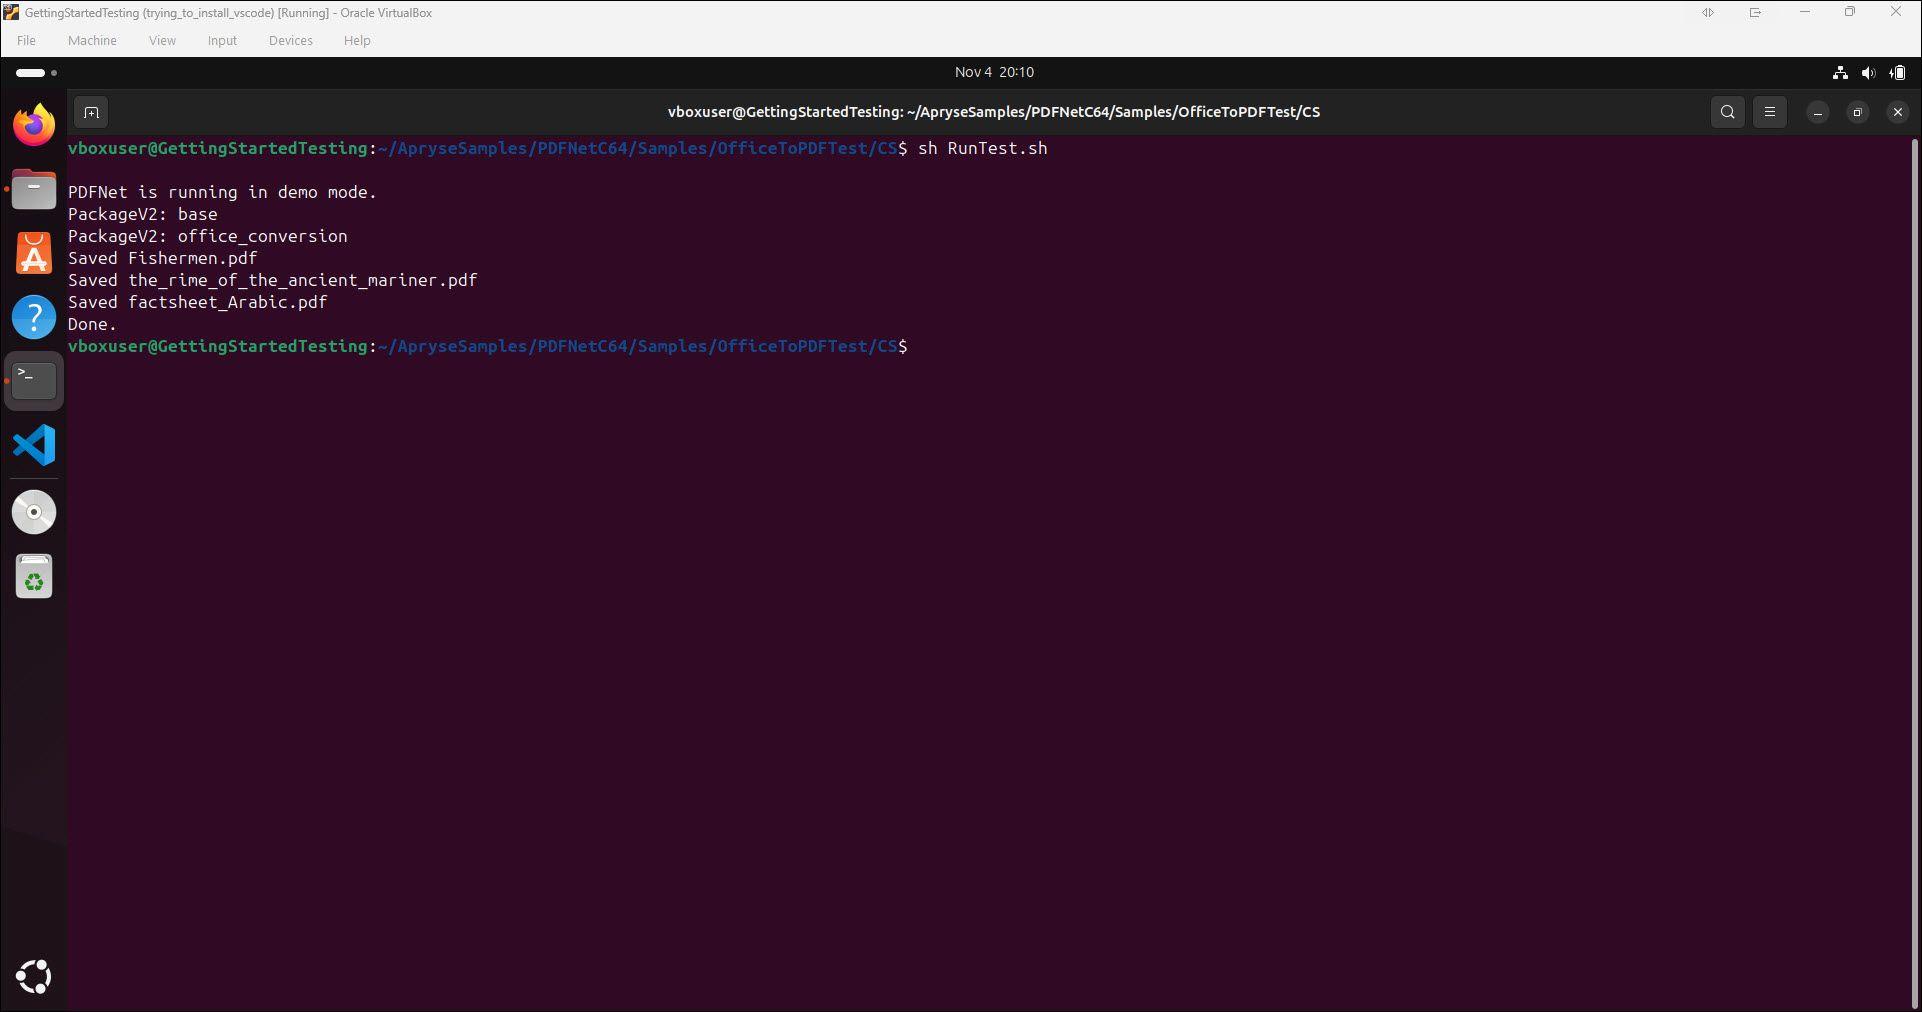
The sample code loads, converts, and saves the resulting PDFs.
Once the sample finishes running, you'll see the status Done in the terminal.
9. At the command prompt, type exit, then press Enter.
10. Go to your Linux file explorer and navigate to: /Home/ApryseSamples/PDFNetC64/Samples/TestFiles/Output. You will see three output PDF files (Fishermen.pdf, the_rime_of_the_ancient_mariner.pdf, and the factsheet_Arabic.pdf):

Three PDF files have been created by running the sample.
11. Open the PDF files to see the converted output. You have successfully run the OfficeToPDFTest conversion sample!
2. Create a new PDFNet .NET project
- In your Linux file explorer, navigate to the Home folder, and select New Folder.
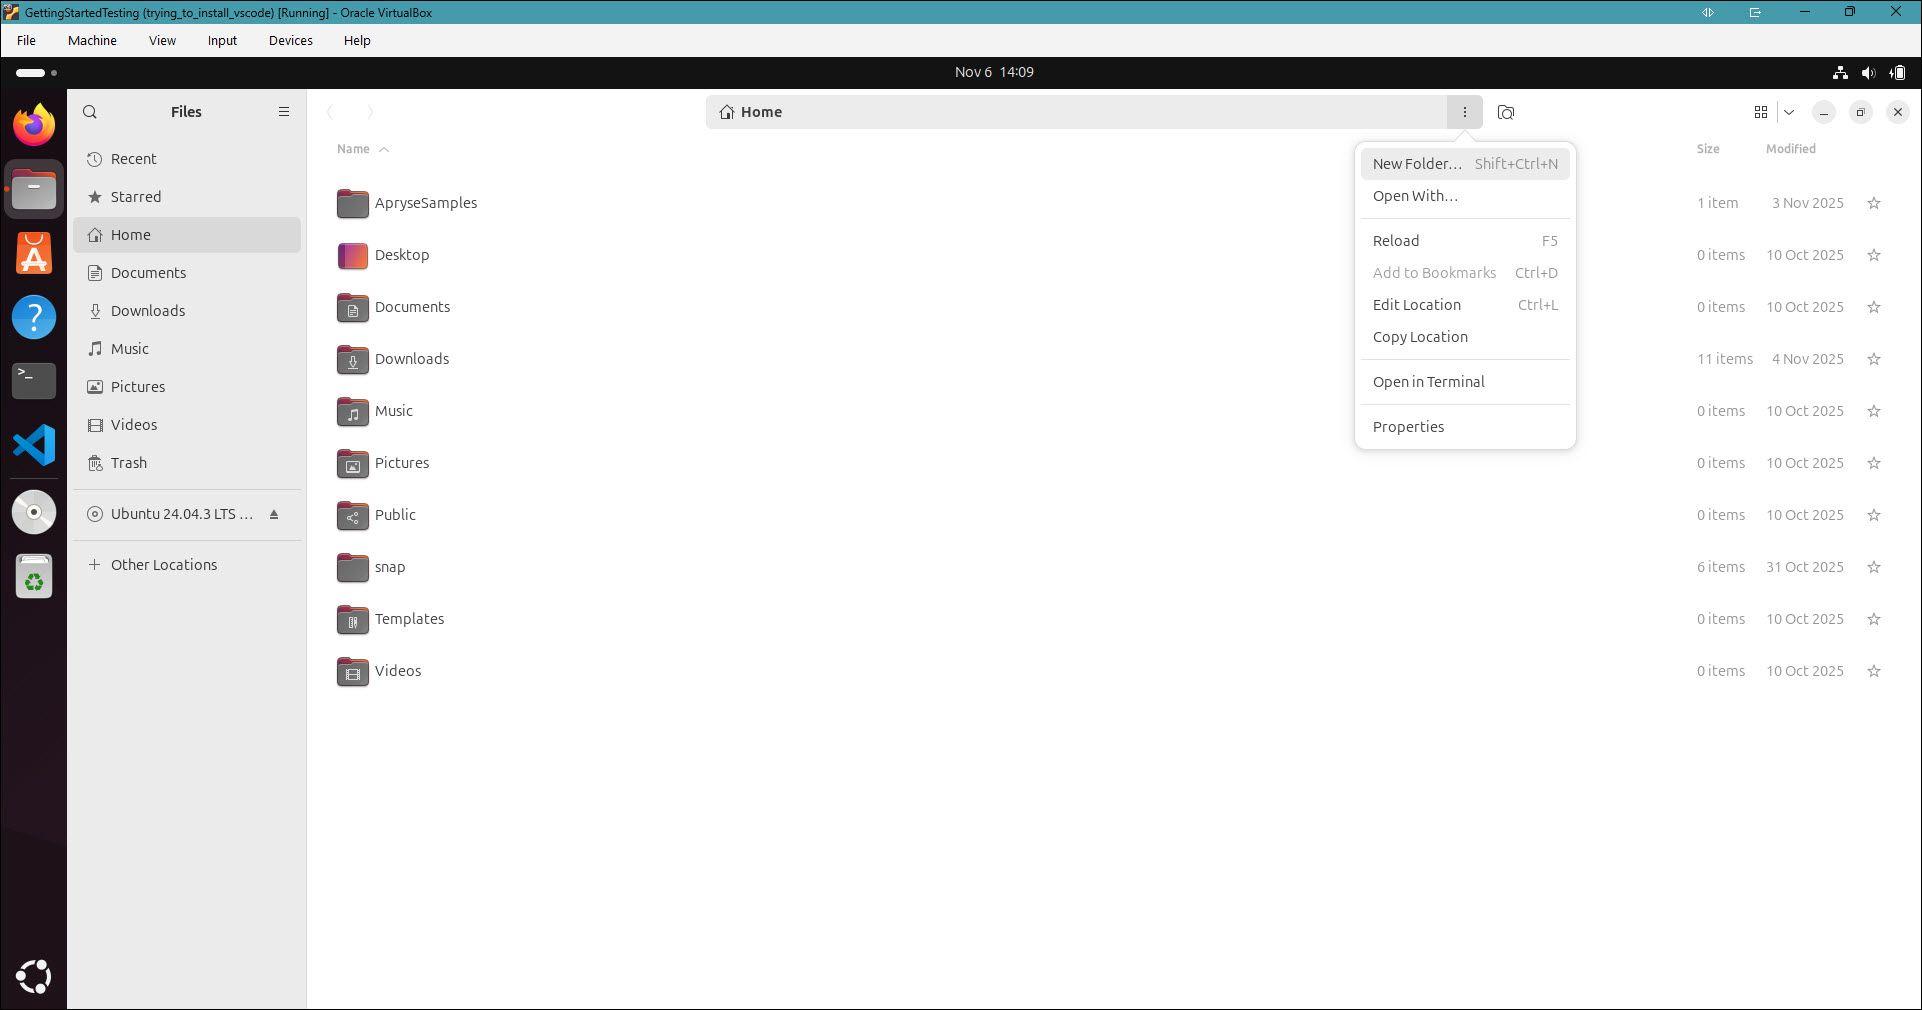
Create a folder for your new project.
2. Enter the folder name, NewApryseProject, then click Create.
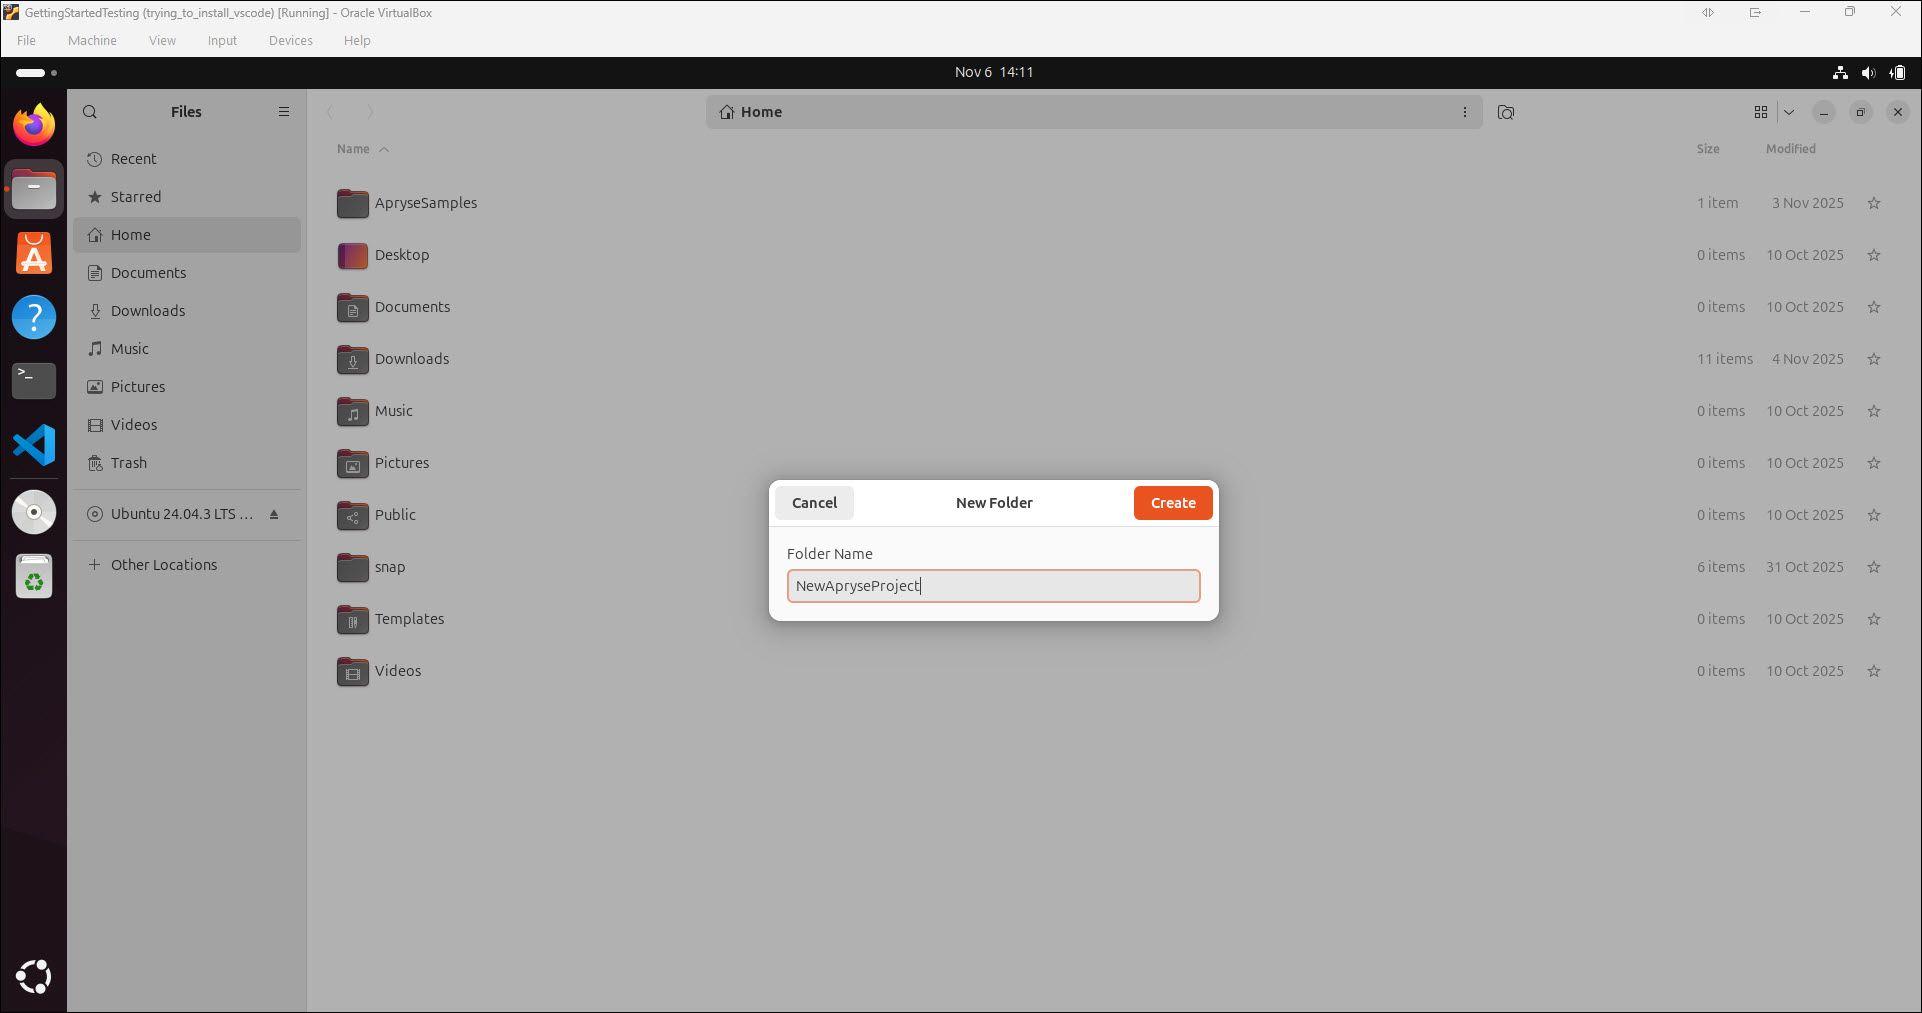
Enter the folder name for your new project.
3. Right-click on the NewApryseProject folder and select Open in Terminal.
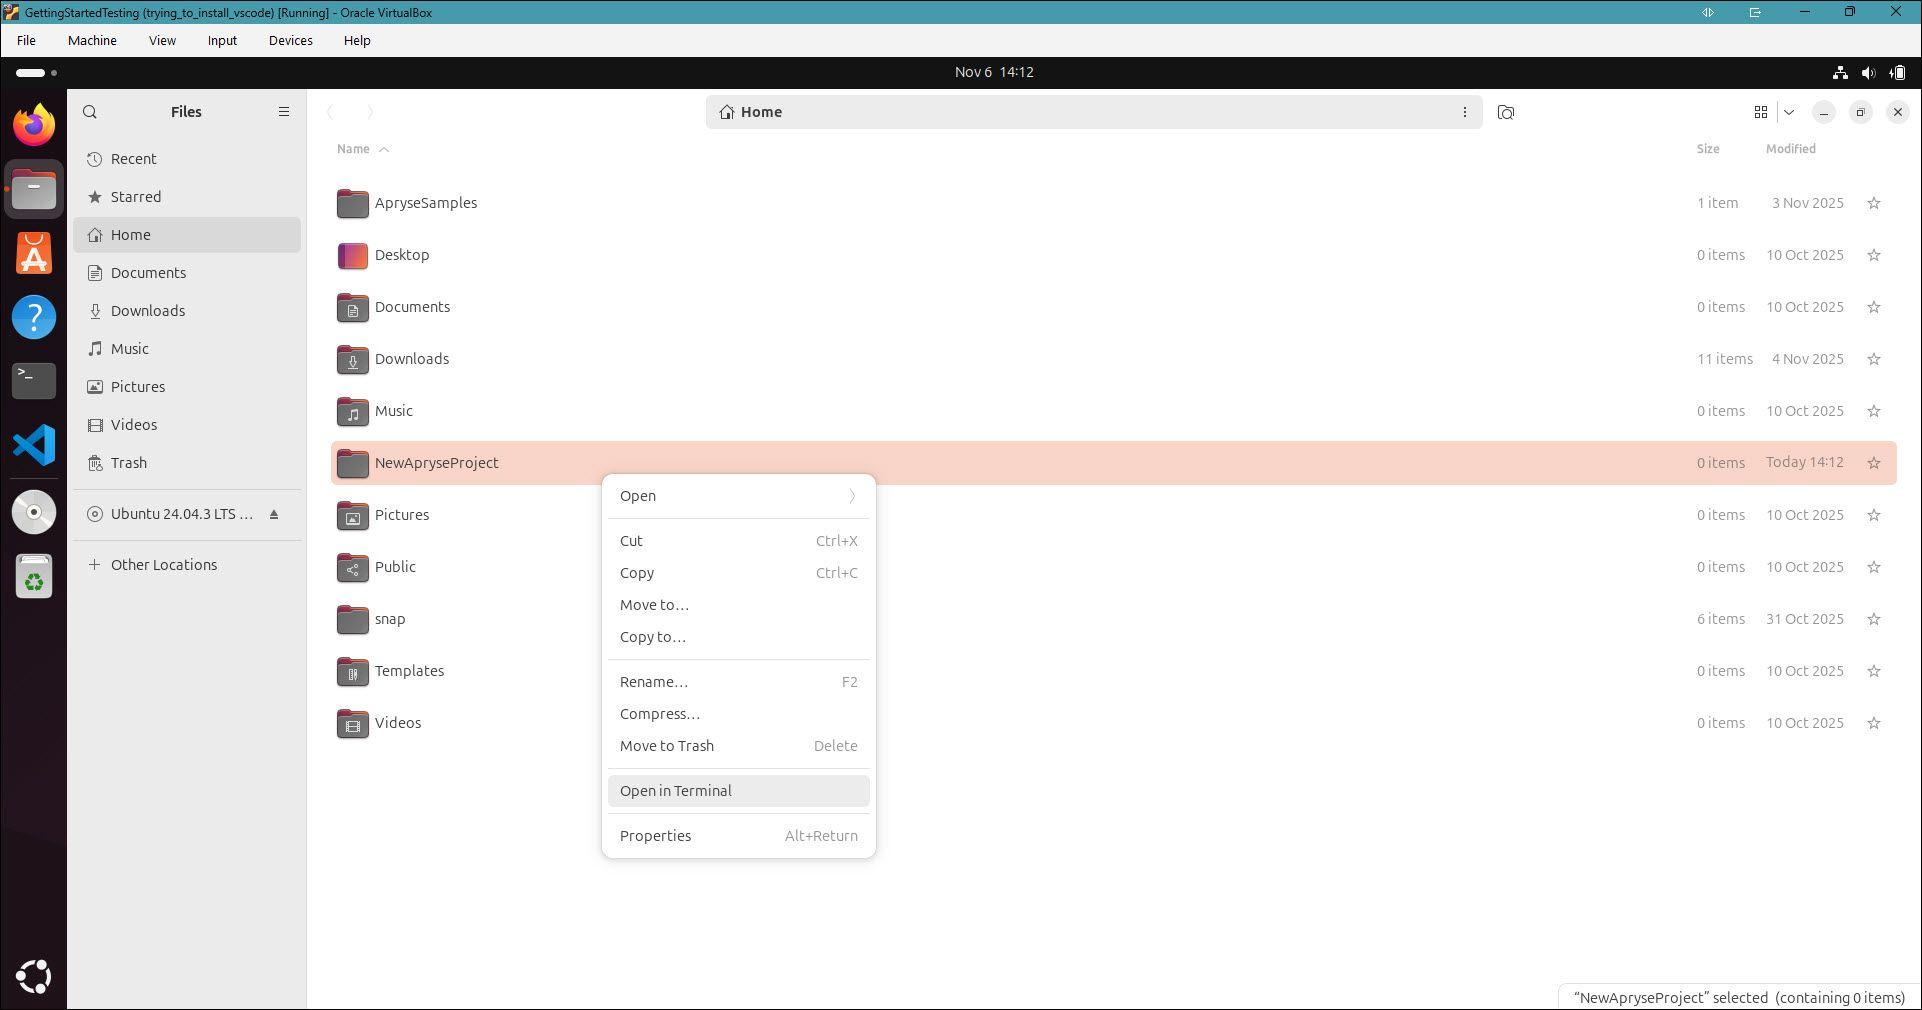
Select the new project and open in the terminal.
4. From the project directory, in the terminal, enter the following and press Enter:
sh
A template "Console App" is created for your new project.
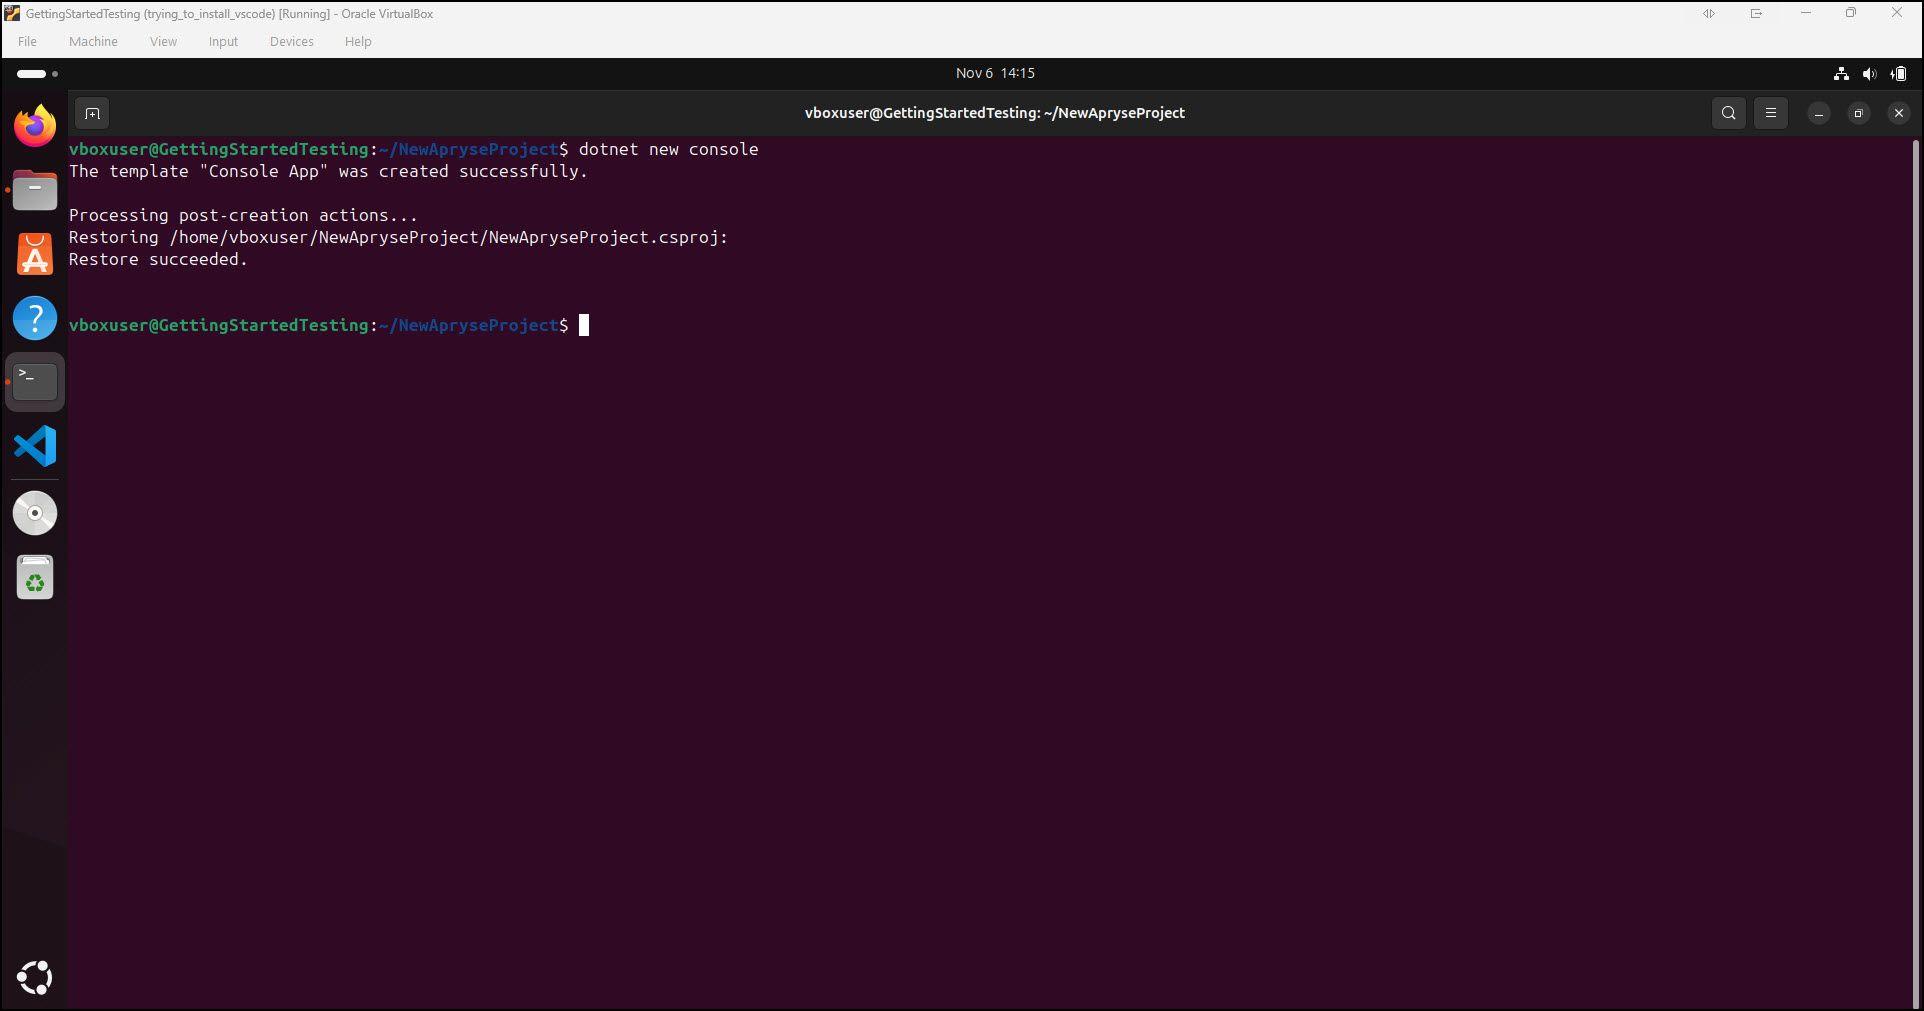
Create a new console app in the terminal.
5. In the terminal, from your project directory, enter the following and press Enter:
sh
You have successfully added the Apryse Server SDK to your .NET project!
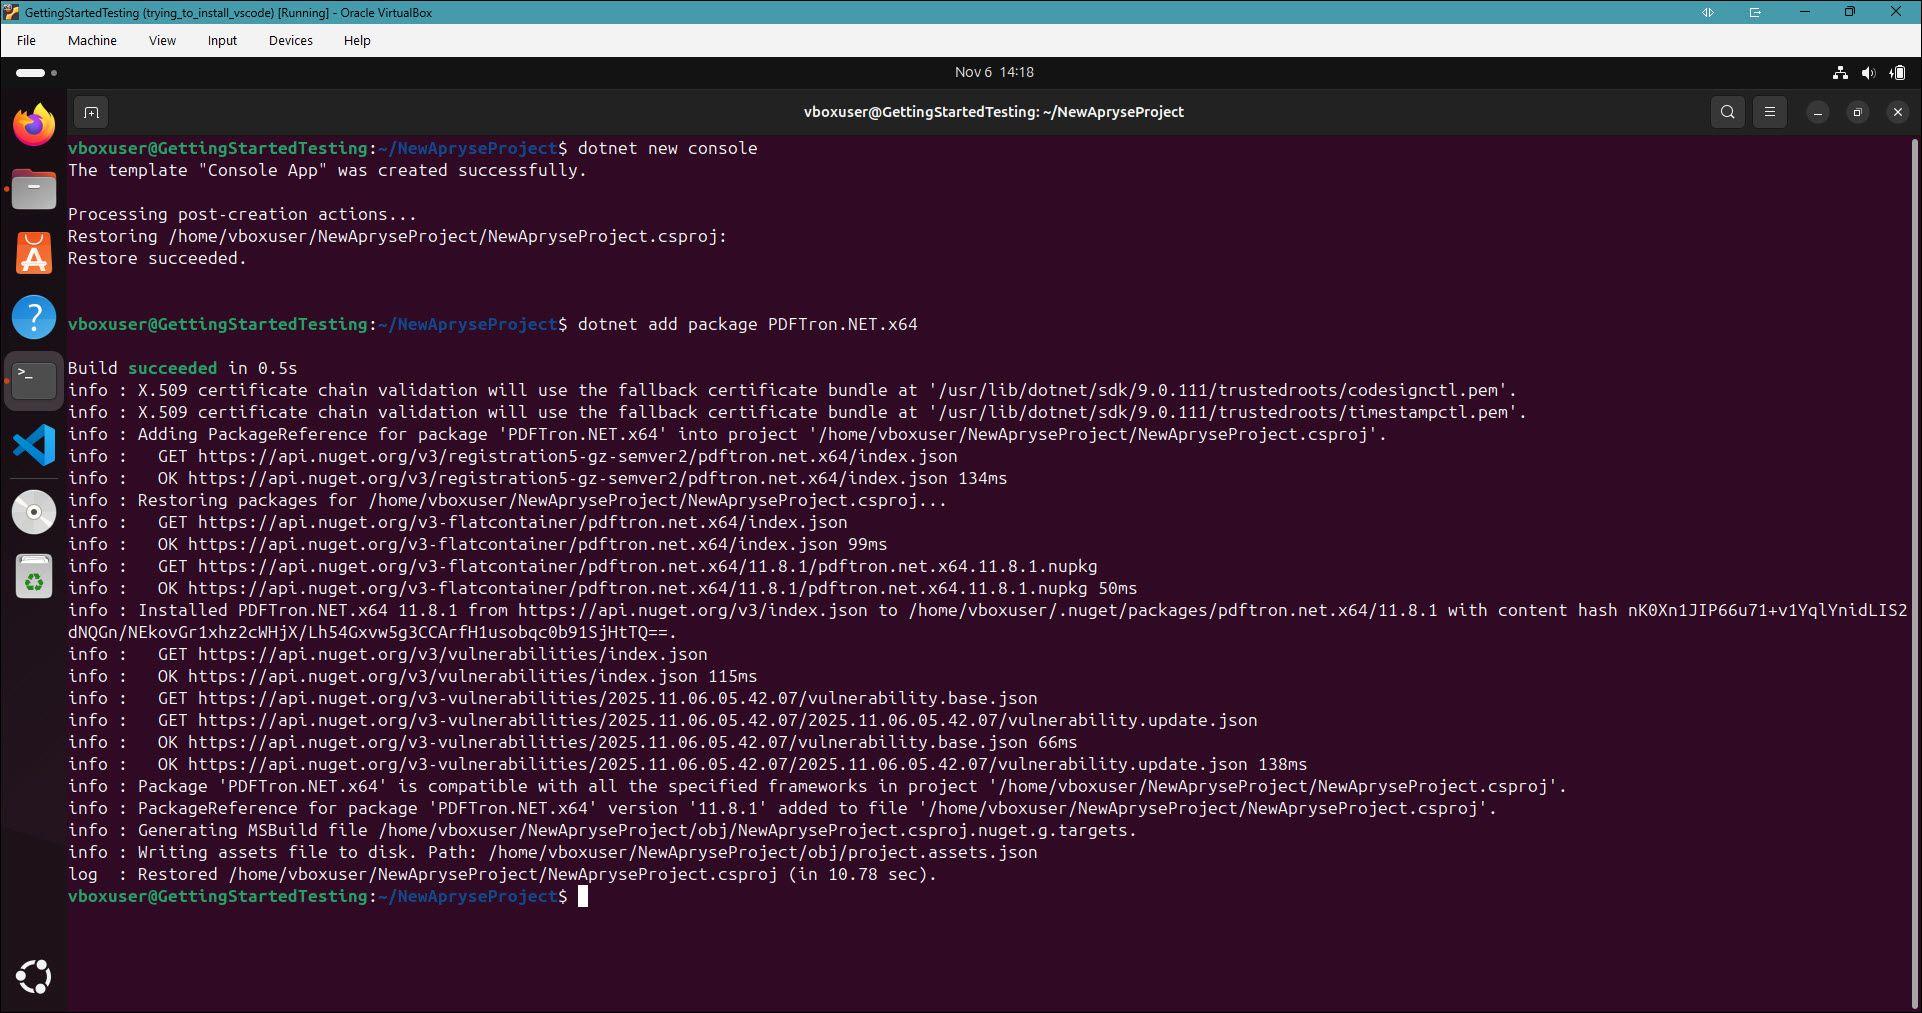
Add the Server package to your project.
6. In the terminal, type exit and press Enter.
3. Initialize and integrate the Apryse Server SDK into your application
- Open Visual Studio Code (or your preferred application) and from the File menu, select Open Folder.

Open Visual Studio Code.
2. Navigate to the Home folder, select the NewApryseProject folder and click Open.

Open your new project in Visual Studio Code.
3. The NewApryseProject opens in Visual Studio Code. Navigate to and open the Program.cs file.
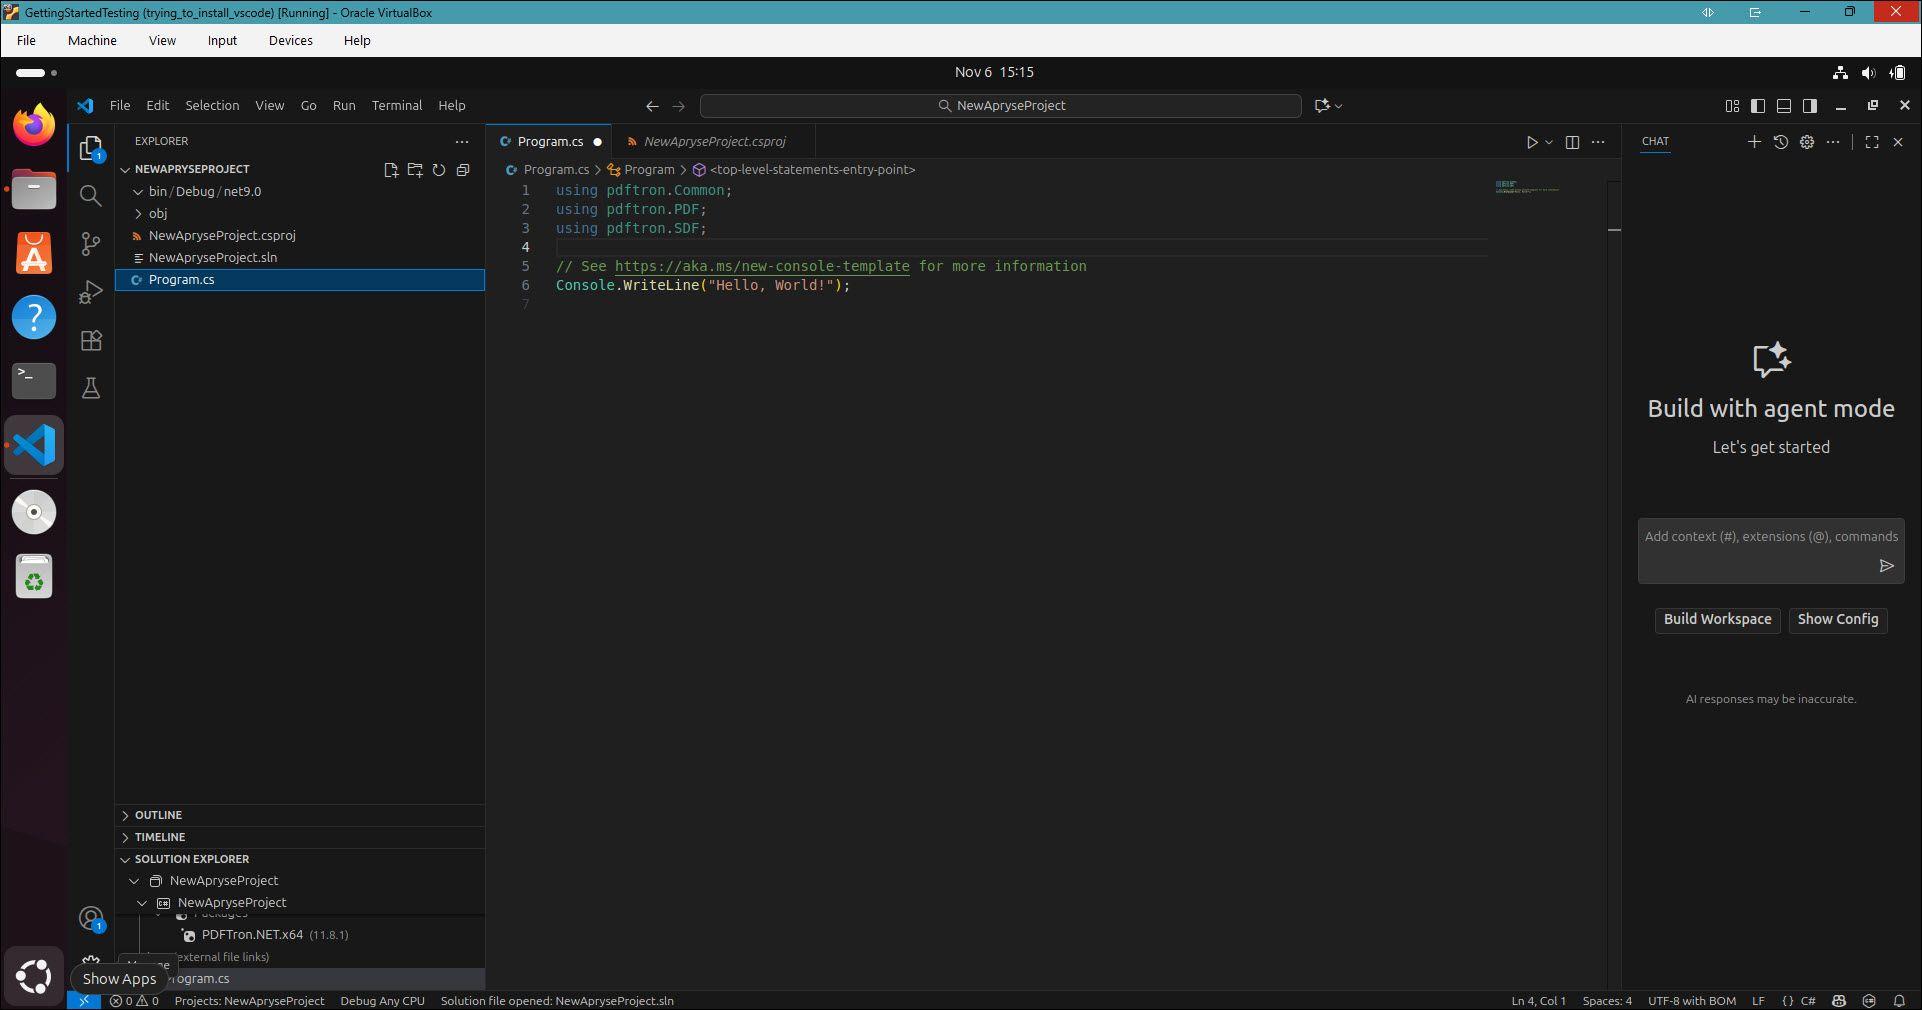
Navigate to and open the Program.cs file.
4. Copy the following C# code and paste in into Line 1 of the Program.cs file (replace the existing content in Line 1 of the file).
C#
5. In the Linux file explorer, navigate to the Home folder. Select the NewApryseProject folder, right-click and select Open in Terminal.
6. From the project directory, on the command line, enter the following, then press Enter.
sh
The code executes and you will see the message, “Hello World!”
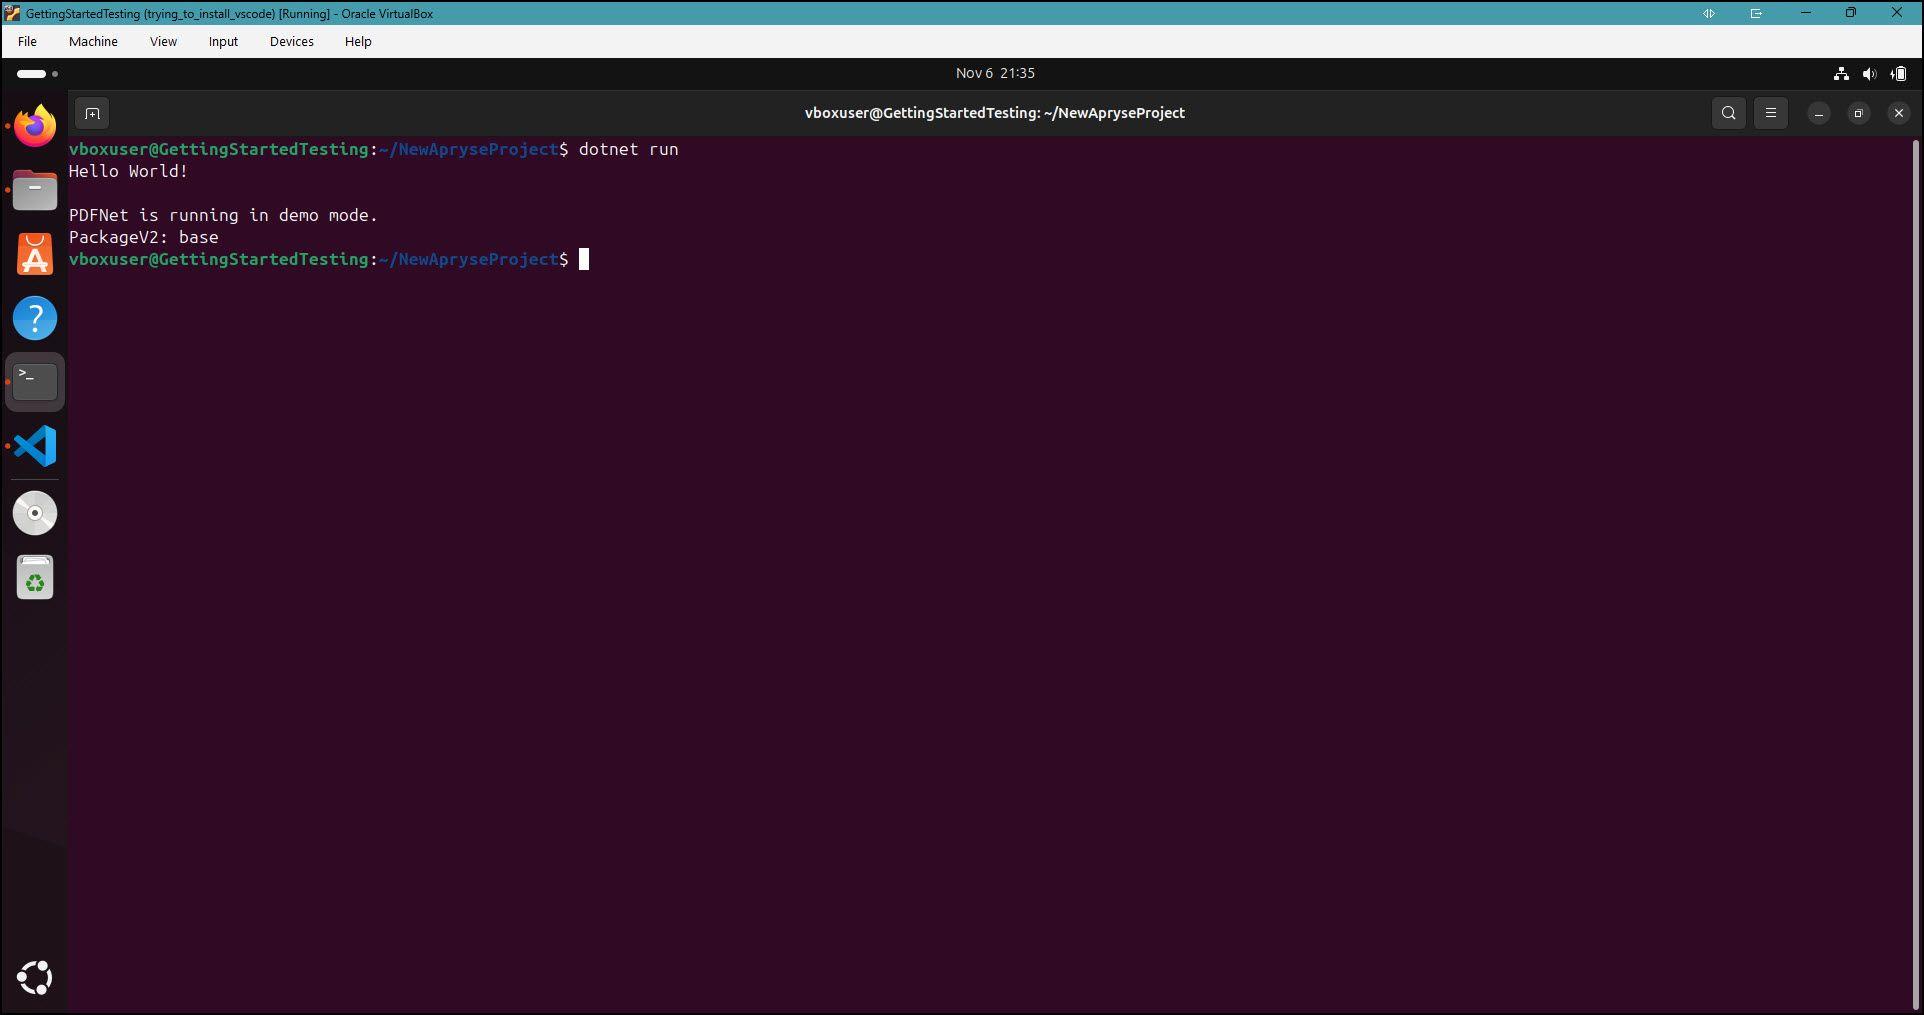
The code runs and you will see the "Hello World!" message.
Keep in mind the following about the code above:
- The system logs a startup message.
- The program imports the .NET SDK.
- The script defines an async main function that builds the PDF.
- The PDFNet engine runs with cleanup and license initialization.
- The program logs any errors.
- The script releases PDFNet resources and shuts down the engine.
7. Exit out of the command line and navigate to the Home > NewApryseProject folder.
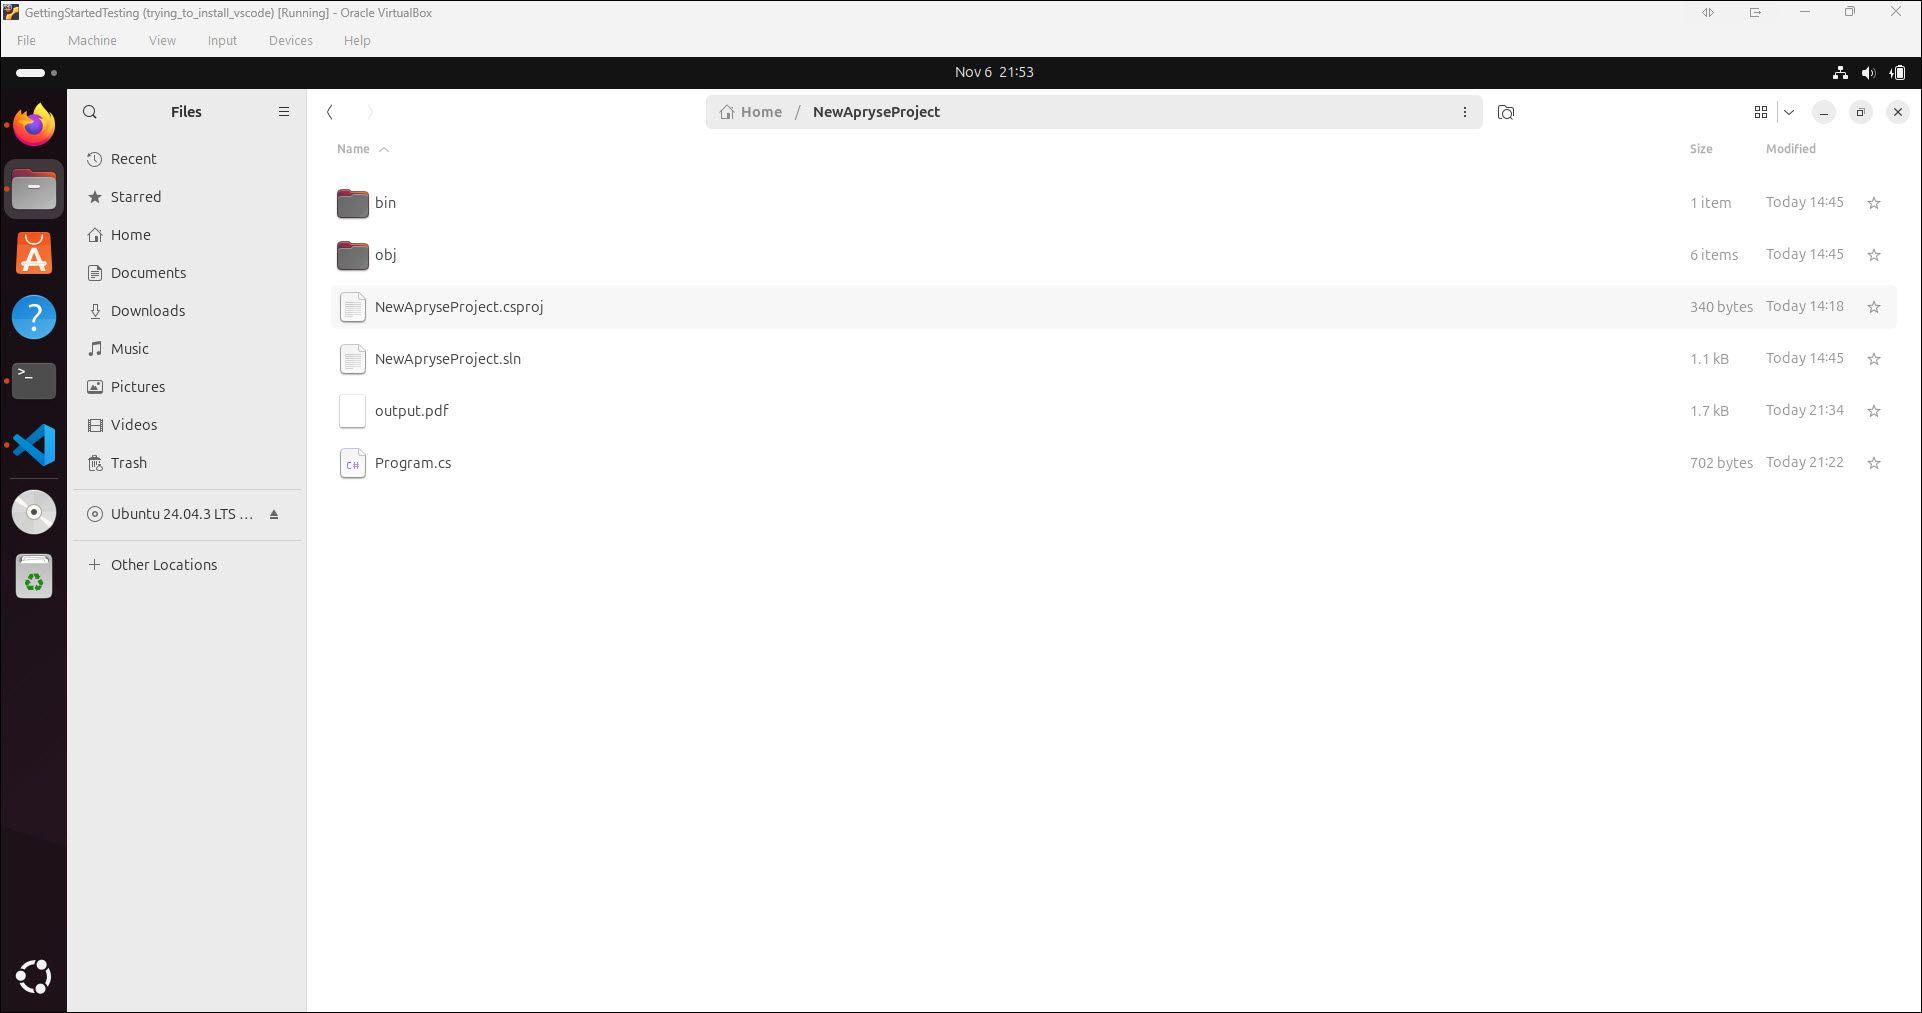
You will see the output.pdf file that was created.
8. Open the output.pdf which you created by integrating the Apryse Server SDK!
9. Now that you have successfully run an OfficeToPDFTest sample and integrated the Apryse Server SDK .NET PDF Library into your application, you can try out 50+ samples depending on your needs:
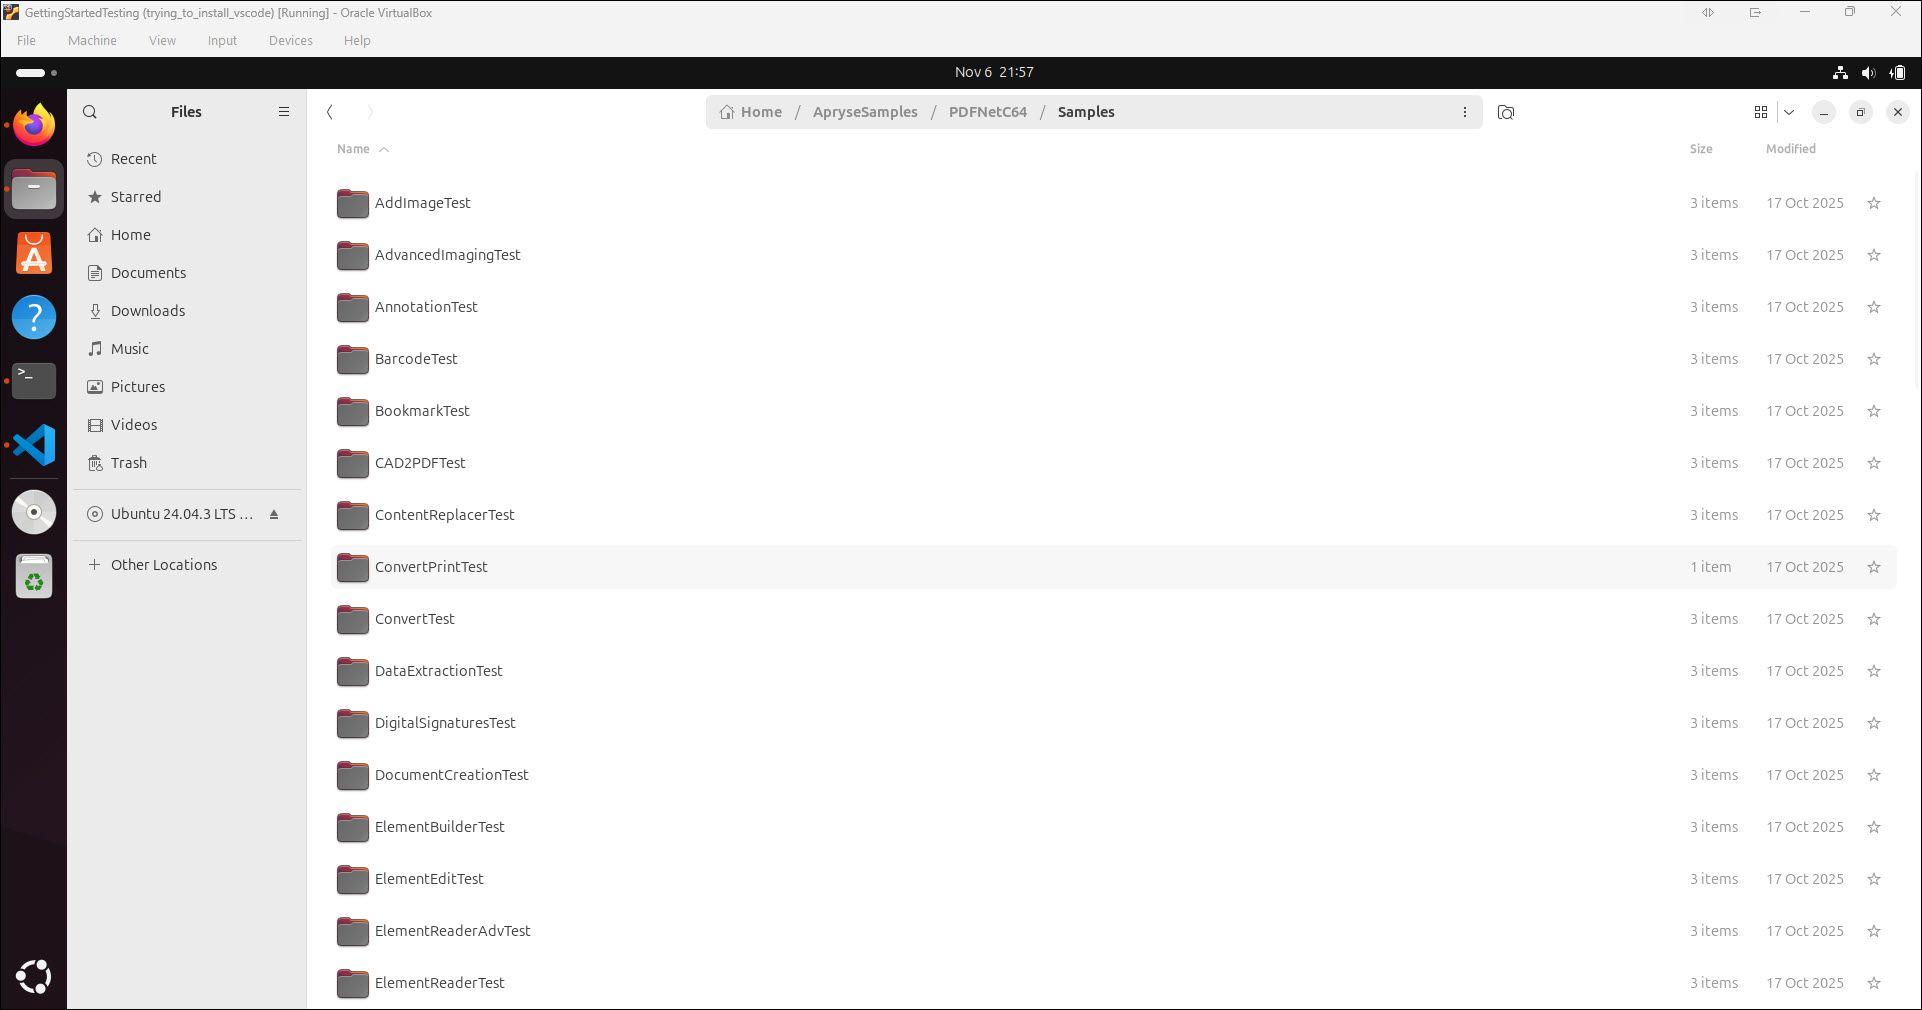
You can try over fifty samples for the Apryse Server SDK.
10. To try additional samples, go to section 1. Run a sample > step 4 above and choose another sample to run.
macOS .NET PDF library integration
You'll get started with our samples to see the output you can create when you integrate the Apryse Server SDK into your application. You'll also create a project and integrate the Server SDK into your application, using the macOS platform.
Prerequisites
Before you start:
- Install Visual Studio Code (or your preferred application) to write, edit, and debug source code.
- Install .NET on macOS ARM64 to build applications for desktop, web, mobile, cloud-based services, and games.
- Download Apryse’s .NET PDF Library for macOS .zip file: Apryse Server SDK ARM64.
- Get your Apryse trial key.
License Key
Apryse collects some data regarding your usage of the SDK for product improvement.
If you wish to continue without data collection, contact us and we will email you a no-tracking trial key for you to get started.
Run Apryse SDK in production.
A commercial license key is required for use in a production environment. Contact sales by filling out our licensing form if you want to purchase a commercial license key.
Keep your commercial license key confidential.
License keys are uniquely generated and strictly confidential. Don't publish or store them in any public location, including public GitHub repositories.
1. Run a PDFNet sample project
In this section, you can download and run the OfficeToPDFTest PDFNet sample module, which demonstrates the SDK's document-conversion capabilities. Upon successful completion, you can convert a DOCX document to a PDF file while leveraging the MS Office-to-PDF conversion API. You can use this module as a reference implementation when integrating similar document-conversion functionality into your own applications. By running the sample, you can quickly:
- Verify the capabilities.
- Understand how to interact with the MS Office to Conversion PDF API.
- Use it as a reference for integrating similar functionality into your own application.
- Download the PDFNetCMac.zip file.
- Navigate to the Downloads folder, right-click on
PDFNetCMac.zip, and select Open With > Archive Utility.
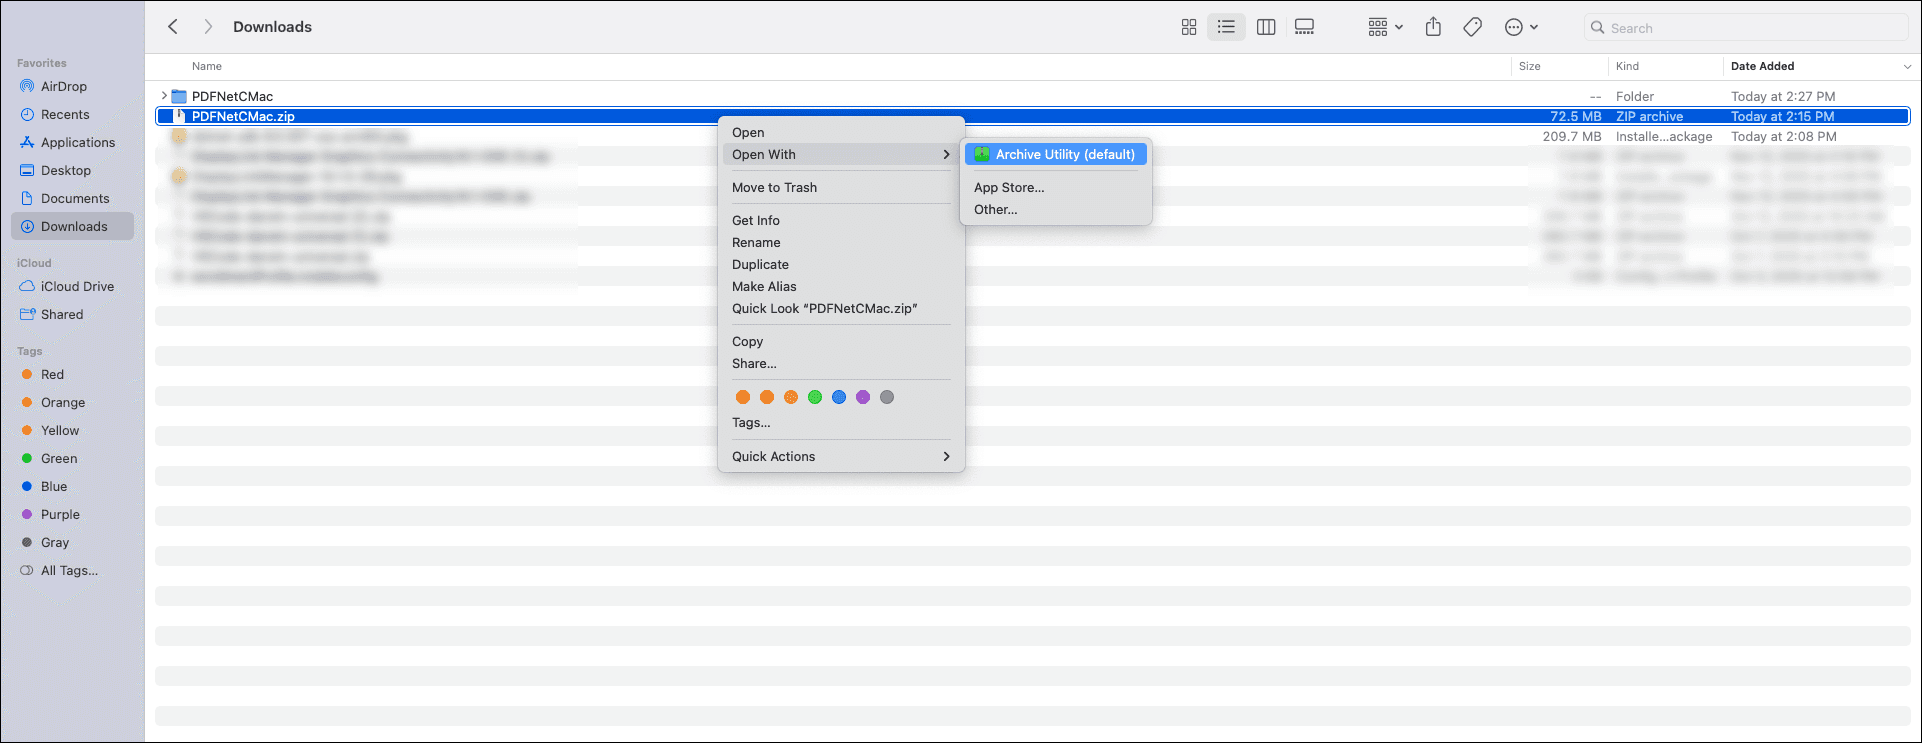
Navigate to the Downloads folder and right-click on PDFNetCMac.zip.
3. Select Documents, New Folder, enter ApryseSamples, and press Enter to create a new folder to run the samples. The ApryseSamples folder is created. Note that you can create a folder at a different location if you prefer, but for this guide’s instructions, we used the location and name above.
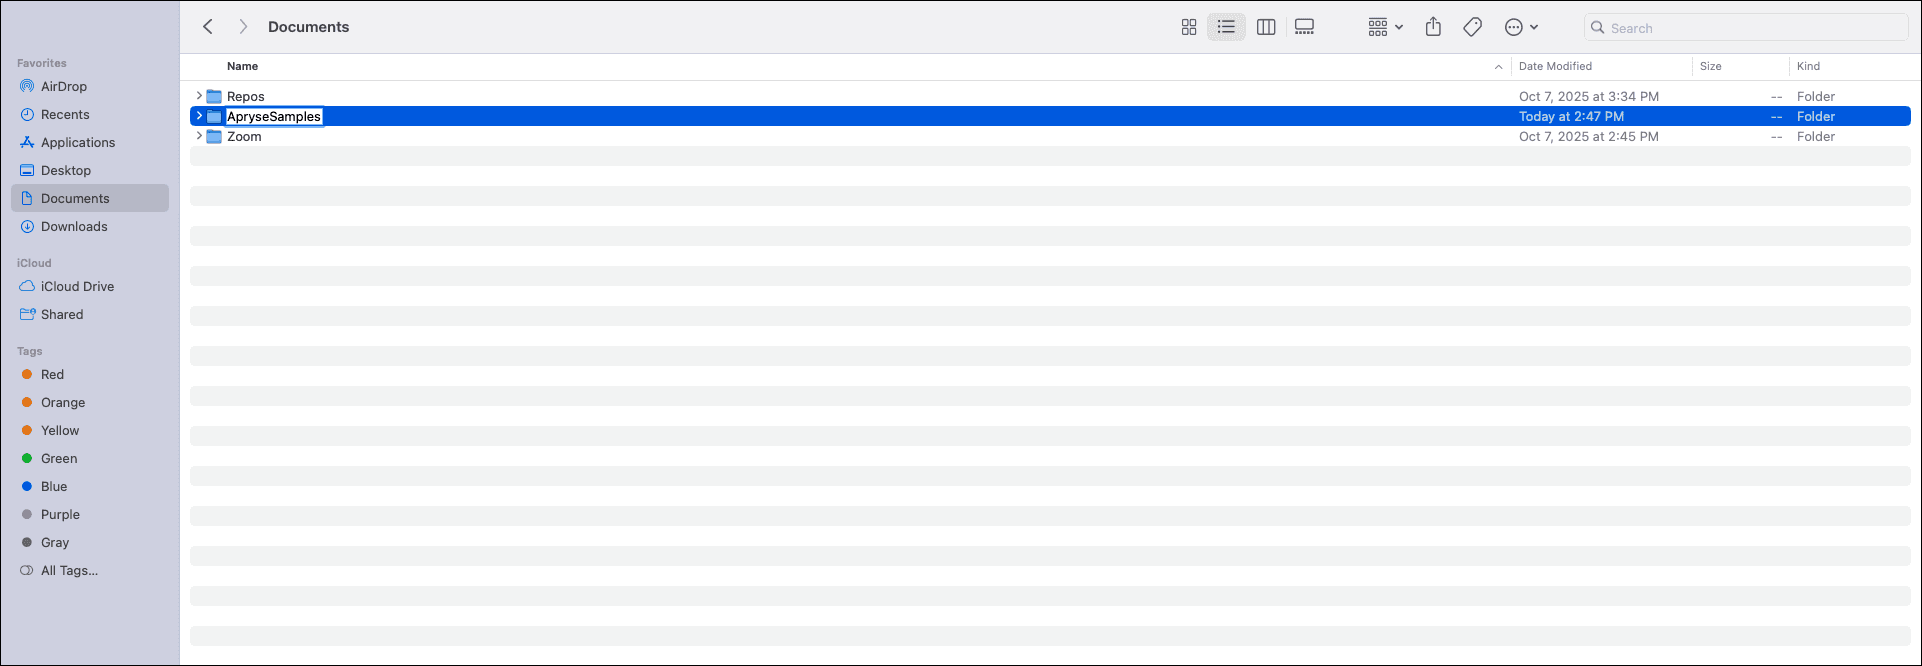
Create the ApryseSamples folder.
4. Go to the Downloads folder, select the PDFNetCMac folder and move it into the new ApryseSamples folder you just created above.
5. Next, to add the license key, navigate to the /Documents/ApryseSamples/PDFNetCMac/Samples/LicenseKey/CS/LicenseKey.cs file and double-click to open it. The license key file should open in Visual Studio Code.
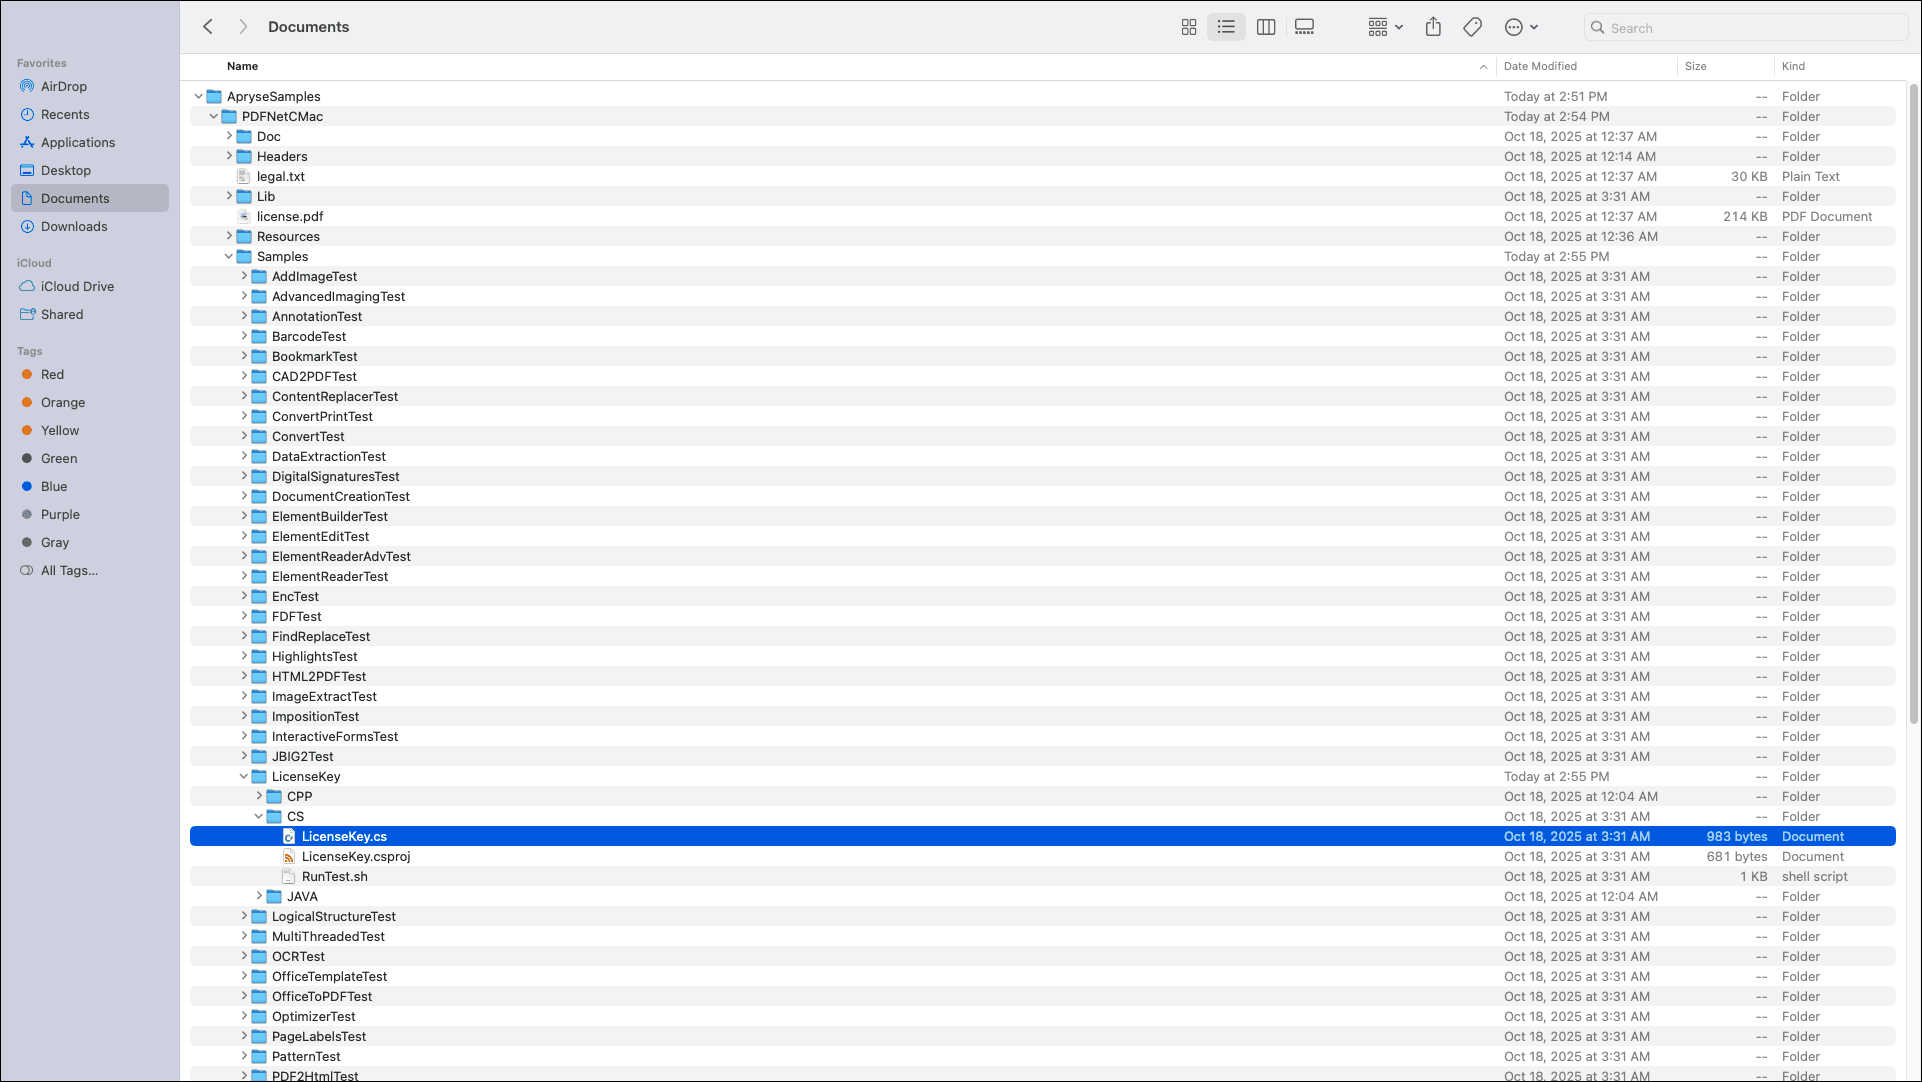
Navigate to the LicenseKey.cs file and double-click to open.
6. Scroll down to the line containing private static string key = “YOUR_PDFTRON_LICENSE_KEY”; and replace the text in quotes with the copy of your trial license key. Do not change any other information in this file. Save your changes and close the file.
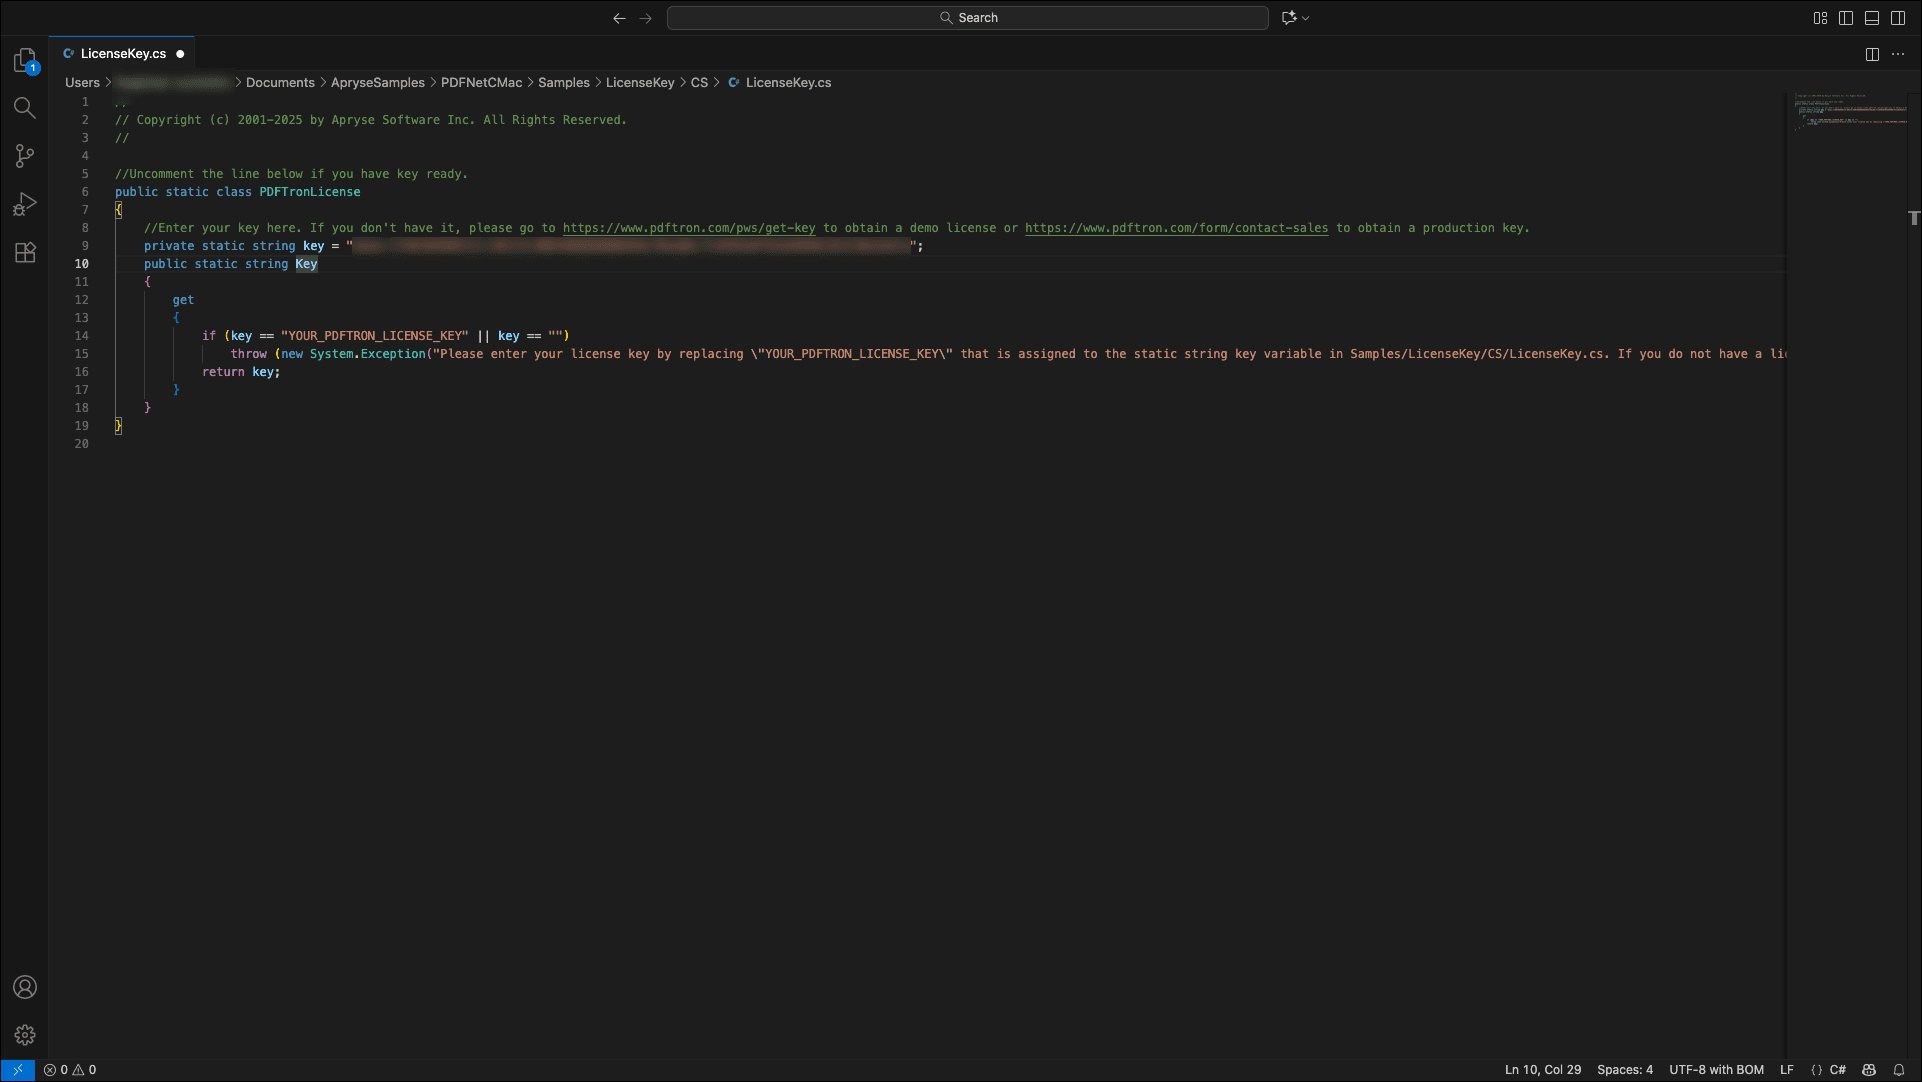
Add your trial license key and save.
7. Navigate to: /Documents/ApryseSamples/PDFNetCMac/Samples/OfficeToPDFTest/CS.
8. Right-click on the CS folder, and select New Terminal at Folder. The Mac terminal opens the OfficeToPDFTest sample.
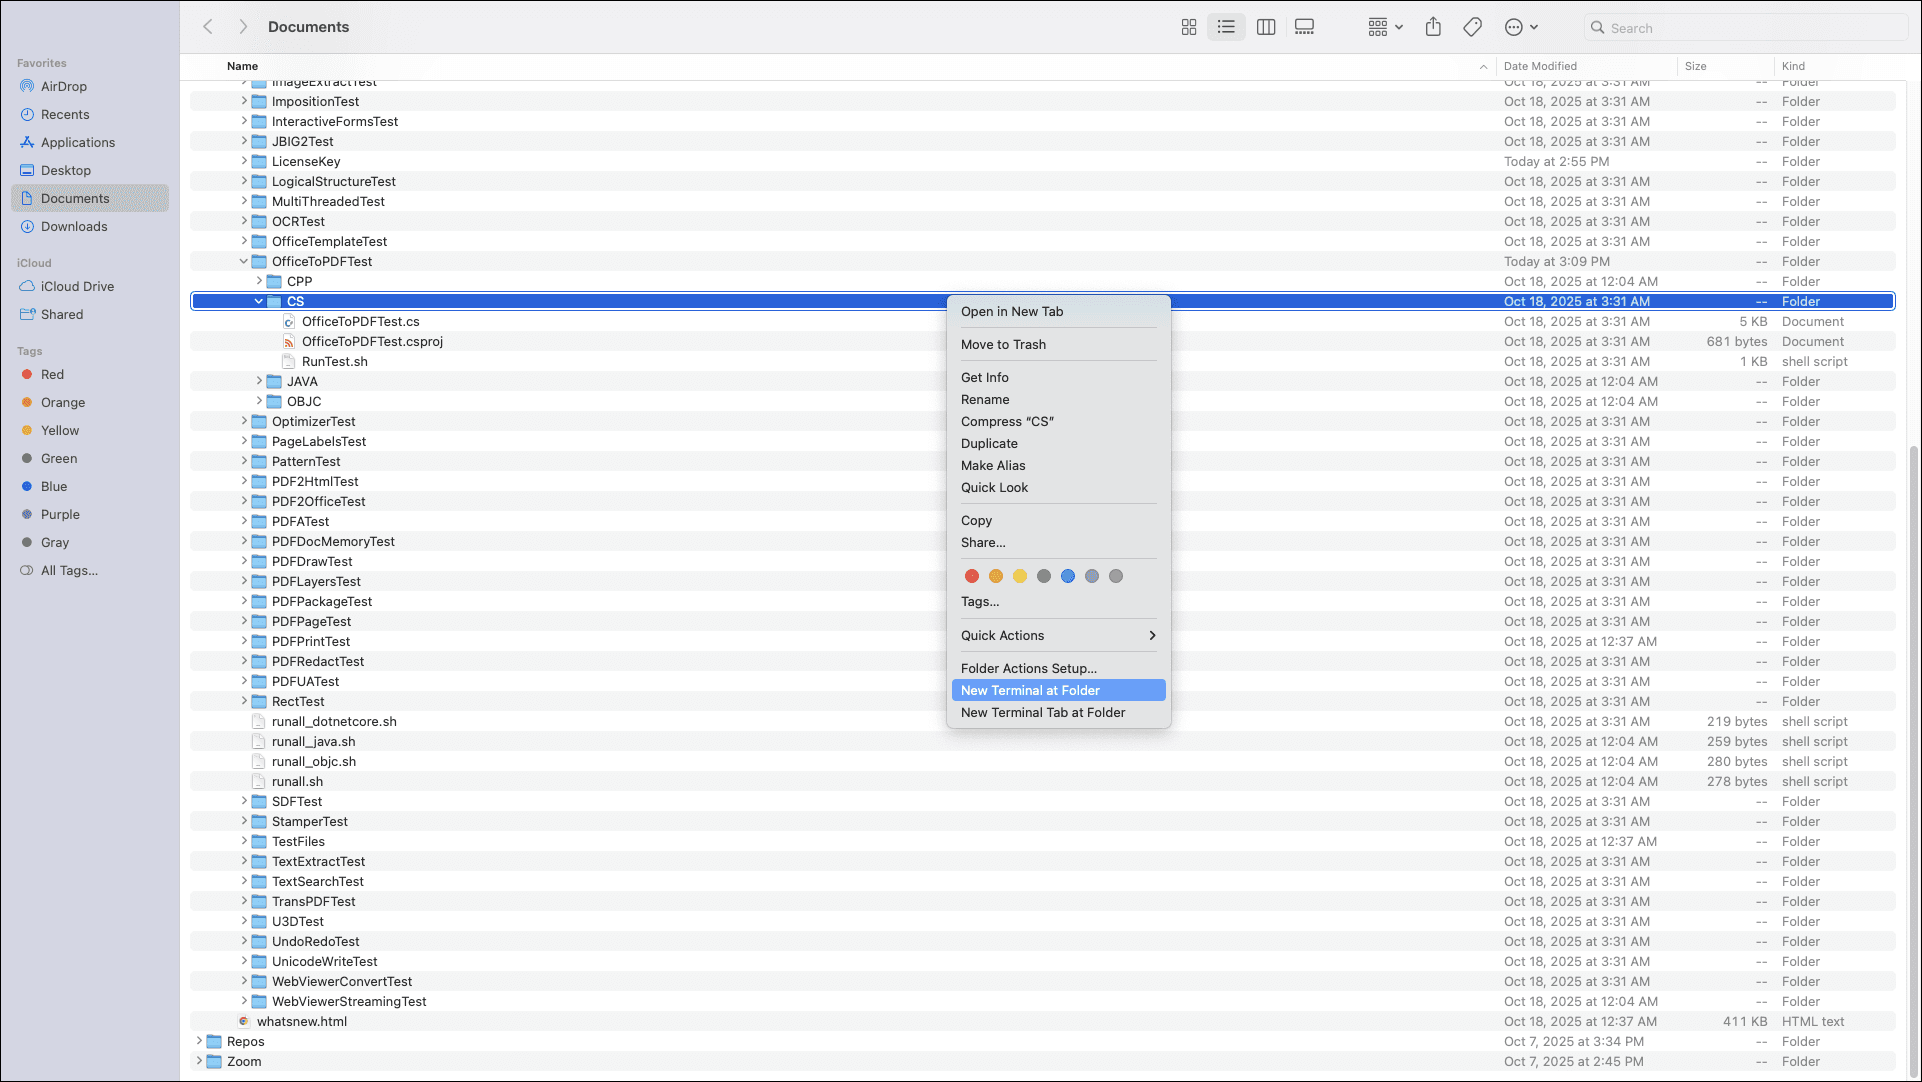
Open the OfficeToPDFTest sample in the terminal.
If you get an error message about not being able to open sample files, go to Privacy & Settings > Privacy, and select Allow to Open. For more information, refer to the article on opening an app on a Mac.
9. From the project directory, in the terminal, enter the following, then press Enter:
Bash
When you run the sh RunTest.sh command, the sample code loads an Office document, converts the Office document to PDF, saves the resulting PDF, and outputs status messages to the console. For more details, you can review additional OfficeToPDF sample code and the Convert MS Office (Word, Excel, PowerPoint) to PDF overview.
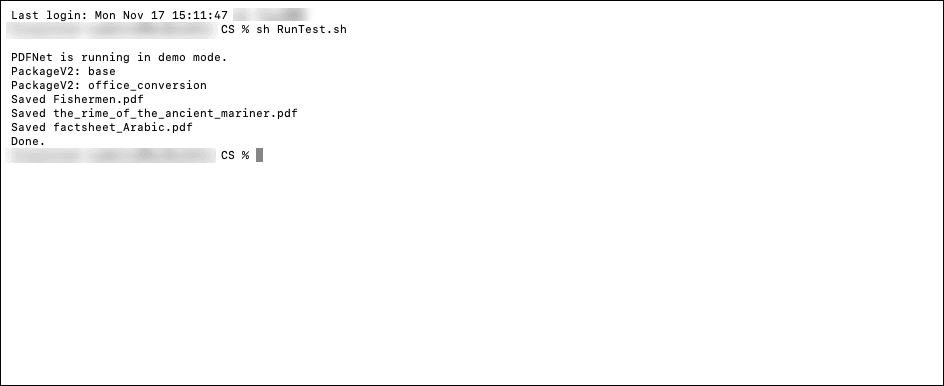
From the project directory, on the command line, run the sh RunTest.sh command.
Once the sample has finished running, you will see Done in the terminal.
10. At the command prompt, type exit, press Enter, and close the terminal window.
11. Navigate to: /Documents/ApryseSamples/PDFNetCMac/Samples/TestFiles/Output. You will see three output PDF files (Fishermen.pdf, the_rime_of_the_ancient_mariner.pdf, and the factsheet_Arabic.pdf):
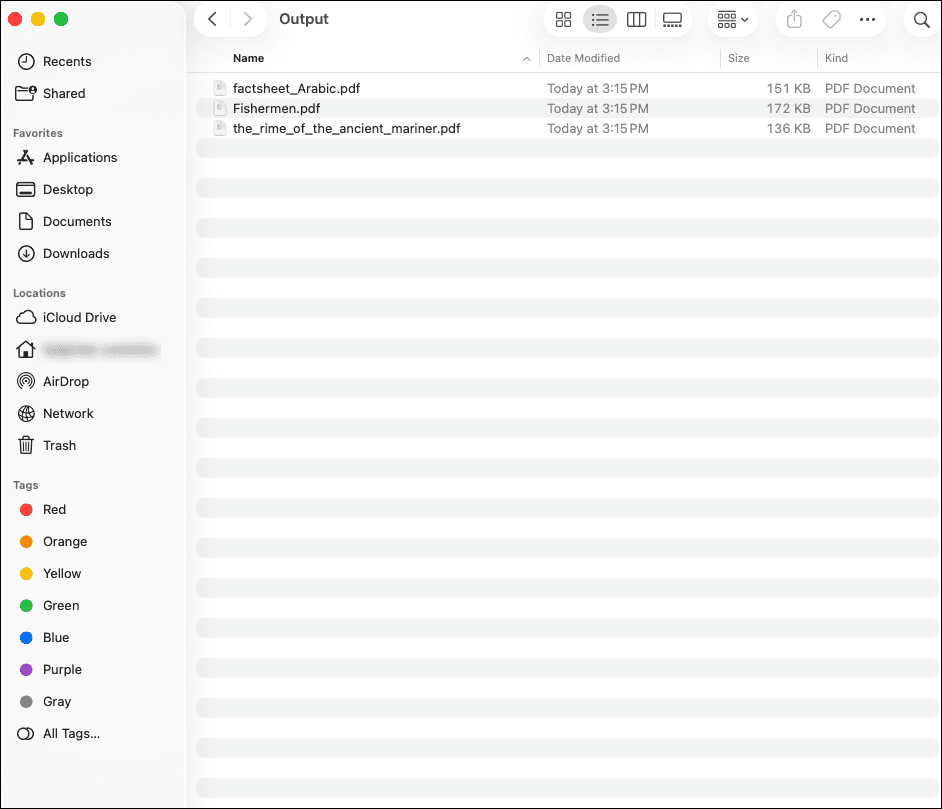
Navigate to the three Sample test files you just created.
12. Open the PDF files to see the converted output. You have successfully run the OfficeToPDFTest conversion sample!
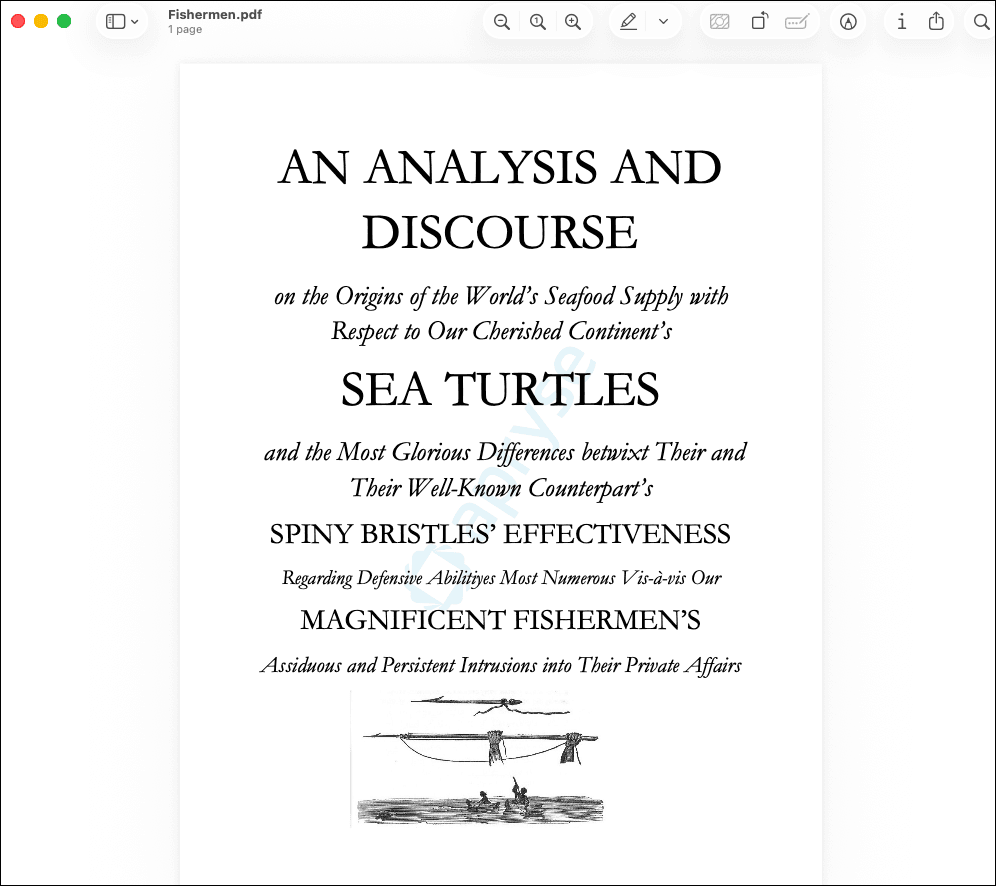
Open the PDF files to see the converted output.
2. Create a new PDFNet .NET project
- Navigate to the Documents folder and create a New Folder.
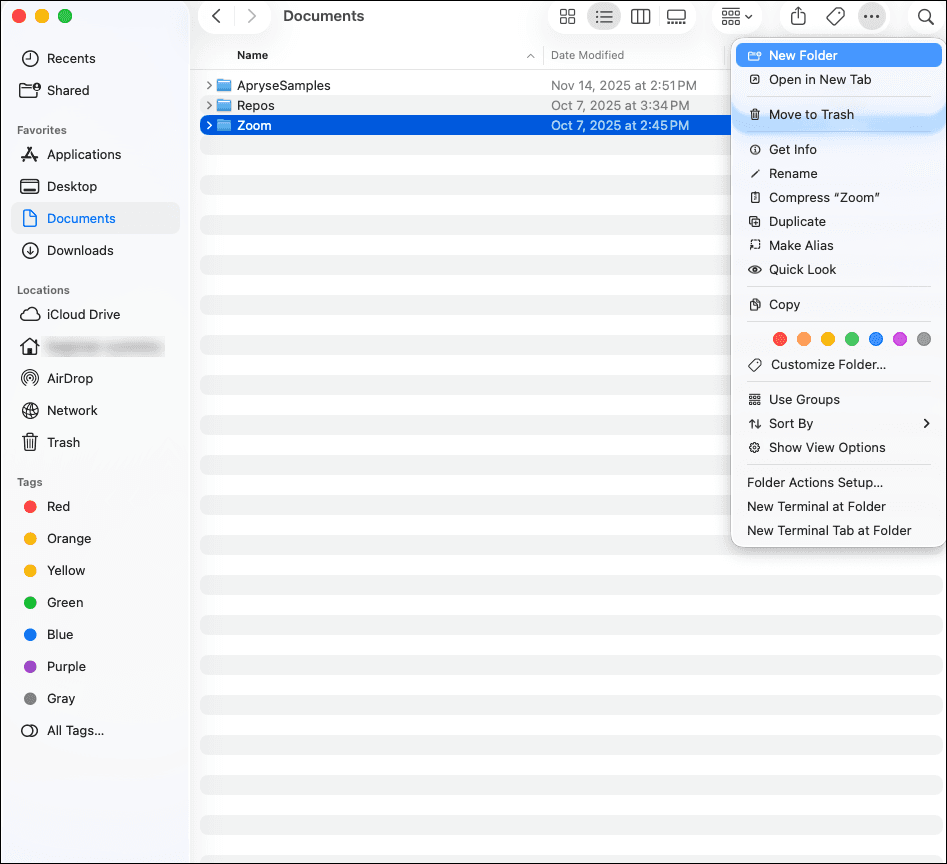
Create a New Folder for your own new project.
2. Enter the folder name, NewApryseProject.
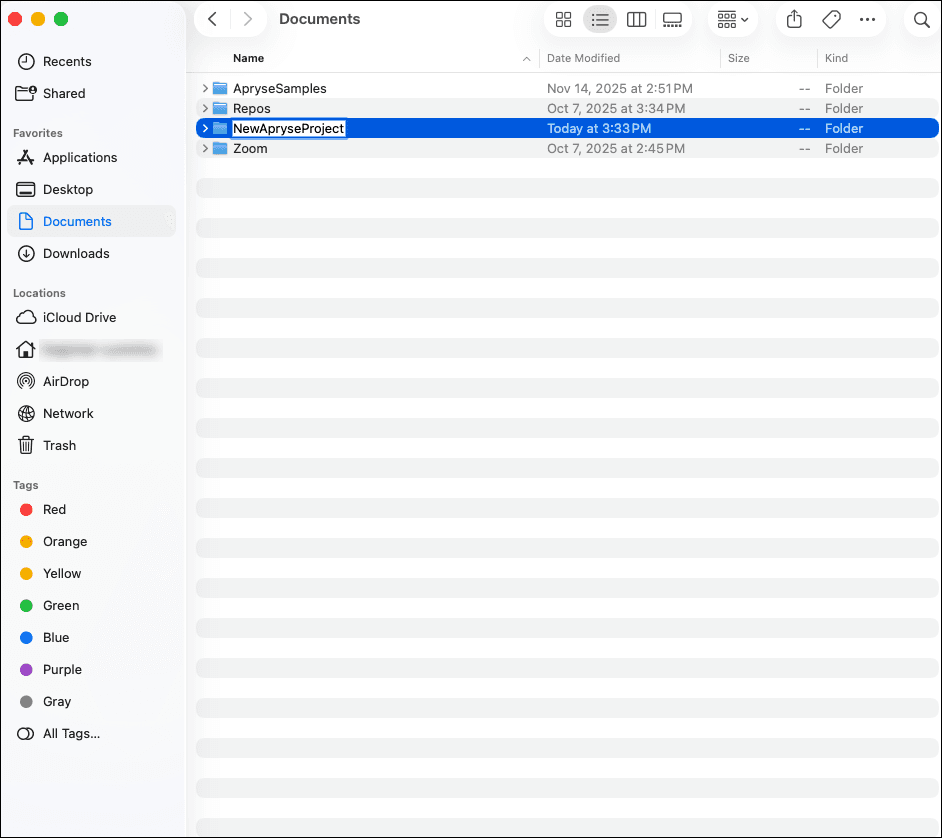
Enter the folder name, NewApryseProject.
3. Right-click on the NewApryseProject folder and select New Terminal at Folder.
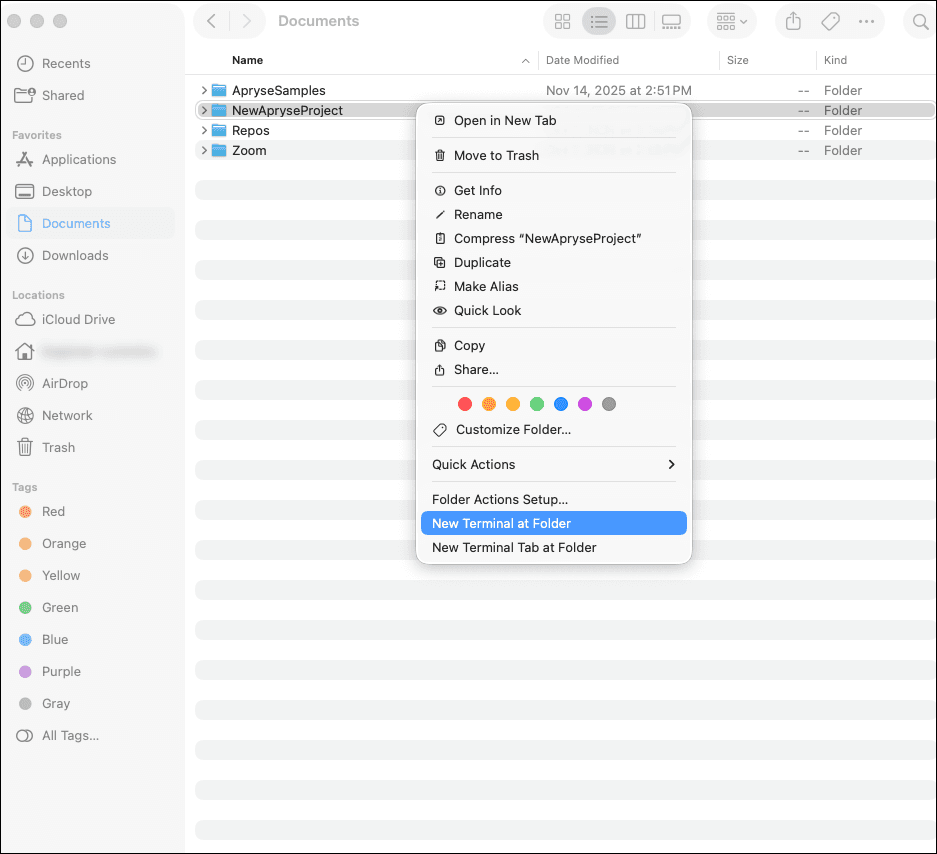
Select New Terminal at Folder to open the terminal.
4. From the project directory, in the terminal, enter the following and press Enter:
Bash
The template “Console App” is created.
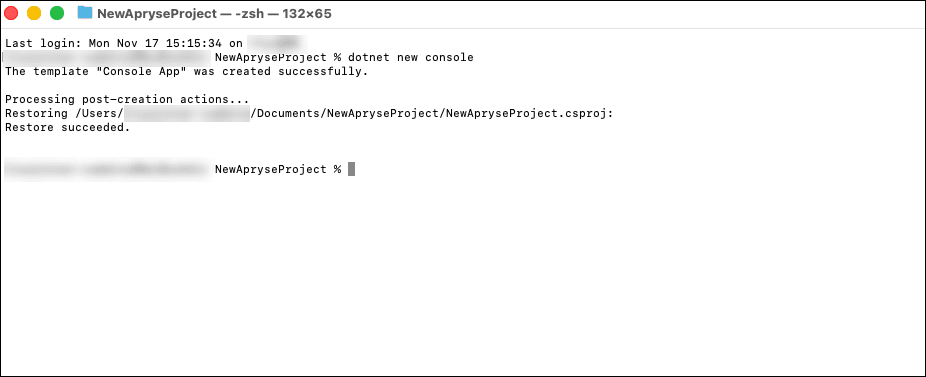
On the command line, enter dotnet new console to create a new Console App.
5. In the terminal, enter the following and press Enter:
Bash
You have successfully added the Apryse Server SDK to your .NET project!
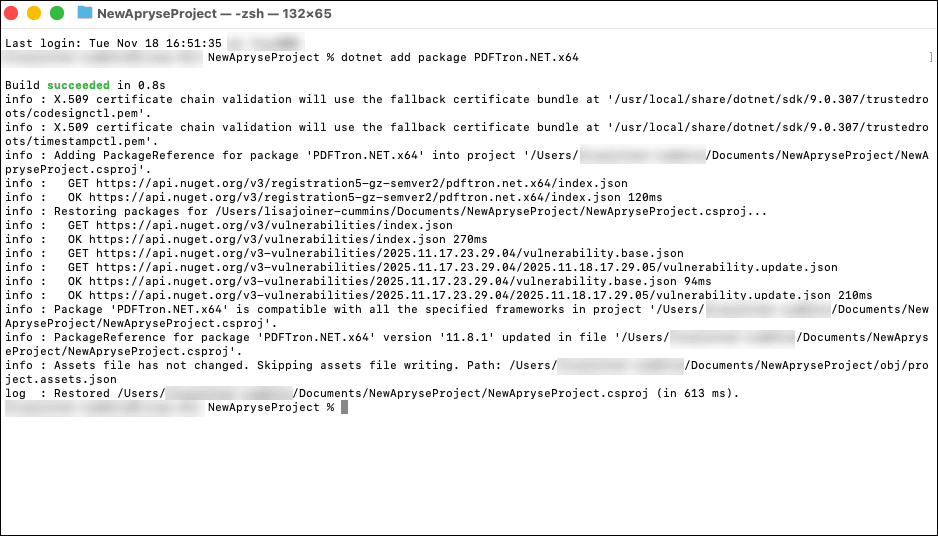
You have successfully added the Apryse Server SDK to your .NET project.
6. At the command prompt, type exit, press Enter, and close the window.
3. Initialize PDFNet & integrate the Apryse Server SDK into your application
- Open Visual Studio Code (or your preferred application) and from the File menu, select Open Folder.
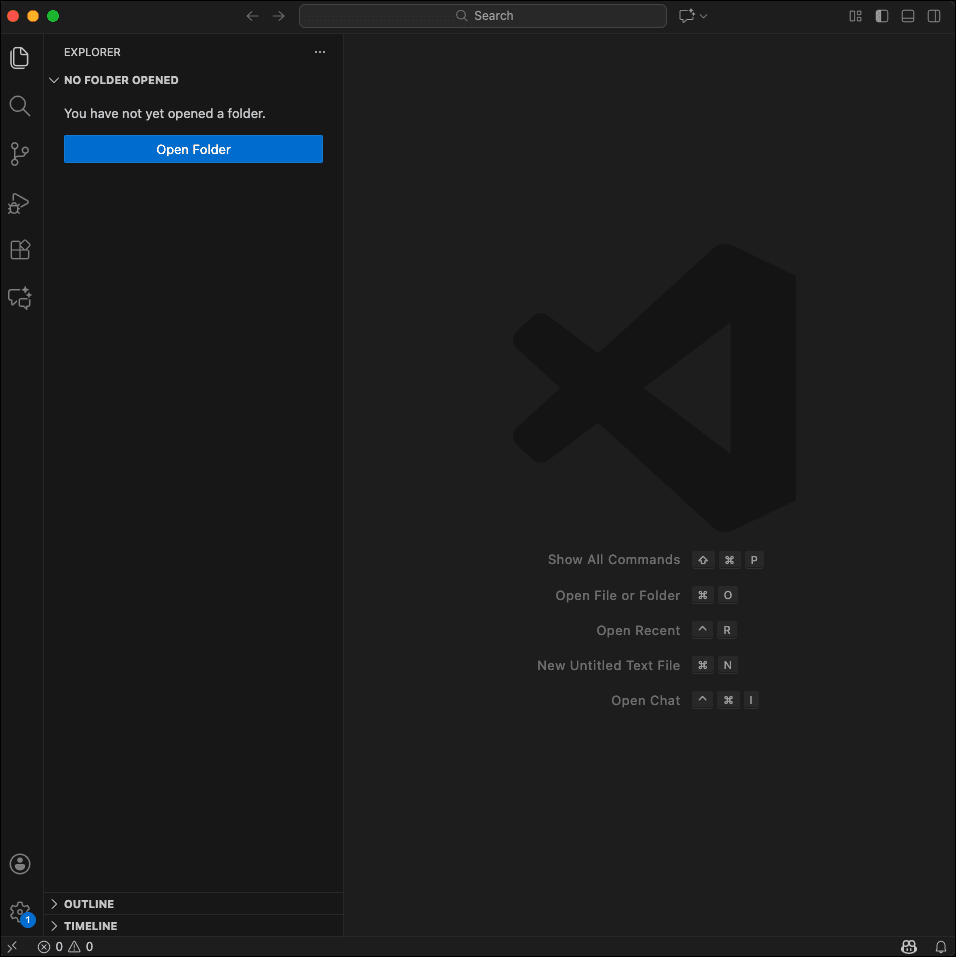
Open a folder in Visual Studio Code.
2. Navigate to the Documents folder, select the NewApryseProject folder and click Open. The NewApryseProject opens in Visual Studio Code.
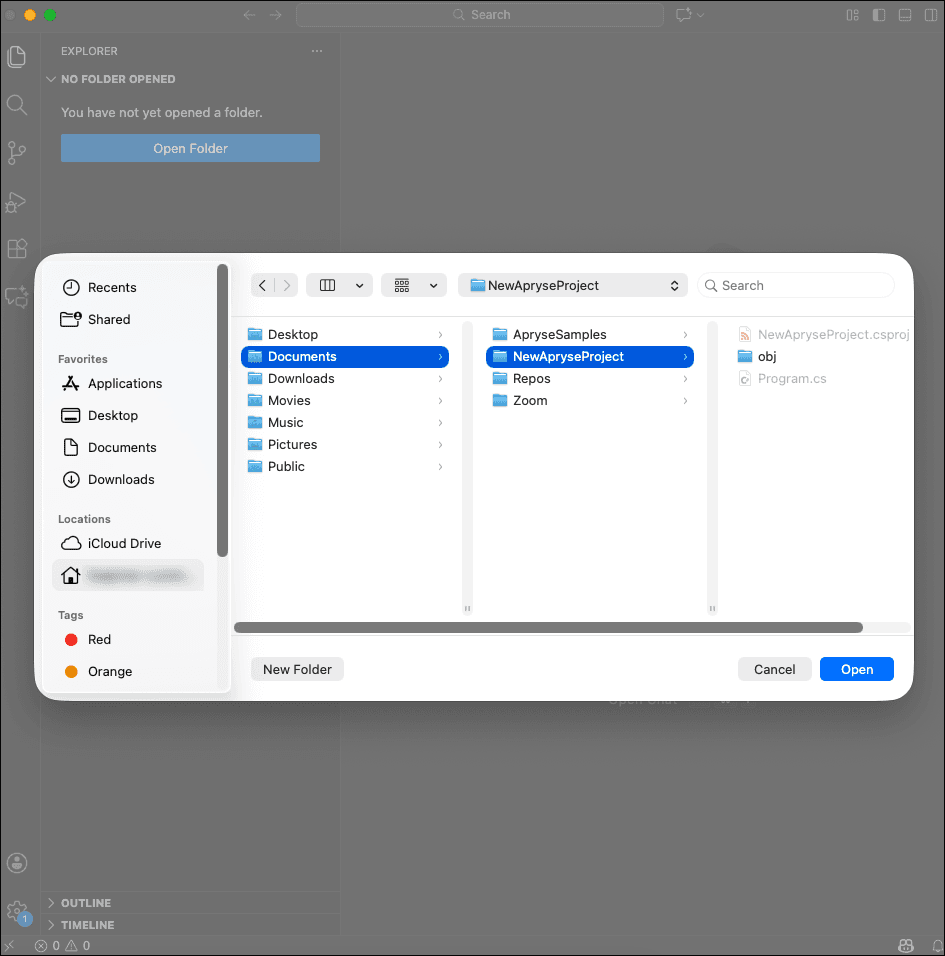
Open the NewApryseProject folder in Visual Studio Code.
3. Navigate to and open the Program.cs file.
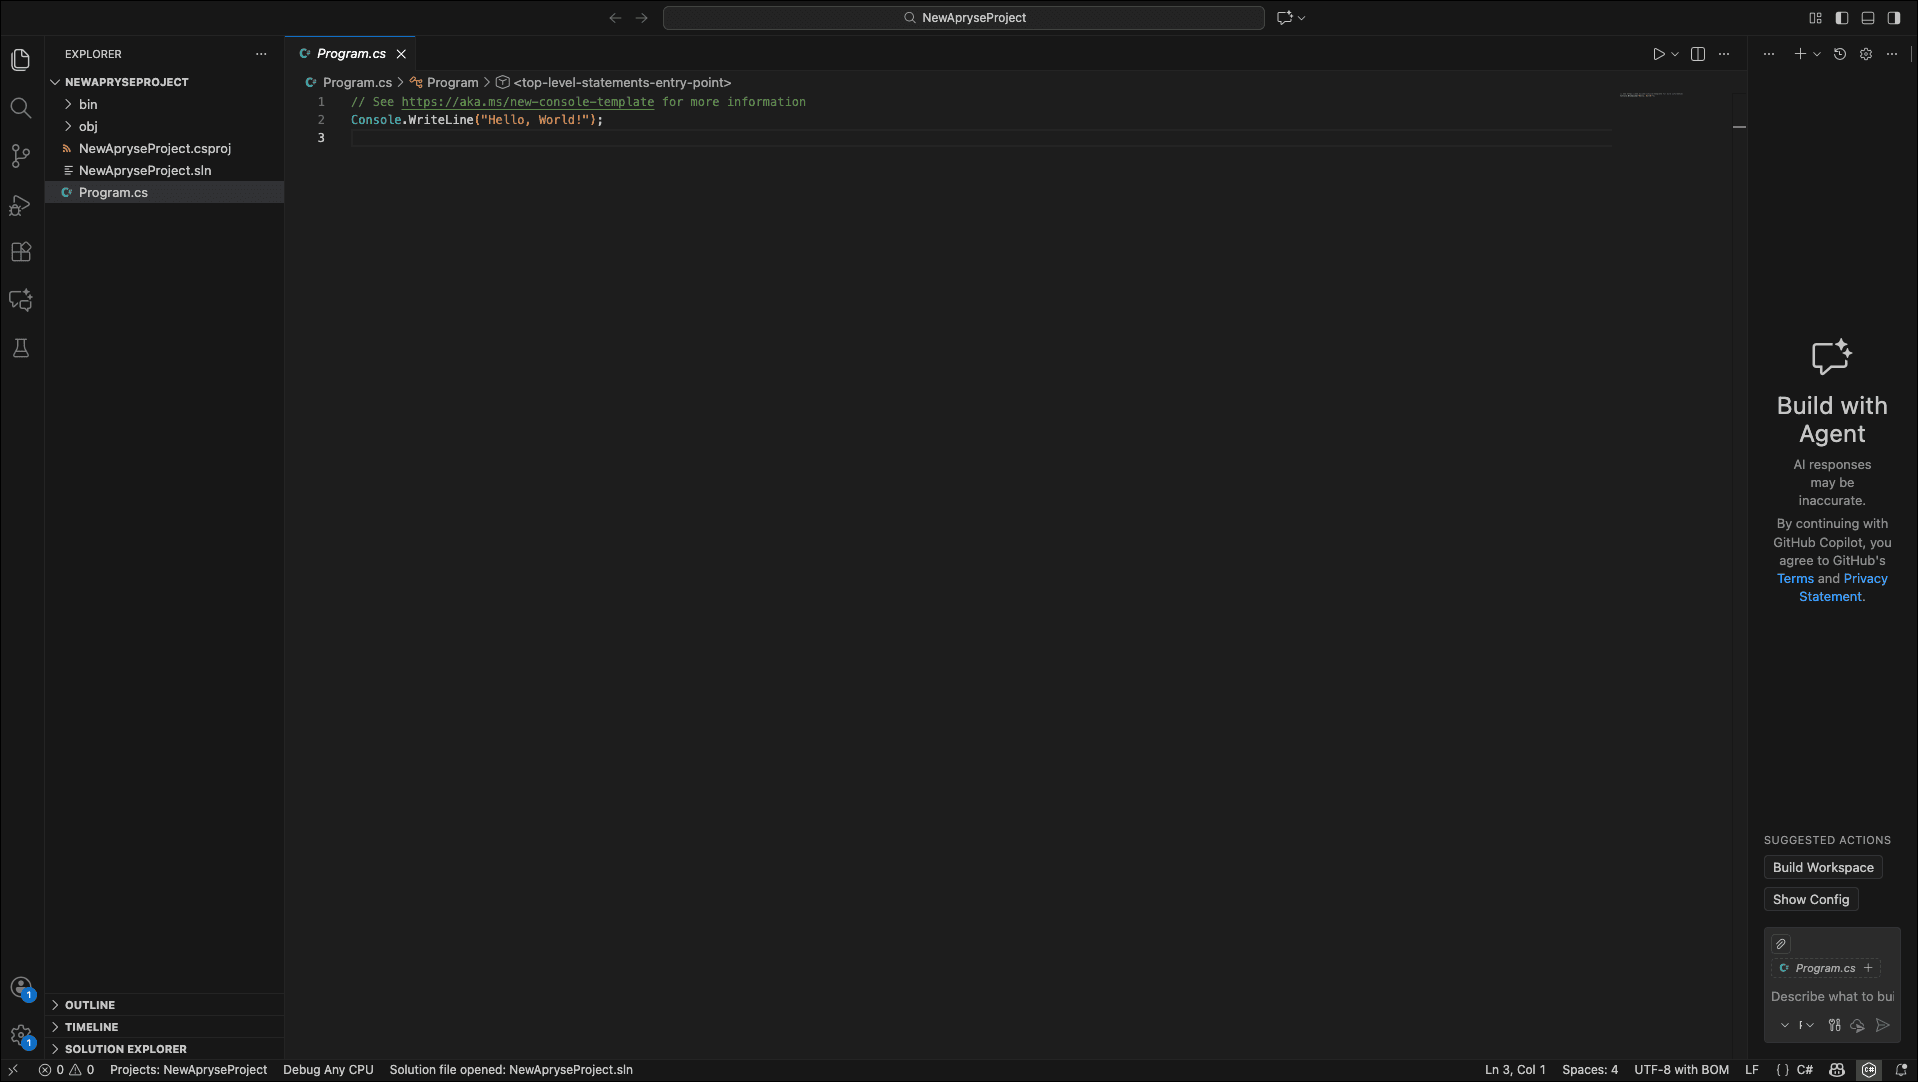
Open the Program.cs file.
4. Copy the following C# code and paste it into Line 1 of the Program.cs file (replace the existing content in Line 1 of the file) and click Save:
C#
5. Navigate to the Documents folder. Select the NewApryseProject folder, right-click and select Open in Terminal.
6. From the project directory, in the terminal, enter the following, then press Enter:
Bash
The code executes and you will see the message, “Hello World!”
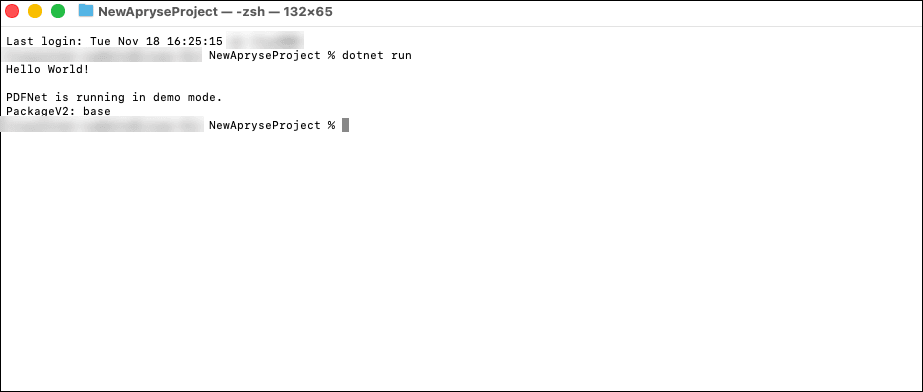
After the code executes, you will see "Hello World!"
Keep in mind the following about the code above:
- The system logs a startup message.
- The program imports the .NET SDK.
- The script defines an async main function that builds the PDF.
- The PDFNet engine runs with cleanup and license initialization.
- The program logs any errors.
- The script releases PDFNet resources and shuts down the engine.
7. Exit out of the command line and navigate to the Documents > NewApryseProject folder.
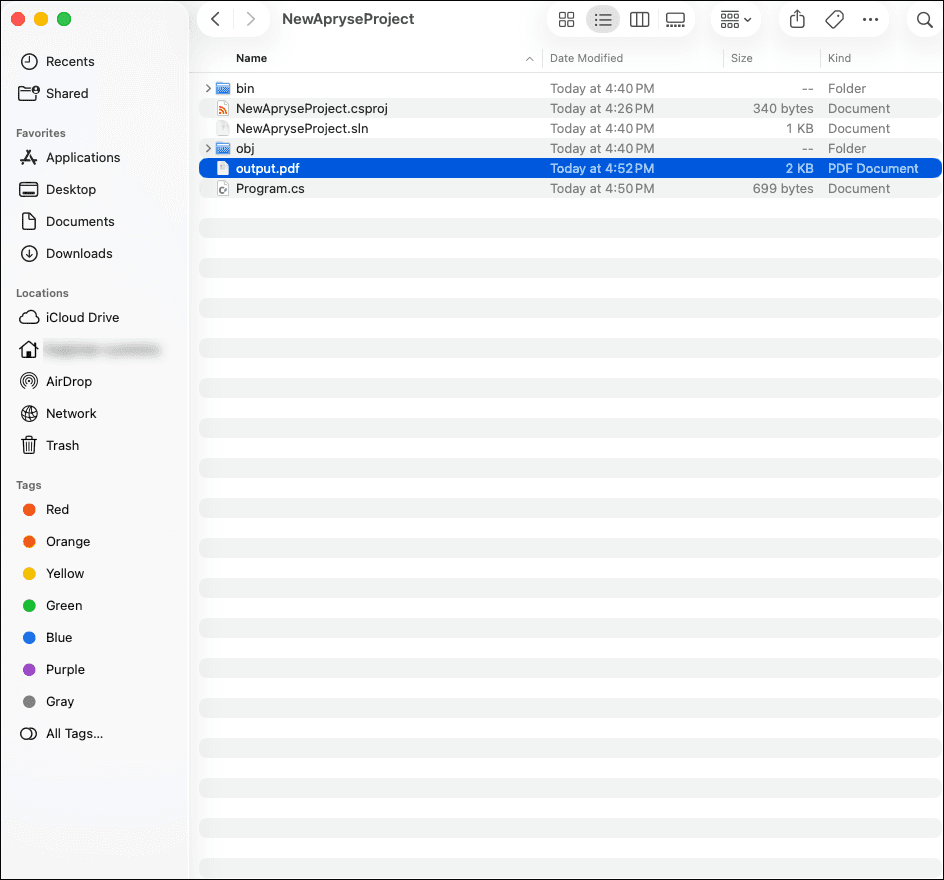
Open the output.pdf to see what you created by integrating the Apryse Server SDK.
8. Open the output.pdf which you created by integrating the Apryse Server SDK!
Now that you have successfully run an OfficeToPDFTest sample and integrated the Apryse Server SDK .NET PDF Library into your application, you can try out 50+ samples depending on your needs:
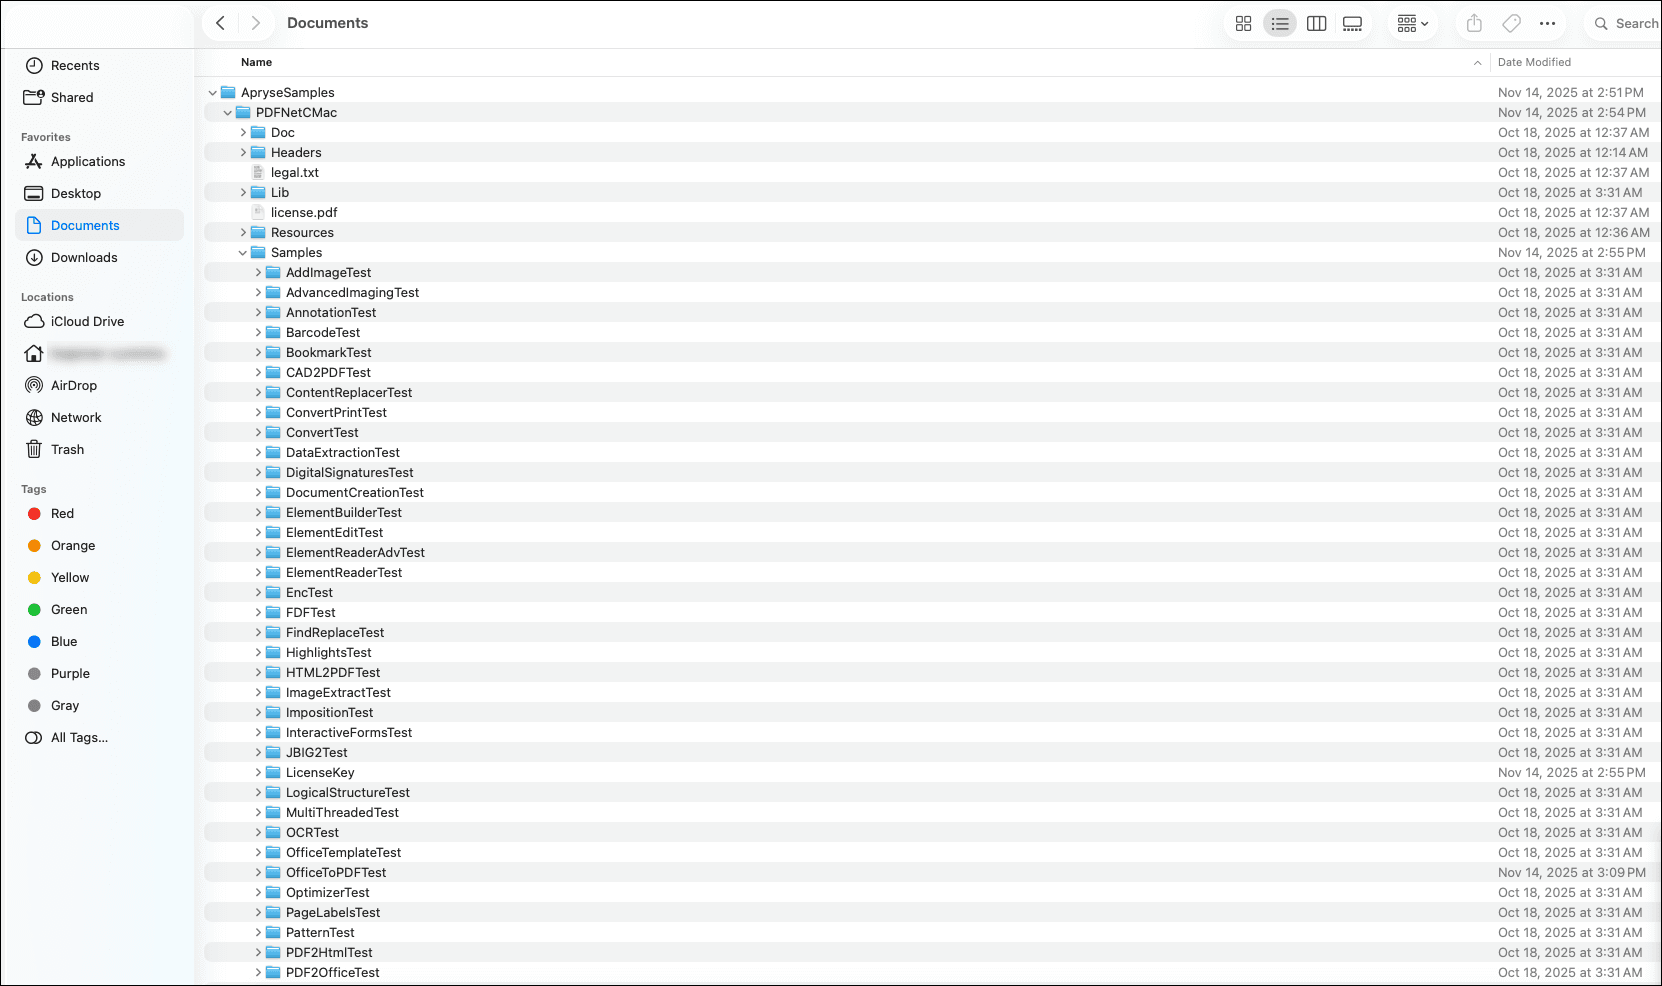
Explore more than 50 samples that you can create and view.
9. To try additional samples, go to section 1. Run a sample > step 4 above and choose another sample to run.
Next Steps
Did you find this helpful?
Trial setup questions?
Ask experts on DiscordNeed other help?
Contact SupportPricing or product questions?
Contact Sales