Product:
.NET Core PDF library integration
Welcome to Apryse. .NET Core for the Apryse SDK is cross-platform and supported on Windows, Linux and macOS. To get started, choose your preferred platform from the tabs below.
Windows .NET Core PDF library integration
This guide will help you run Apryse samples and integrate a free trial of the Apryse SDK into .NET Core applications on Windows. Your free trial includes unlimited trial usage and support from solution engineers.
- Visual Studio Make sure that the
.NET Core cross-platform developmentworkload andMSBUILDare part of your installation.This guide will use Visual Studio 2017. If you would like to use the NuGet integration for Windows x64 please make sure you have Visual Studio
2017 or later. - .NET SDK
- You may use either .NET 9, .NET 8, .NET Standard or .NET Core
- Apryse's .NET Core PDF library for Windows:
Download the 64-bit Apryse SDK
Download the 32-bit Apryse SDK
Run Apryse SDK in production
A commercial license key is required for use in a production environment. Please fill out our licensing form if you do not have a valid license key.
Keep your commercial license key confidential.
License keys are uniquely generated. Please make sure that it is not publicly available (e.g. in your public GitHub).
Initial setup
1. Extract the folder from the .zip file.
This article uses PDFNET_BASE as the path into the folder that you extracted.
Text
2. Get your Apryse trial key.
License Key
Apryse collects some data regarding your usage of the SDK for product improvement.
If you wish to continue without data collection, contact us and we will email you a no-tracking trial key for you to get started.
Run the samples
Navigate to the location of extracted contents. Find and enter the Samples folder (PDFNET_BASE/Samples). Here you can find sample code for a large number of features supported by the Apryse SDK.
Run a specific sample
1. Find the sample you want to run and navigate into the CS folder inside.
2. Open a Command Prompt here and run:
Text
Alternatively, you can open the project in Visual Studio, Set as Startup Project and run it (F5).
Run all samples
- Download the 64-bit Apryse SDK
- Extract and navigate to the
Samplesdirectory inside the SDK. - Double click the file in this location to run all the .NET Core samples.
Integrate into your application
You can follow a manual or nuget integration as described below.
Manually
This section will help you build the "Apryse Hello World" application. It is easy to integrate the rest of Apryse SDK if you are able to open, save and close a PDFDoc.
1. Open a new instance of Visual Studio 2017 and create a new .NET Core console application project (File > New > Project... ). You can find this under the Visual C# menu.
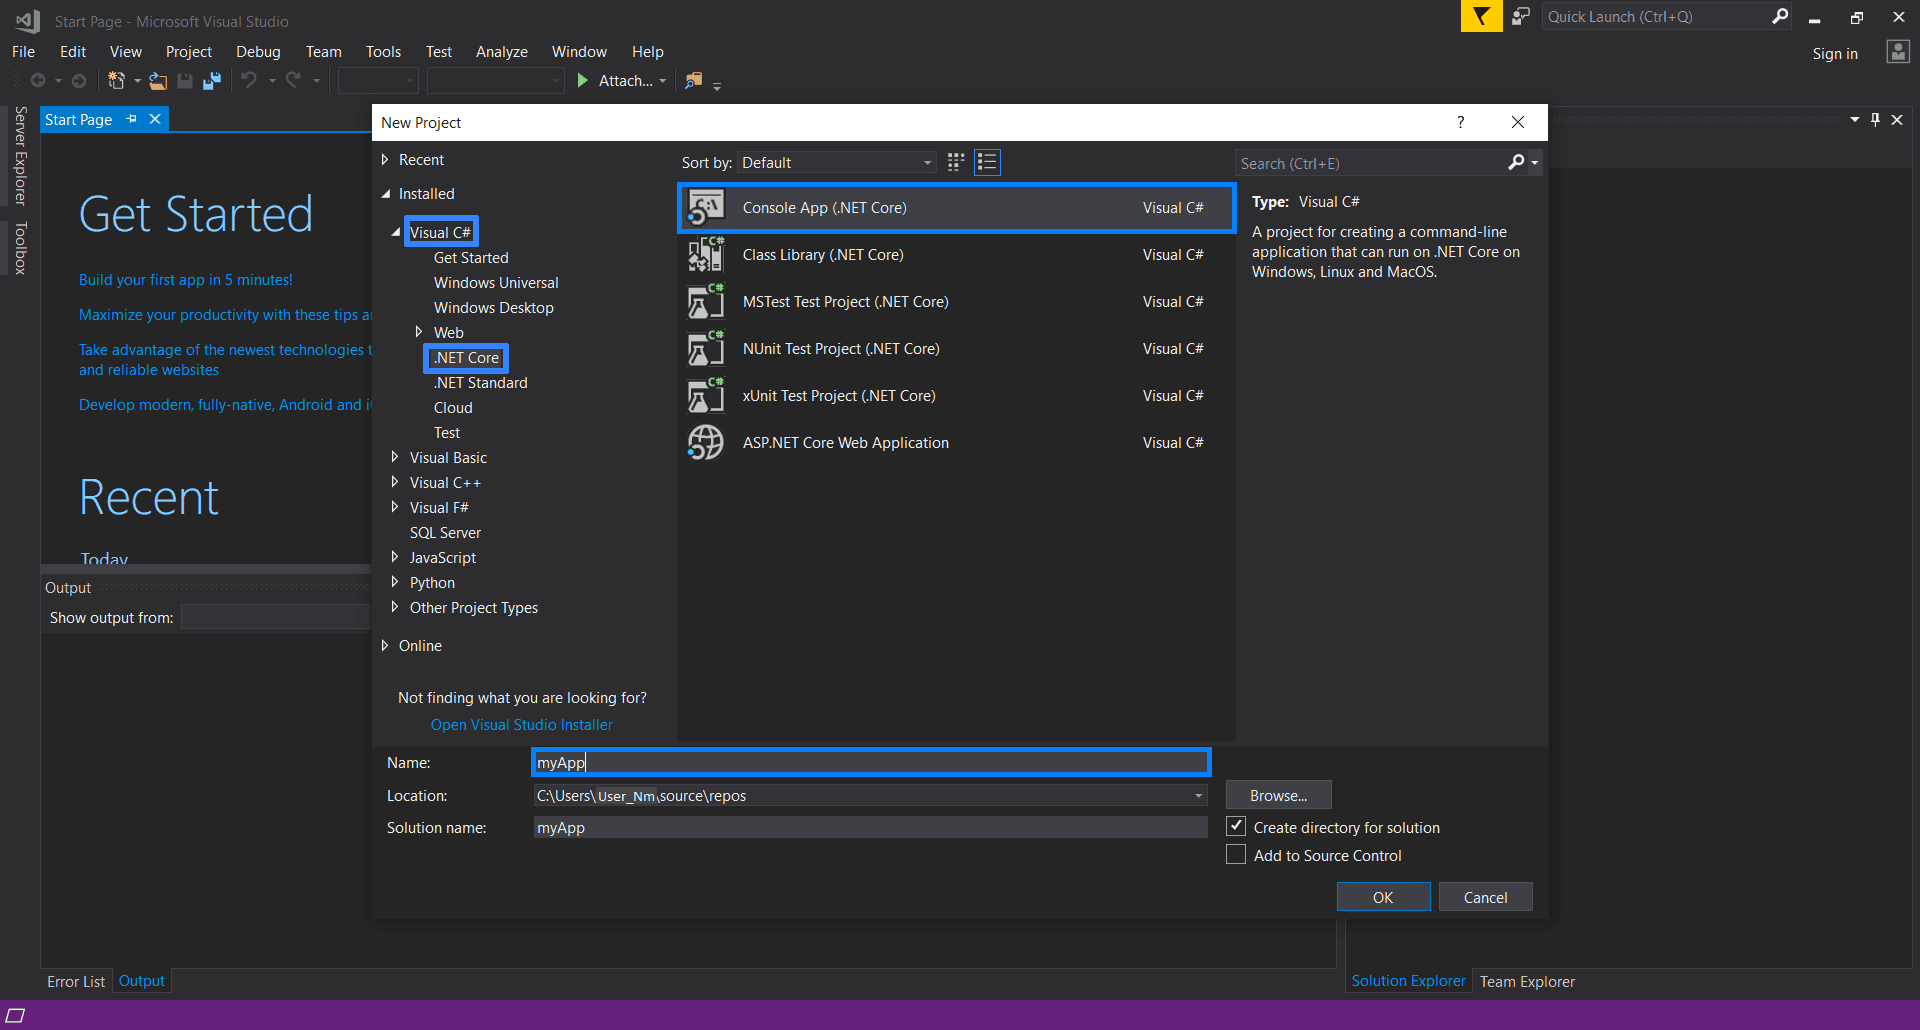
Click on OK and allow the IDE to create the project.
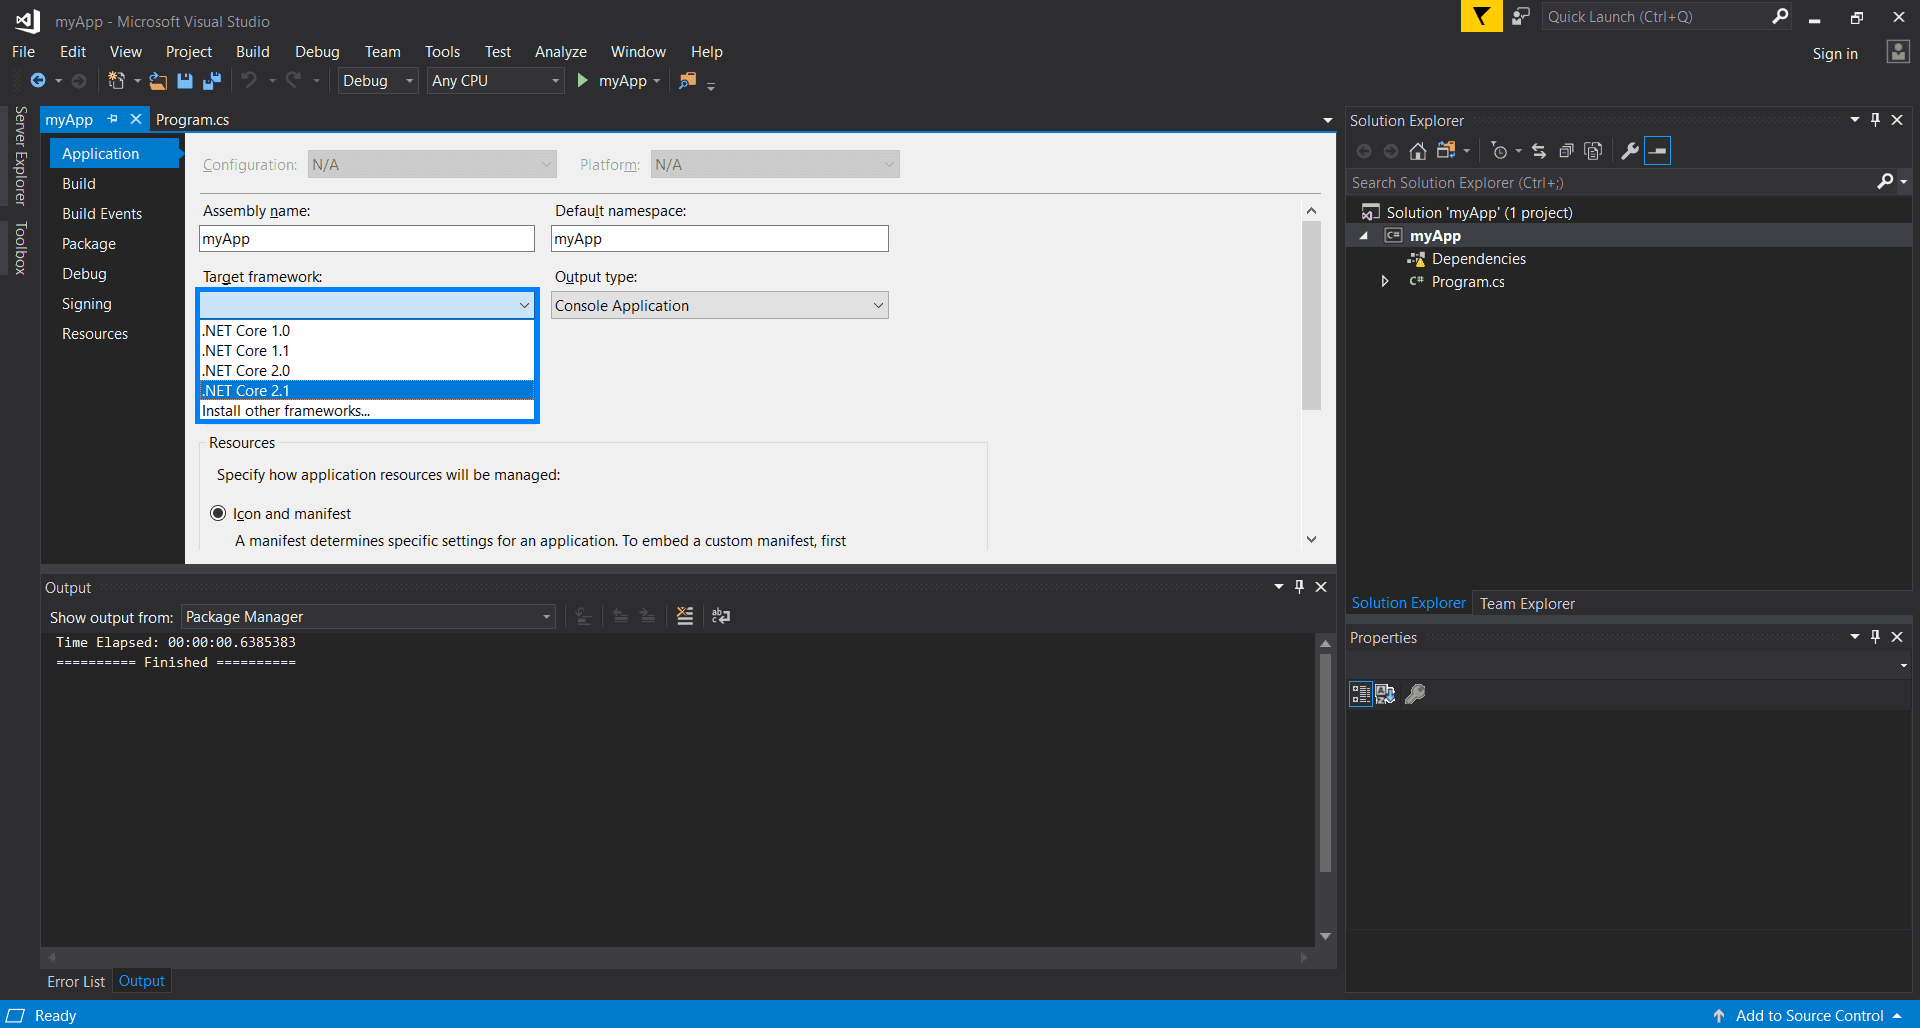
2. Find the Solution Explorer on the right side of the screen. Select the project and press Alt + Enter. This will open the properties tab.
Alternatively, you can right click on the project and find the properties option.
Select .NET Core 2.1 (or above) as the target framework for your application.
If you are using a Windows x64 machine for your .NET Core development, you can use NuGet package manager to get the Apryse SDK. Otherwise, please integrate the SDK manually.
3. Right click on project Dependencies and click on Add Reference. This will open the Reference Manager dialog. Click on the Browse... option at the bottom of the dialog. Navigate to PDFNET_BASE/Lib and select PDFNetDotNetCore.dll and click Add.
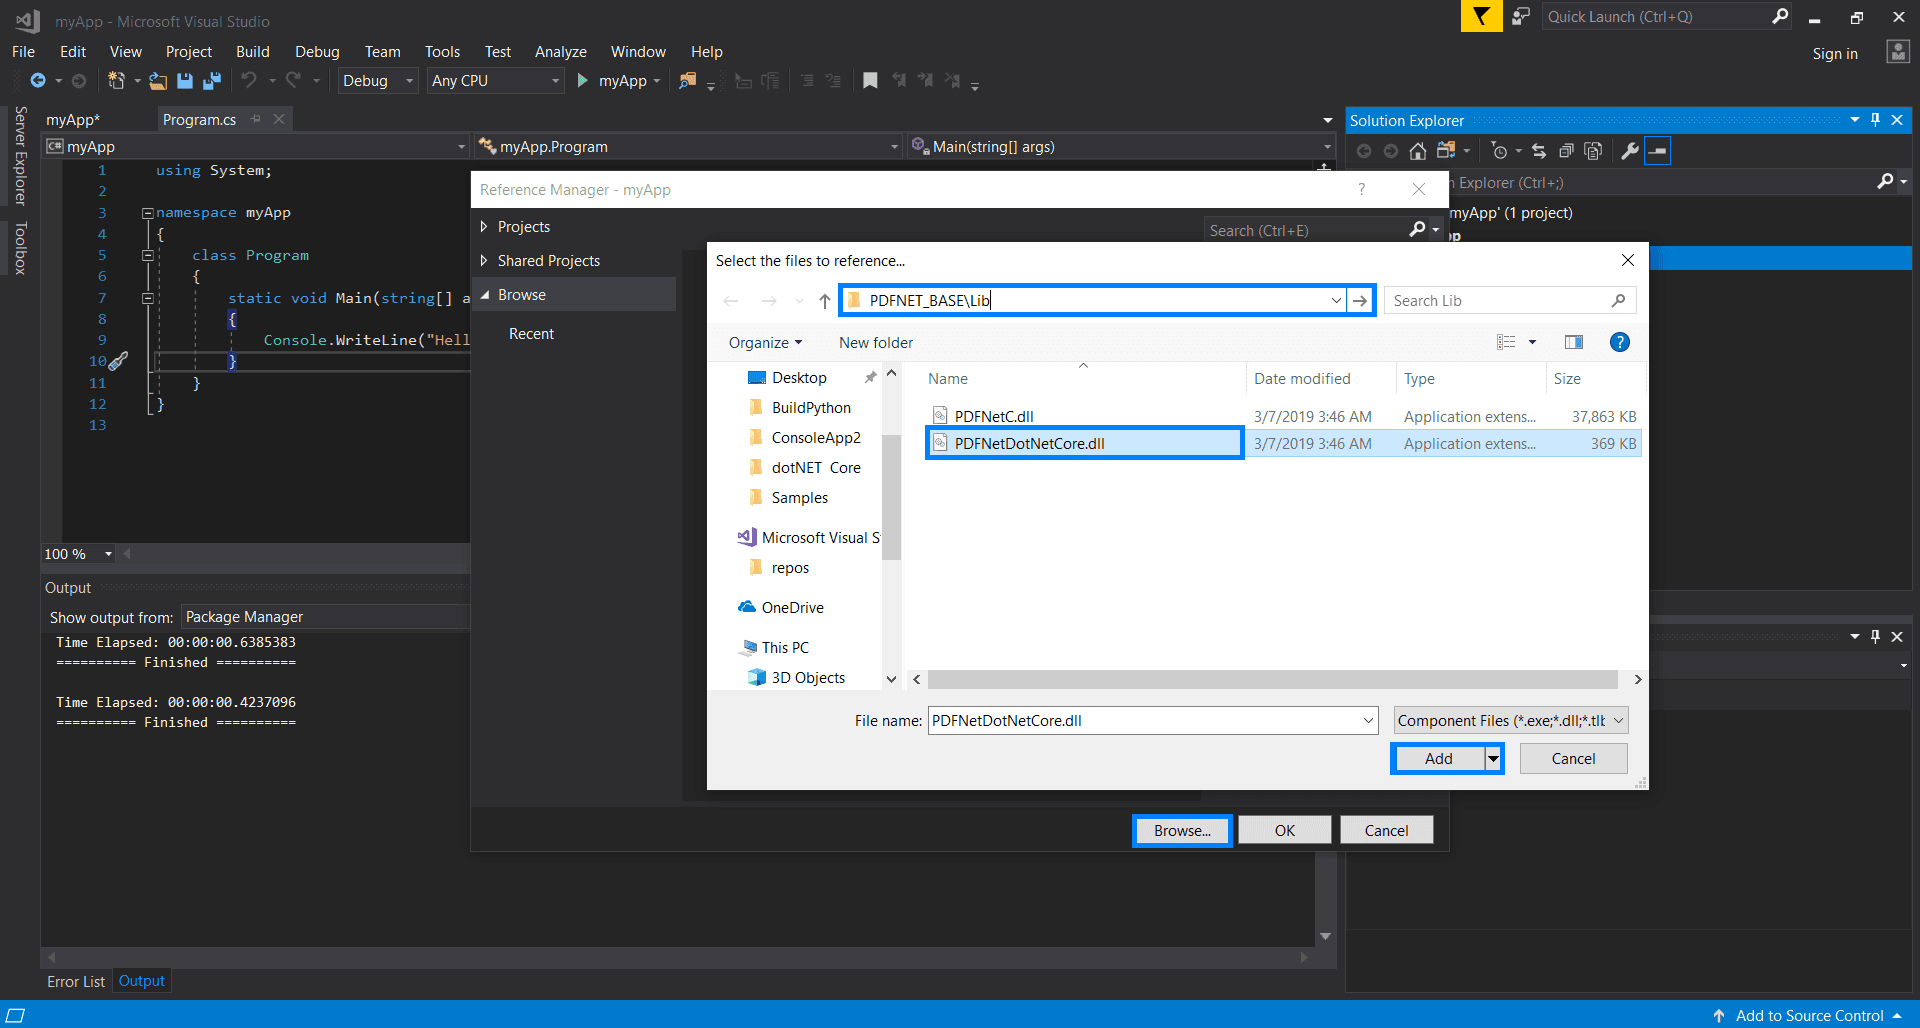
Click OK on the Reference Manager and continue.
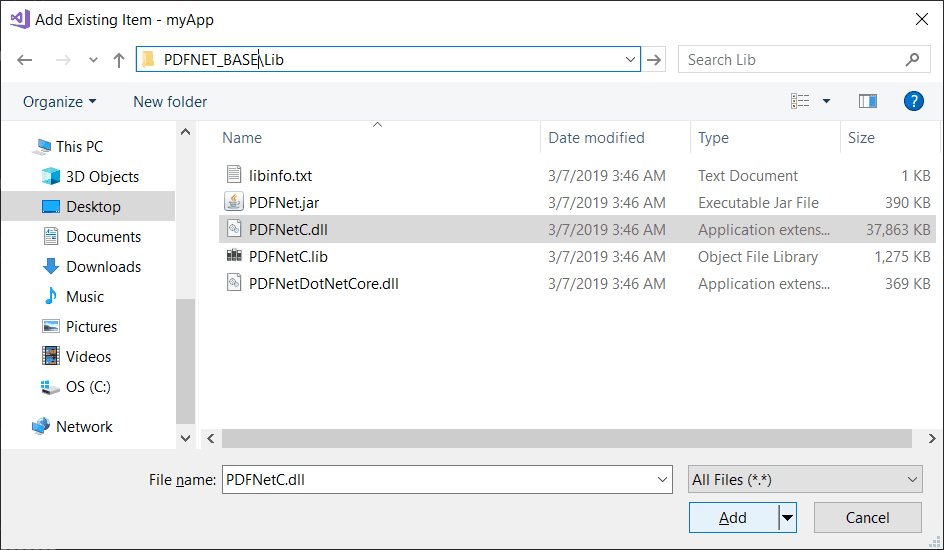
4. In the Solution Explorer, select the project and press Shift + Alt + A. With this you can Add an Existing Item.
Alternatively, you can right click on the project and find the Add an existing item... option under the Add submenu.
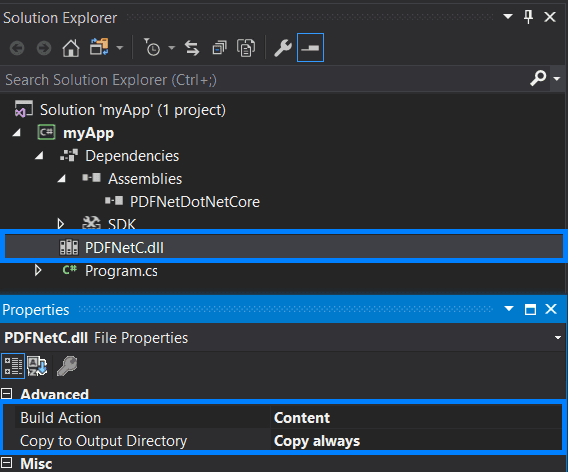
Once again, navigate to PDFNET_BASE/Lib. Choose the file type as All Files (*.*) and select PDFNetC.dll. Click on Add.
5. Select PDFNetC.dll in the solution explorer. A properties window should appear below. In it, change the Build Action setting to Content and the Copy to Output Directory setting to Copy always. To avoid errors, use the drop-down menus available for those fields.
NuGet using Visual Studio
This section will go through the nuget integration steps.
1. Perform the first 2 steps of integrating manually.
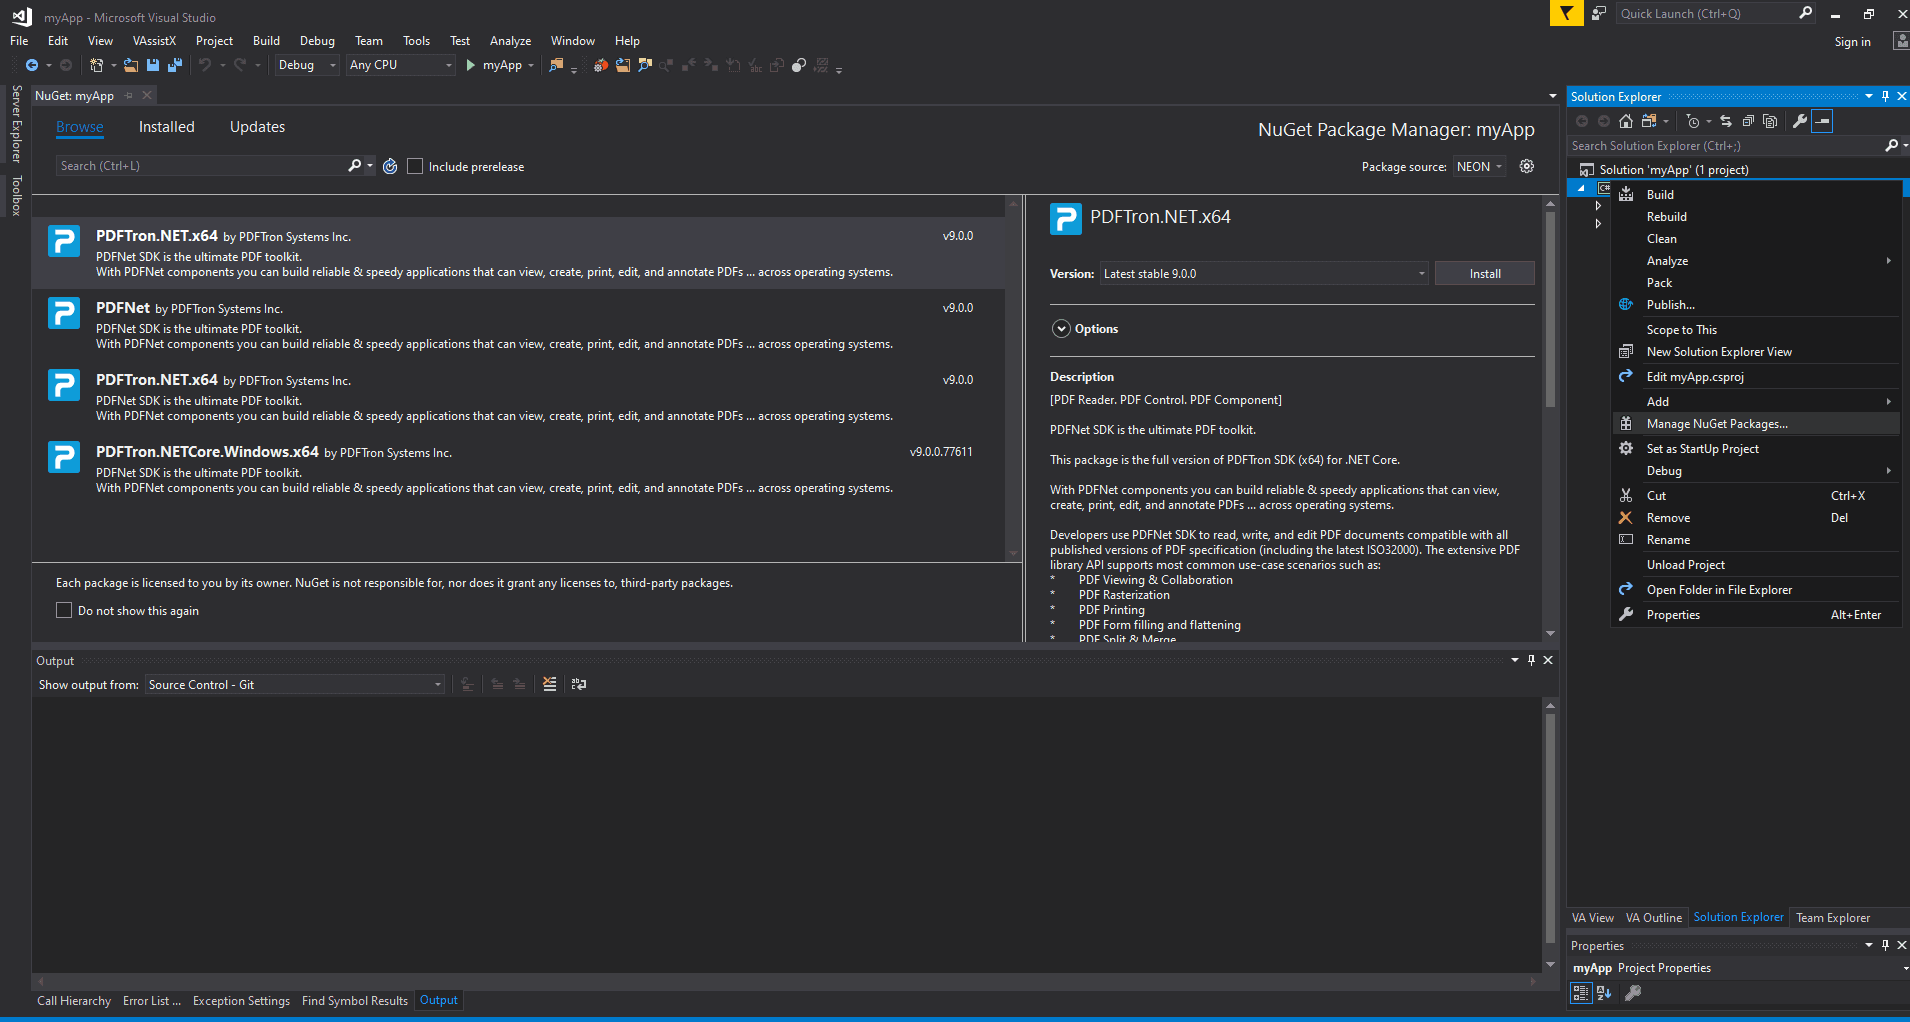
2. Right click on project Dependencies and click on Manage NuGet Packages.... This will open the NuGet Package Manager.
3. Click on the Browse tab near the top of the package manager. In the search bar enter:
Text
4. Select the PDFTron.NET.x64 package by Apryse Systems Inc. and click on the Install button in the panel with the package information. If you're prompted or an external dialog is opened for confirmation, click on Ok.
5. Get your Apryse trial key.
License Key
Apryse collects some data regarding your usage of the SDK for product improvement.
If you wish to continue without data collection, contact us and we will email you a no-tracking trial key for you to get started.
The Code
Replace the contents of Program.cs with:
C#
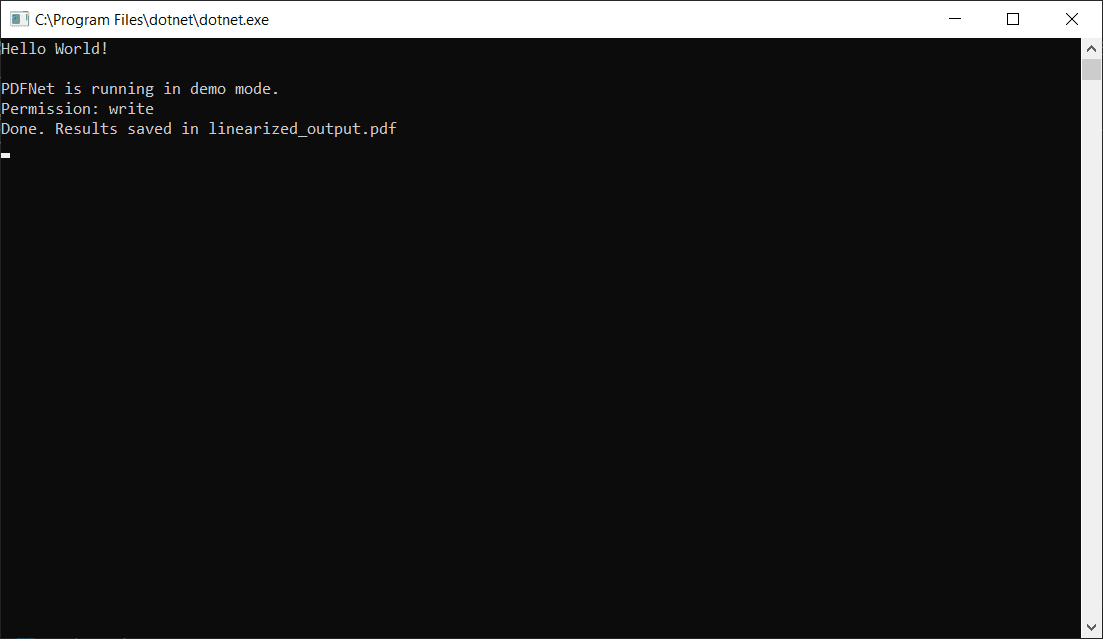
Run the program using the Local Windows Debugger. The program will give the following output in the console:
You should see an output file produced at the location of your project. If you used .NET Core 2.1, then by default it will be in the following folder:
Text
This guide will help you set up Apryse SDK serverless Azure functions. Your free trial includes unlimited trial usage and support from solution engineers.
Prerequisites
Initial setup
In this particular guide, we will demonstrate how to set up an Azure function to use Apryse SDK.
First, create an Azure function using this guide.
Next, edit your csproj to include PDFNetC.dll and reference PDFTronDotNet.dll from the download package.
Integrate into your application
Once you have followed the initial setup instructions, you can begin calling Apryse SDK APIs in your Azure function source. For example:
C#
Run Sample Code
You can update C# script of your Azure function project with the following code or download the source code from our github repository. This snippet shows how to process a request sent from a client to convert an office document to PDF and send the output to client.
C#
The last step is to publish your Azure function and have it running and its url ready. Make sure to set Settings/Configuration/General settings/Platform to 64-bit in Azure portal.
Testing
In order to use this Azure function to convert an office document to PDF, the client needs to post a REST API request to the server. The request must include json data structured as in C# code above.
Python
Upon receiving a client's request, a response will be sent back to the client including the base64 encoded pdf output using the same json structure. All the client needs to do now is decode the encoded data into pdf. That's it!
You can access the sample python code on Github. After cloning the repository and installing necessary packages, please refer to /client/README.txt for detailed instructions. Navigate to the client folder, run the following command, and see the reponse to client's request in the console and check the output in the output folder:
sh
The client will send a REST API request to convert /input/simple-word_2007.docx to pdf and the server will send back the encoded data, which will then be saved as pdf in the output folder.
You can experiment with your own office document by putting it inside input folder:
sh
We have shown how to set an Azure function using Apryse SDK. You can now experiment making your own functions, URLs, and can fully utilize Apryse SDK. If your have any questions, please don't hesitate to contact us!
Linux .NET Core PDF library integration
This guide will help you run Apryse samples and integrate a free trial of the Apryse SDK into .NET Core applications on Linux. Your free trial includes unlimited trial usage and support from solution engineers.
Run Apryse SDK in production
A commercial license key is required for use in a production environment. Please contact sales to purchase a commercial key or if you need any other license key assistance.
Keep your commercial license key confidential.
License keys are uniquely generated. Please make sure that it is not publicly available (e.g. in your public GitHub).
Prerequisites
- .NET SDK
- You may use either .NET 9, .NET 8, .NET Standard or .NET Core
- Nuget CLI
- Your license key
License Key
Apryse collects some data regarding your usage of the SDK for product improvement.
If you wish to continue without data collection, contact us and we will email you a no-tracking trial key for you to get started.
Setup a Project
1) Create a folder that will contain your project and navigate to it.
2) Inside this folder, create a new .NET Core project via
new proj
3) This will create some project files for a new .NET Core application. Now you can add the Apryse SDK package.
add
If you wish to manually download and setup our libraries, you can skip step 3 and download directly from here. You may also choose to download these libraries to run our samples.
Download Linux 64-bit Apryse SDK
Download Linux 64-bit ARM Apryse SDK
Download Linux 32-bit Apryse SDK
Using the Apryse SDK
This section will show you how to use our SDK to create a simple Apryse "Hello World!" application. It will create a document with one blank page and save it as a linearized PDF in its running directory.
1) Import the required headers into your source code.
C#
2) Place your Apryse SDK key into the constructor of the PDFNet Initialize call.
add key
3) Instantiate a new document with one blank page. Then save the document as a linearized PDF named output.pdf. Your final program should look like this:
C#
4) Now run the application via dotnet run
sh
Running the samples
Run a specific sample
1) Download Linux 64-bit Apryse SDK or another architecture of SDK as mentioned in the setup steps.
2) Extract the SDK and navigate to the Samples directory. Navigate to the sample you wish to run and enter the CS folder.
3) Add your Apryse license key to LicenseKey/CS/LicenseKey.cs, where YOUR_PDFTRON_LICENSE_KEY is located.
4) Execute the following command:
sh
Run all samples
1) Navigate to /Samples inside your PDFNetC64 package.
2) Add your Apryse license key to LicenseKey/CS/LicenseKey.cs, where YOUR_PDFTRON_LICENSE_KEY is located.
3) Run the Samples/runall_dotnetcore.sh file
sh
The tests will run one by one.
Output files will be in /Samples/TestFiles/Output
Next steps
macOS .NET Core PDF library integration
This guide will help you run Apryse samples and integrate a free trial of the Apryse SDK into .NET Core applications on macOS. Your free trial includes unlimited trial usage and support from solution engineers.
Run Apryse SDK in production
A commercial license key is required for use in a production environment. Please contact sales to purchase a commercial key or if you need any other license key assistance.
Keep your commercial license key confidential.
License keys are uniquely generated. Please make sure that it is not publicly available (e.g. in your public GitHub).
Prerequisites
- .NET SDK
- You may use either .NET 9, .NET 8, .NET Standard or .NET Core
- Your license key
License Key
Apryse collects some data regarding your usage of the SDK for product improvement.
If you wish to continue without data collection, contact us and we will email you a no-tracking trial key for you to get started.
Setup a Project
1) Create a folder that will contain your project and navigate to it.
2) Inside this folder, create a new .NET Core project via
New project
3) This will create some project files for a new .NET Core application. Now you can add the Apryse SDK package.
Add the package
If you wish to manually download and setup our libraries, you can skip step 3 and download directly from here. You may also choose to download these libraries to run our samples.
Download Universal Mac Apryse SDK
Using the Apryse SDK
This section will show you how to use our SDK to create a simple Apryse "Hello World!" application. It will create a document with one blank page and save it as a linearized PDF in its running directory.
1) Import the required headers into your source code.
C#
2) Place your Apryse SDK key into the constructor of the PDFNet Initialize call.
add key
3) Instantiate a new document with one blank page. Then save the document as a linearized PDF named output.pdf. Your final program should look like this:
C#
3) Now run the application via dotnet run
sh
Running the samples
Run a specific sample
1) Download Universal Mac Apryse SDK and extract it.
2) Add your Apryse license key to Samples/LicenseKey/CS/LicenseKey.cs, where YOUR_PDFTRON_LICENSE_KEY is located.
3) Navigate to the CS folder in the sample you want to run(e.g. /Samples/AddImageTest/CS and execute
sh
Run all samples
1) Navigate to /Samples and find the file named runall_dotnetcore.sh.
2) Add your Apryse license key to Samples/LicenseKey/CS/LicenseKey.cs, where YOUR_PDFTRON_LICENSE_KEY is located.
2) Run the runall_dotnetcore.sh in Samples
sh
The tests will run one by one.
Output files will be in /Samples/TestFiles/Output
Next step
Did you find this helpful?
Trial setup questions?
Ask experts on DiscordNeed other help?
Contact SupportPricing or product questions?
Contact Sales