Product:
Get started with the Apryse Server SDK Node.js PDF library integration
In this guide, you'll create a simple Node.js application, add the Apryse Server SDK, and learn how to generate a pdf file programmatically.
To get started, choose your preferred platform from the tabs below.
Prerequisites
Before you start:
- Install Visual Studio Code or another code editor to develop and debug your code.
- Install Node.js and npm for your runtime environment. Use the latest active LTS version of Node.js within the supported range (Node.js 10.x–24.x).
- Get your Apryse trial key.
License Key
Apryse collects some data regarding your usage of the SDK for product improvement.
If you wish to continue without data collection, contact us and we will email you a no-tracking trial key for you to get started.
Run Apryse SDK in production.
A commercial license key is required for use in a production environment. Contact sales to purchase a commercial license key.
1. Set up your project
Set up your project by creating a folder and preparing your workspace for the application.
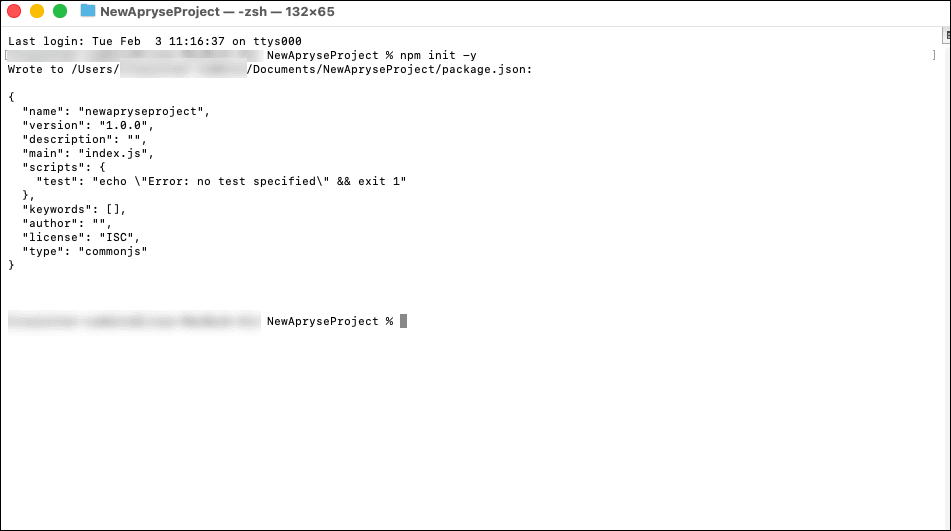
- Within your Documents folder, create a new NewApryseProject folder.
- From the terminal, within your new folder, initialize a new Node.js project and create a default
package.jsonfile:
Shell
A successful output looks similar to:
Shell
2. Add the Apryse SDK
Next, integrate the Apryse Server SDK into your .NET application and add the code needed to generate a PDF.
1. Navigate to the Documents\NewApryseProject directory in your terminal, then install the Apryse SDK:
Shell
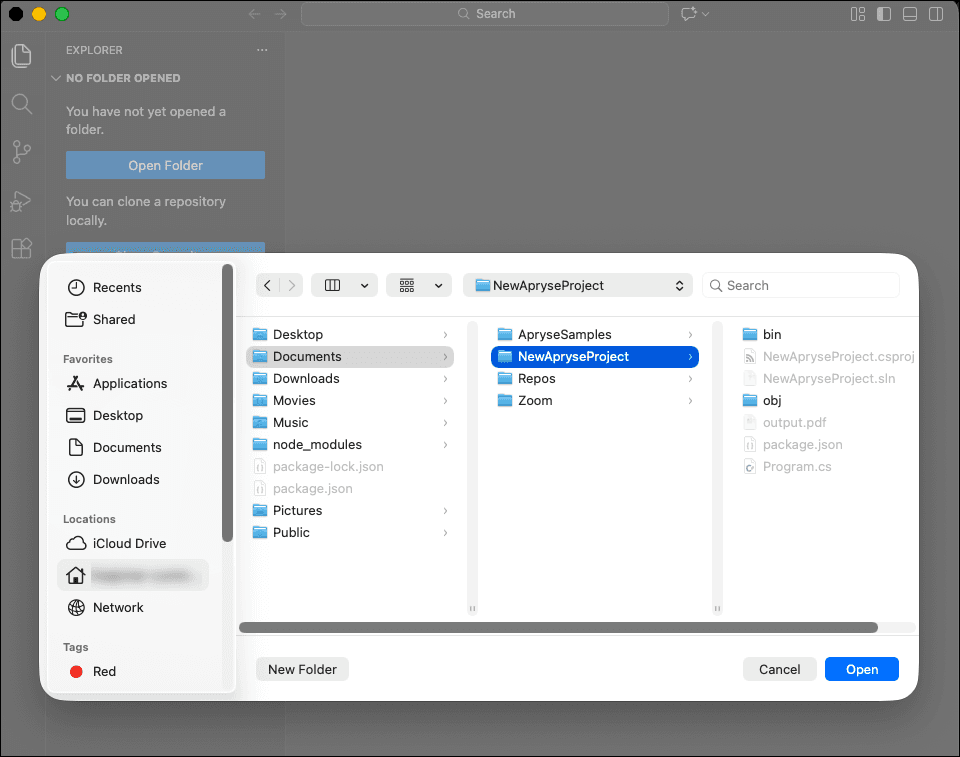
2. In Visual Studio Code, go to File > New Text File.
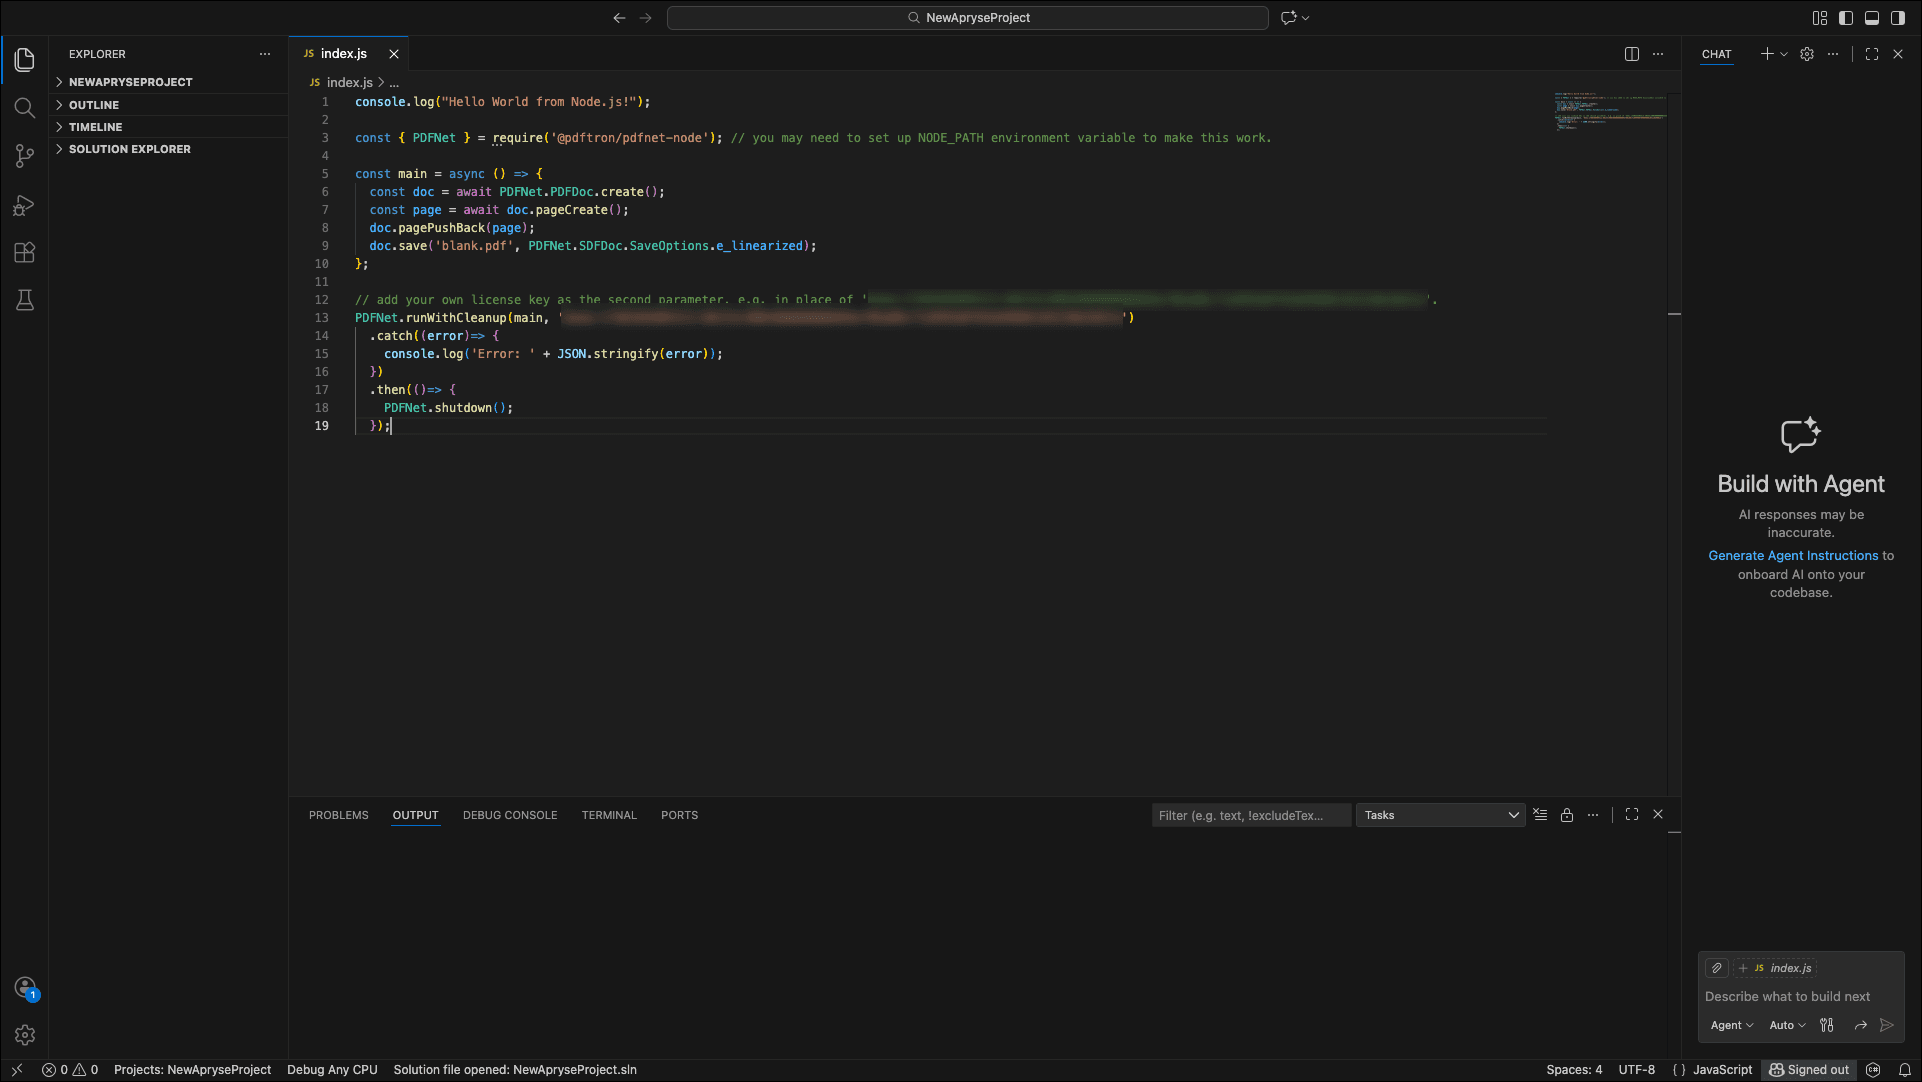
3. Paste this code into the text editor, update your license key, and save the file in the Documents\NewApryseProject directory as index.js:
JavaScript
index.js
Info
If you're signed in with an Apryse account, your license key is automatically prepopulated in all code snippets.
With this code, you can:
- Log a startup message to confirm the application is running.
- Import the Apryse Node.js SDK.
- Define an asynchronous
mainfunction that creates a new PDF document, adds a blank page, and saves it as a linearized PDF. - Use
runWithCleanupto initialize the SDK, execute the main function, and handle cleanup automatically. - Handle errors and shut down the
PDFNetengine after execution to release resources.
3. Verify your output
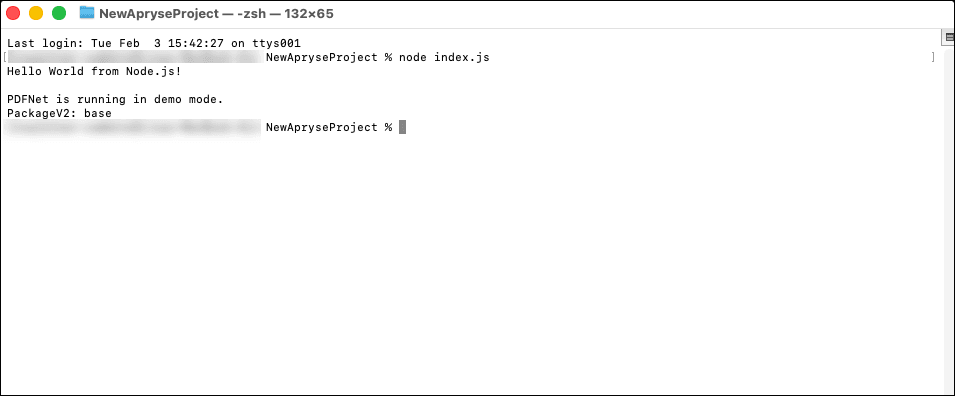
Finally, build and run your application to confirm that the Apryse Server SDK is working correctly. After the application runs successfully, it will generate a blank PDF file locally.
- Navigate to the Documents > NewApryseProject folder in your terminal.
- Build and launch the application:
Shell
A successful output looks similar to:
Shell
3. Navigate to the Documents > NewApryseProject folder.
4. Verify the blank output.pdf file was generated programmatically using the Apryse Server SDK:
Text
Prerequisites
Before you start:
- Install Visual Studio Code or another code editor to develop and debug your code.
- Install Node.js and npm for your runtime environment. Use the latest active LTS version of Node.js within the supported range (Node.js 10.x–24.x).
- Get your Apryse trial key.
License Key
Apryse collects some data regarding your usage of the SDK for product improvement.
If you wish to continue without data collection, contact us and we will email you a no-tracking trial key for you to get started.
Run Apryse SDK in production.
A commercial license key is required for use in a production environment. Contact sales to purchase a commercial license key.
Keep your commercial license key confidential.
License keys are uniquely generated and strictly confidential. Don't publish or store them in any public location, including public GitHub repositories.
1. Set up your project
Set up your project by creating a folder and preparing your workspace for the application.
- Go to your Documents folder and create a new NewApryseProject folder.
- From the terminal, within your new project folder, initialize a new Node.js project and create a default
package.jsonfile:
Bash
A successful output looks similar to:
Bash
2. Add the Apryse SDK
Next, integrate the Apryse Server SDK into your .NET application and add the code needed to generate a PDF.
- From your terminal, install the Apryse SDK:
Bash
2. In Visual Studio Code, go to File > New Text File.
3. Paste this code into the text editor, update your license key, and save the file in the Documents/NewApryseProject directory as index.js:
JavaScript
index.js
Info
If you're signed in with an Apryse account, your license key is automatically prepopulated in all code snippets.
With this code, you can:
- Log a startup message to confirm the application is running.
- Import the Apryse Node.js SDK.
- Define an asynchronous
mainfunction that creates a new PDF document, adds a blank page, and saves it as a linearized PDF. - Use
runWithCleanupto initialize the SDK, execute the main function, and handle cleanup automatically. - Handle errors and shut down the
PDFNetengine after execution to release resources.
3. Verify your output
Finally, build and run your application to confirm that the Apryse Server SDK is working correctly. After the application runs successfully, it will generate a blank PDF file locally.
- Navigate to the Documents > NewApryseProject folder.
- In the terminal, build and launch the application:
Bash
A successful output looks similar to:
Bash
3. Navigate to the Documents > NewApryseProject folder.
4. Verify the blank output.pdf file was generated programmatically using the Apryse Server SDK:
Text
Prerequisites
- A version of Node.js supported by AWS Lambda (up to v24)
- An active AWS account
- Docker (optional)
Initial Setup
In this particular guide, we will demonstrate how to set up an AWS Lambda function to use the Apryse SDK with Node.js.
First, you will have to prepare a deployment package with the pdfnet-node module and your Lambda function code (typically named index.js) within it. From the command line:
sh
Now, copy your lambda function code to YOUR_FUNCTION_FOLDER.
It's at this point that it is important to note that the pdfnet-node module must be installed using the same operating system that AWS Lambda will use for its runtime. This is dependent on on the version of Node.js you are using. To see which operating system is required, look here.
We recommend that you use a Docker container to simulate this runtime and have included a Dockerfile to do just that. Create a Dockerfile with the contents below.
Dockerfile
Dockerfile
Next, run the following docker commands to generate a deployment package to upload to AWS Lambda. Replace YOUR_IMAGE_NAME_HERE with the image name of your choice, as well as YOUR_NODE_VERSION_HERE as the Node version of your choice. YOUR_NODE_VERSION_HERE as the Node version of your choice. Note that this Dockerfile requires that your AWS Lambda function code file be named index.js, and that it uses your project's package.json and package-lock.json to install dependencies such as the pdfnet-node module you installed in the last step.
sh
After running this Docker container, you should have your deployment package within the ./output directory and can now upload it to AWS Lambda.
Second, create a Lambda function in your AWS account and upload the deployment package:
- Lambda > Functions > Create function > Author from scratch > Function name [
YOUR_FUNCTION_NAME] > Runtime (matching your Node version) > choose Create Function - Upload from .zip file > Upload [your deployment package] > Save
- Add trigger > API Gateway > Create an API > REST > Security [Open]
- Configuration > General configuration > Edit > memory [Choose 10240MB]
Integrate Into Your Application
Once you have followed the initial setup instructions, you can begin calling Apryse SDK APIs in your Lambda function code. For example:
JavaScript
Run Sample Code
You can update the Node.js script of your AWS Lambda function with the following code or download the source code from our GitHub repository. This snippet shows how to process a request sent from a client, convert an office document to a PDF, and send the output to client.
JavaScript
Testing
After you have uploaded your deployment package to AWS Lambda and set its API endpoint in Configuration > Triggers, you can now do a simple test using a REST API.
In order to use the function to convert an office document to PDF, the client needs to POST a REST API request to the server. The request must include JSON data structured as in the code below.
Python
Upon receiving a client's request, a response will be sent back to the client including the base64 encoded PDF output using the same JSON structure. All the client needs to do now is decode the encoded data into a PDF. That's it!
Please review the sample python code. After cloning the repository and installing necessary packages, please refer to /client/README.txt for detailed instructions. Navigate to the client folder, run the following command, see the response to client's request in the console, and check the output in the output folder:
Python
The client will send a REST API request to convert /input/simple-word_2007.docx to a PDF and the server will send back the encoded data, which will then be saved as PDF in the output folder.
You can experiment with your own office document by putting it inside input folder:
Python
In this article, we have shown how to set up an AWS Lambda function using the Apryse SDK. You can now experiment making your own functions, URLs, and can fully utilize the Apryse SDK using AWS Lambda. If your have any questions, please don't hesitate to contact us!
Prerequisites
Before you start:
- Install Visual Studio Code (or your preferred application) to write, edit, and debug source code.
- Install Node.js and npm on macOS to use as your runtime environment and package manager. We recommend using the latest Active LTS version of Node.js.
- Get your Apryse trial key.
License Key
Apryse collects some data regarding your usage of the SDK for product improvement.
If you wish to continue without data collection, contact us and we will email you a no-tracking trial key for you to get started.
Run Apryse SDK in production.
A commercial license key is required for use in a production environment. Contact sales by filling out our licensing form if you want to purchase a commercial license key.
Keep your commercial license key confidential.
License keys are uniquely generated and strictly confidential. Don't publish or store them in any public location, including public GitHub repositories.
1. Set up your project
Set up your project by creating a folder and preparing your workspace for the application.
- Navigate to the Documents folder and create a New Folder named NewApryseProject.
- From the project directory, in the terminal, enter the following to initialize a new Node.js project and create a
package.jsonfile with default values.
Bash
A new package.json file is created:
Create a new Node.js project.
2. Add the Apryse SDK
- Open Visual Studio Code, select File >Open Folder.. . Navigate to Documents > NewApryseProject and click Open.
Open Node.js folder.
2. From the File menu, select NewTextFile and name it index.js.
3. Copy the following code and paste it into the index.js file to create a blank PDF page.
HTML
Keep in mind the following about the code above:
- The system logs a startup message.
- The program imports the Node.js SDK.
- The script defines an async main function that builds the PDF.
- The PDFNet engine runs with cleanup and license initialization.
- The program logs any errors.
- The script releases PDFNet resources and shuts down the engine.
4. Scroll down to the line containing PDFNet.runWithCleanup(main, ‘YOUR_PDFTRON_LICENSE_KEY’) and replace the words in quotes with the copy of your trial license key.
Add your trial license key.
5. Save your changes and close the file.
6. You have successfully added the Apryse Server SDK to your Node.js project!
3. Run your project
- Navigate to the Documents folder. Select the NewApryseProject folder, right-click and select NewTerminal at Folder.
- From the project directory, in the terminal, enter the following, then press Enter:
sh
The sample code executes, creates a blank PDF page, and displays the message, “Hello World!”
The sample code runs.
3. Exit out of the terminal and navigate to the Documents > NewApryseProject folder.
4. Open the blank.pdf which you created by integrating the Apryse Server SDK.
Get started video
Get started with the Apryse Server SDK and Node.js on the Windows platform by watching this 4-minute video.
Get started video for Apryse Server SDK and Node.js on Windows
Next Steps
Did you find this helpful?
Trial setup questions?
Ask experts on DiscordNeed other help?
Contact SupportPricing or product questions?
Contact Sales