Product:
Libraries and Frameworks
Integrations
Get Started with Apryse WebViewer SDK in a JavaScript app via NPM
The Apryse WebViewer SDK delivers high-quality rendering, conversion, and document manipulation capabilities through a single, customizable component. Supporting PDF, Office, CAD, and images, it's fully featured out of the box, delivering great usability and functionality.
Adding WebViewer to your application allows users to view and edit PDFs without going outside of your application. This reduces reliance on third-party systems, multiple vendors, and file downloads for everyday tasks without compromising control, compliance, or security.
Interact with our showcase demo to test out all of the Apryse WebViewer SDK functionality.
This guide walks you through steps to integrate the Apryse WebViewer SDK into your project. We'll use an HTML-based project as our example project throughout this guide. By the end, you’ll be able to render a PDF document in the user interface (UI).
Get started video
Get started with the Apryse WebViewer SDK via NPM by viewing our video. You can also skip the video and follow the steps below to get started.
Get started video for Apryse WebViewer SDK via NPM
Prerequisites
Before you start:
- Install Node and npm to use as your run-time environment and package manager.
- Create a folder for your project.
- Open a text editor like Visual Studio Code.
- Get your Apryse trial key.
License Key
Apryse collects some data regarding your usage of the SDK for product improvement.
If you wish to continue without data collection, contact us and we will email you a no-tracking trial key for you to get started.
1. Integrate WebViewer into your project
Run the following command on the command line from your project directory to install WebViewer into your project:
sh
This will download the assets required to use WebViewer.
2. Create public folder
1. Create a folder in your project named public where we'll store the code as part of your project.
2. Within the new public folder, create a file named index.html.
3. Copy static assets
1. Create a subfolder within the new public folder you created and name it lib/webviewer.
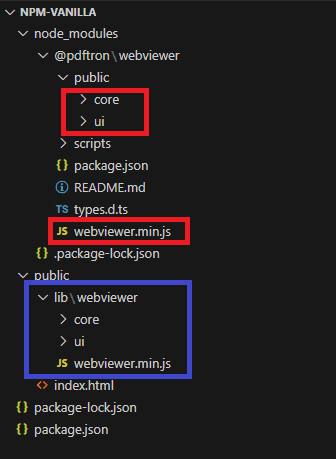
2. Next, copy specific static assets required for WebViewer. The static files to copy are located in node_modules/@pdftron/webviewer/public in your project and are as follows:
coreuiwebviewer.min.js
3. Paste the select files you copied to the new lib/webviewer public location that will be served via HTTP/HTTPS.

The project files and folders (in red) that you need to copy into your project (in blue).
(Optional) Automate static asset copying
Alternatively, you can automate the process of copying the static assets by using one of the scripts below:
You can add a script to your package.json that moves the static files for you after your build completes. This copies all required files into the /public/lib/webviewer folder after your build is complete.
JSON
If you're using webpack to bundle your project, use copy-webpack-plugin to copy files for you automatically.
Install the package:
sh
then add the following to your webpack config:
JavaScript
If you are using parcel to bundle your project, use parcel-plugin-static-files-copy to copy your files.
Install the package:
sh
Then, add the following to your package.json
JSON
If you're using a different package manager, look for a plugin that copies static files at build time.
Read more about copying WebViewer static assets.
4. Add HTML
Copy the HTML below and paste it into your index.html file in your project. Two essential things to take note of in the HTML are that:
- The script tag must reference the path of the JS file you copied into the public folder you created.
- The div element
viewerid is where WebViewer will be mounted. In this example it also contains styling elements for the viewer, though you could do so using CSS if you prefer.
HTML
5. Add JavaScript code
Next, you'll copy and paste in the script tag that includes the WebViewer constructor.
- Copy, then paste the script below into the
index.htmlfile in your project after the div and before the close body tag. - Add the relative location of where you pasted the static files
core,ui, andwebviewer.min.js, using thepathparameter. - Add your own license key in place of 'YOUR_LICENSE_KEY'. If you've created your license key and you're logged in, your key is already in the code below.
- Specify an initial document to open when WebViewer starts using the
initialDocparameter. - Specify the id of the element where you want WebViewer to be mounted. In this case, that's
viewer.
Starting in version 11, WebViewer instantiates using a web component instead of an iframe by default; however, both methods are available. See this guide for more information.
For example, if you copied the static files into public/lib/webviewer, your code would look something like this:
JavaScript (SDK v10.2+)
JavaScript (SDK v8.0+)
6. View PDF in WebViewer UI
After you've saved all of the files, you'll serve the webpage so you can see the WebViewer UI and the PDF you included to open in WebViewer. We'll use http-server to view the webpage in this example.
- Run the following command on the command line from your project directory to run http-server which is a simple web server.
- Click the
localhostlink created in your terminal to view the WebViewer UI and PDF file locally.
sh
Next Steps
Did you find this helpful?
Trial setup questions?
Ask experts on DiscordNeed other help?
Contact SupportPricing or product questions?
Contact Sales