Product:
Printing a document with JavaScript
WebViewer allows users to print the currently viewed document and also provides APIs to trigger printing programmatically.
UI
WebViewer's print modal
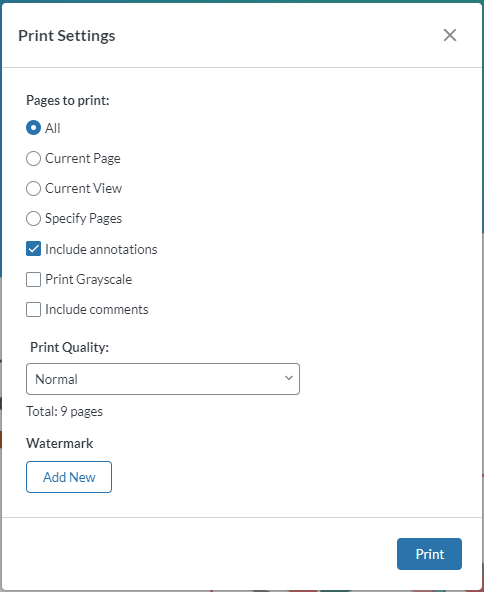
To access it in the UI
Customizing the print modal
You can customize the CSS for the print modal just like any other UI component
For more advanced customizations you can modify the component directly.
Look for the PrintModal component in the WebViewer UI repository.
Programmatically
To display the print dialog programmatically you can use the instance.print API.
Setting print quality
Browsers don't have an API to directly access the printer. Instead WebViewer will render each page and place it in the DOM so that the pages are visible for printing. This means that WebViewer needs to choose a resolution to render each page. If the resolution isn't high enough then the pages may appear blurry.
The setPrintQuality API allows you to increase the resolution of the rendered pages. Note that higher values will also take longer to complete because each page needs to be rendered at a higher quality.
The recommended values are 2 to 5. 2 or 3 is suitable for most purposes. Values higher than 5 will have diminishing returns in terms of increasing quality. Note that it has no effect on the printed document quality if using embedded printing.
Embedded printing
WebViewer supports another mode of printing called "embedded printing" where the PDF will embedded in the page and the browser print function is triggered. This allows the native PDF printing capabilities of browsers like Chrome, Safari, and Firefox to be utilized. Since embedded printing embeds the actual PDF content this ensures that high quality text and graphics are preserved when printing to physical paper or printing as a PDF.
Rasterized (default) | Embedded | |
|---|---|---|
Quality | Converting text and images into a raster format (pixels) | Preserves the original font and graphic information |
Speed and memory | Needs to render every page in JavaScript | Doesn't need to render pages |
Maintenance |
| Printing flow is entirely run using our own API |
Browser Support | All | Everything except Android Chrome |
Save as PDF file name | Retains the original file name | Does not retain the original file name |
When using embedded printing the grayscale and "include comments" options require the full API to be enabled.
When selecting the option to Save as PDF from the embedded print modal, the original file name will be lost due to browser API limitations. Consider downloading the PDF instead.
WebViewer's Embedded print modal
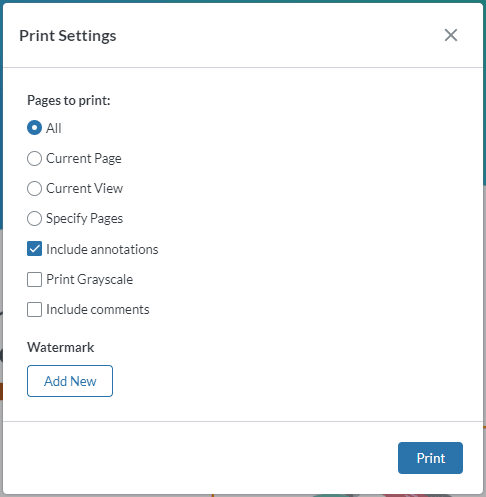
You can enable it using the useEmbeddedPrint API
Alternative Printing Methods
If you encounter quality or performance issues, an alternative approach is to open the PDF in a new browser tab when the user presses print. You can embed an auto-print action in the PDF along with the annotation on your server and generate a link to that PDF to be opened in a new tab. This is actually the approach used by WebViewer Server and is similar to the embedded print method described above.
This will open the PDF in the native browser PDF viewer and if supported by the viewer the print dialog will immediately appear. For browsers that don't support auto-print, the user can click the print button. This is the same approach used by Gmail when printing PDFs.
The benefit is that you're not constrained by JavaScript processing or memory, allowing the printing to start quickly and at high quality. The downside is that depending on the browser the user may need to press the print button a second time in the new tab.
This print output is the default behavior when using WebViewer Server. However, you can disable this by calling useClientSidePrint. This option allows you to utilize rasterized or embedded custom print features, such as including annotations or printing the document in grayscale.
JavaScript (SDK v8.0+)
Did you find this helpful?
Trial setup questions?
Ask experts on DiscordNeed other help?
Contact SupportPricing or product questions?
Contact Sales