Product:
Deploying WebViewer on Amazon Web Server
This guide will show you how to build a highly reliable auto scaling server backend that will automatically work with your WebViewer based application to display documents. This server backend is built through a CloudFormation template.
We also offer directions on running WebViewer Server on a single EC2 server.
WebViewer Server on a Single Instance
This will be the easiest and quickest way to get going on Amazon. This guide will show you how to setup a single EC2 server and run the WebViewer Server container on it.
- Log into the Amazon Web Services console and select the EC2 service. Select the EC2 Dashboard and click
Launch Instance. From here we will configure this EC2 server for launch. - Select the
Amazon Linux AMIfor your server. SelectChoose Instance Type- select the instance you want. We recommend at minimum thet2.mediuminstance. SelectConfigure Security Groupand hitAdd Rule. Set the type toHTTP. SelectReview and Launch. In moments your server is will be online. The next step will setup and install Docker. - To perform the next steps you need to SSH into the EC2 Server, this can be done by getting its EC2 Public Key and finding its DNS public name, both which should be visible on the details of the server. Once you've found these, perform a SSH on t
he DNS public name. SSH can be done with a tool such as putty on windows and the ssh command on Linux.
- Once you've connected to the server, install Docker by executing these commands. The commands install Docker, start the service and set provide user permissions for Docker.
Bash
- Install and run the WebViewer Server docker image.
Bash
- Congratulations, you now have a WebViewer Server running on AWS. The server address will be the public DNS of the EC2 Server. You will be able to find a demo app at your public_dns_name/demo?s - or you can point your WebViewer application at this public dns name.
Load Balancers and WebViewer Server
If you choose to attach a load balancer to WebViewer Server there are some things to keep in mind.
- The server uses both typical HTTP/HTTPS requests and Websockets. This means if you are using the classic load balancer you cannot use HTTP/HTTPS listeners and must instead use TCP/SSL listeners.
- When load balancing between multiple servers you should keep this section of the guidein mind. If clients are not kept stickied to a server on first connection, there will be connection issues.
Auto-Scaling WebViewer Server Setup
In this portion of the guide we go over using our CloudFormation template to launch an auto scaling server architecture for running WebViewer Server.
This auto-scaling server setup will provide a way to handle any incoming load by scaling servers out as required, and in as required. Prior to launching this template, you should already have an Amazon Web Services account that is able to use these features: EC2, VPC, Lambda, CloudWatch, CloudFormation, IAM, ACM and the Elastic Container Service.
The steps for usage are as follows.
- Download the template and
Create a New Stackon CloudFormation using this template. - The first page to appear will be for configuration. Most options available are in regards to customizing the scalability aspect of the WebViewer Server. Below are key notes about several configuration options.... many more options are included which correspond to those defined in our config
Stack Name- All resources will be prefixed with the stack name. Required.EC2Key- The private key the infrastructure resources will use. Required.AvailabilityZone (1 & 2)- The zones your resources are run in, must be two seperate zones. Required.Path- The path of your resources in AWS, should be ‘/’ unless there are special considerations. Required.PDFNetKey- Your Apryse license. The server will continue to run in demo mode until an Apryse key is provided.SSLServerCertificateARN- required to run the server with HTTPS, to setup a SSL Certificate on AWS we suggest using the Certificate Manager: https://docs.aws.amazon.com/acm/latest/userguide/acm-overview.htmlECSNotificationTopic- The ARN of a SNS notification topic. Notifications will be sent to the group given when the containers upscale and downscale.
2a. This template works out of the box for WebViewer Server version >= 2.1.6, for versions below this, please change HealthCheckCall option to the following...
node /usr/local/apache-tomcat/bin/healthcheck.js
- Hit next. The next page is entirely optional and can be used to setup any custom alarms. Click next.
- On this page, check the box titled
I acknowledge that AWS CloudFormation might create IAM Resources. ClickCreate. In approximately 15 minutes your stack will be created and ready to go. - Once the stack creation has completed, you can select
Outputsin the dropdown menu on CloudFormation. This will show links to the resources created.
Using the Server
Now that your server has built you have a complete WebViewer backend for viewing documents. To target the server with your application you need to find the DNS name of the main load balancer. The load balancer will be prefixed with your stack name. It can be also found by:
- Access the
Outputssection of your stack in CloudFormation. - Select the link to the
LoadBalancer.
Any certificates or domains you are using for the WebViewer Server should be tied to this DNS name. From here, you can use this DNS name in your WebViewer initializer as directed by the WebViewer Server guide.
A demo of the WebViewer Server’s capabilities can also be found at: your-load-balancer-address/demo?s
Updating WebViewer Server settings
- Navigate to
CloudFormation. Right click on your stack and selectUpdate Stack. - Upload the previously used CloudFormation template.
- Continue to configuration and adjust the settings as required.
- Confirm the stack update.
Updating the server with a newer version
- Navigate to
CloudFormation. Right click on your stack and selectUpdate Stack. - Upload your new CloudFormation template and continue through the setup process. Your old settings should be present. Review the remaining settings to ensure that no changes are required for the version update.
- Confirm the update, and wait till it has completed. May take anywhere from 15 minutes to an hour depending on the required changes.
If your update becomes stuck during this update it means the CloudFormation changes were too complex for CloudFormation to handle. In this situation we recommend creating a new stack with the new template.
Deleting your server
- Navigate to
CloudFormation. - Right click on your stack and select
Delete. - Deletion may take anywhere from 15 minutes to an hour. After deletion is completed, all resources relating to the stack will be gone.
Logging
All logs for the Apryse server will be placed under a single log group in CloudWatch. This log group can be found in the Outputs of your stack under PDFTronCloudWatchGroup. The log group name will be prefixed with your stack name.
Contained within the group will be 2 types of log, one for each container. The logs within the group represent each ECS cluster and are as follows:
- HAProxy Cluster - pdft-internal-load-balancer
- WebViewer Server cluster - pdft-pdf-server
Creating Alarms and Notifications
As of version 1.1.0 of the template we now offer built in notification alarms regarding container upscaling and downscaling activity. We offer an option within the settings for placing your SNS group for notifications on AWS.
WebViewer Server does not come with built in alarms to notify users on server state changes. These can be user added. Below are some key metrics that could be used for your alarms and notifications:
- Container Health
- Instance Health
- Existing scaling alarms used by WebViewer Server
- Log activity
https://docs.aws.amazon.com/AmazonCloudWatch/latest/monitoring/AlarmThatSendsEmail.html
Manually Modifying Container Arguments
In our documentation we describe several arguments. These arguments can be set in the template as well by modifying the PDFDTaskDefEnvironment variable. Some variables are set in the template by default. Do not alter existing options under this Environment variable, they are either required in their state or controlled by the options available at the start of the template load.
Troubleshooting
There are a handful of known issues:
Updating an existing stack after changing AWS::ECS::Service configuration in the template may cause failure on update as well as long delays before this failure notification.
- This is caused by existing server instances not having enough resources to partition another container. Shutdown unused container instances so that CloudFormation is able to deploy replacements.
Deleting the stack results in failure occasionally.
- This is due to known and inconsistent issues with how CloudFormation handles detaching Lambda Functions on private subnets from network interfaces. The only solution is to manually delete the afflicted network interface/subnet/vpc or continue attempting deletion until CloudFormation succeeds.
How it all works
When deploying the server, the CloudFormation template is used as a blueprint for AWS infrastructure. It builds this infrastructure and pulls in our WebViewer Server Docker image. These images are pulled directly from DockerHub.
The diagram below shows how the CloudFormation auto scaling server setup is designed
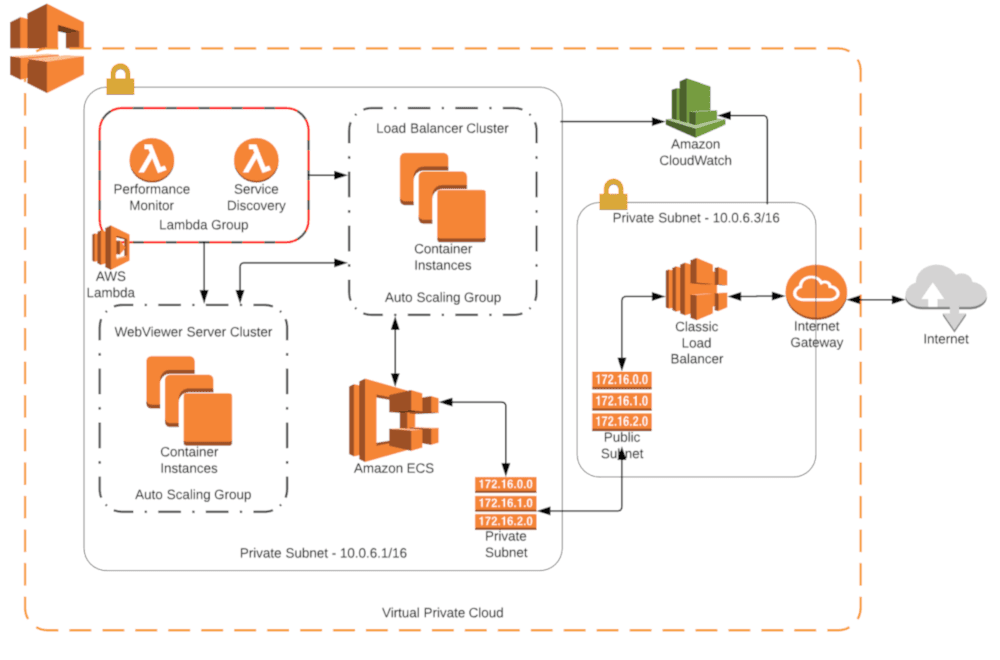
The Elastic Container Service is the backbone of the system. It manages 2 types of container:
- Load Balancer
- WebViewer Server
The Elastic Container Service, in tandem with the auto scaling groups control container and server instance scalability. A series of Lambda functions manage performance measures, alarms and network mapping for these containers. This ensures high availability for the server. We use Fargate servers rather than direct EC2 instances by default in the newest version of the template.
At the front of everything sits an AWS Application Load Balancer. The internal network is private and heavily restricted to ensure security. As a result, the AWS Application Load Balancer is the only public facing part of the system and gives access to the main functionality required for application development with WebViewer.
Constructing your own architecture
Some customers may choose to construct their own architecture on Amazon when using WebViewer Server. This part of the guide will detail things you will need to know when doing so.
- WebViewer Server must have some sort of stickiness mechanism for client connections. We achieve this by using a cookie with HAProxy and running a Lambda which acts as service discovery for all WebViewer Server instances in our auto-scaling template. This Lambda directly notifies our HAProxy instances through TCP management of available instances.
- Load Balancers on Amazon can cause issues when run with WebViewer Server. This is due to our usage of websockets and the fact that the Classic load balancer does not actually support websockets on the HTTP layer. You can get around this by accepting incoming connections on SSL and redirecting them to the server through TCP or SSL.
- Ensure proper idle timeouts on load balancers. If the timeouts of the balancers are too short (less than 60 seconds), inactivity could result in abruptly terminated interactions for clients.
- The network balancer provides the highest level of performance when load balancing, but is difficult to implement with WebViewer Server.
- The load balancer can use WebViewer Server's health check mechanism to determine if instances are working properly
Did you find this helpful?
Trial setup questions?
Ask experts on DiscordNeed other help?
Contact SupportPricing or product questions?
Contact Sales