Product:
Hardware & network setup for WebViewer server
Hardware configuration
WebViewer Server manages its own work queues and caches a lot of intermediate data opportunistically locally, both in RAM and on disk. As such, having access to more system resources will allow the Server to operate more responsively and efficiently (using cached data improves response time, and also conserves CPU resources).
If your use case calls for multiple backend nodes, then a smaller number of more capable nodes is a better choice than a large umber of smaller nodes -- a 4 core/8GB server will have a higher peak user capacity than two 2 core/4GB servers.
Minimum hardware requirements
In order to maintain efficient operation, WebViewer server requires access to at least 2 CPU cores, at least 2GB of RAM, and 50GB of storage space. Anything less than 2 cores, and internal work queues will start to behave serially, which will drastically raise server response times.
Access to insufficient RAM limits the amount of data that can be held in the short-term cache, and it also limits the ability of the server to process particularly difficult documents.
If there is insufficient storage space, then the server will be unable to generate data without first pushing out existing cached data that is still in use by clients.
The hard disk which WebViewer Server does it's read/write operations on should also exceed at least 60 MB/s, without disk speeds reaching at least this level, there may be problems with operation of WebViewer Server under high load.
Network configuration
Docker HTTPS
HTTPS via pdftron/wv-loadbalancer
The WebViewer server comes with a self-signed certificate, usable for HTTPS debugging purposes only.
When accessing the WebViewer Server demo via your browser, note that HTTPS and HTTP are hosted on different ports:HTTPS: https://<HOST_IP_ADDRESS or localhost>:8443/HTTP: http://<HOST_IP_ADDRESS or localhost>:8090/
In order to have HTTPS work correctly on your own domain you must provide a certificate chain file. This certificate chain file should:
- Contain within it a public certificate, an optional intermediary certificate and a private key in the pem format.
- The private key must not have an associated password.
Excluding the intermediary certificate
If you do not include an intermediary certificate in your certificate chain file, SSL may not work correctly for users on Firefox.
In order to use the HTTPS keys WebViewer Server must have them passed from the outside to the inside. We do this by mounting the key within the Docker container.
Once the key is prepared you should:
- Name the key
combined_key.pem - Create a directory and mount it to the
ssldirectory underloadbalancerin your docker-compose file like below. - Place the keys in the external directory, in this case,
ha_ssl. - Restart the container.
YAML
HTTPS Config via pdftron/webviewer-server
We also allow you to use the HTTPS built in directly to Tomcat. This is useful if you wish to use WebViewer Server without its load balancer.
In order to use these keys to the container we must pass them from the outside to the inside of the container. We do this by mounting the keys within the Docker container.
- Name the public certificate
cert.crt - Name the private key
private_key.pem - Create a directory and mount it to the
ssldirectory underpdfd-tomcatin your docker-compose file as a volume like below. - Place the keys in the external directory, in this case,
tc_ssl. - Restart the container
YAML
It is also possible to place your certificates somewhere instead of /home/tomcat/libs/ssl - this can be controlled by the TRN_SSLCERT_PATH and TRN_SSLCERTKEY_PATH options found within our configuration documentation. If using the container, we recommend you keep them under /home/tomcat.
Adding self signed HTTPS certificates to WebViewer Server for file servers
Your network may use self signed certificates in the file servers WebViewer Server will fetch files from. WebViewer Server will require those certificates in order to fetch files. You can add these certificates by placing your public certificates in a directory called external_certs at the same level as the docker-compose.yml, by adding it as a volume to pdfd-tomcat and rebuilding. Please note that the certificate must be a '.crt' file. The contents of each certificate should be base64 encoded strings. You may need a single .crt file with all your required certificates in the external_certs directory.
In order to use these certificates, we must pass them from outside the container to inside of it. We will mount a volume to do this:
The certificate which is used here should follow this specification:
sh
YAML
The certificates in this directory will be directly imported into WebViewer Server's Java certificates on first run.
Windows HTTPS
HTTPS config via replacing keys
Using this method we are simply replacing the existing dummy keys in the install.
- Take your public certificate and rename it to
cert.crt, place this certificate inWebViewer-Server/libs/ssl/overwriting the existing certificate. - Take your private key and rename it to
private_key.pem, place this certificate inWebViewer-Server/libs/ssl/overwriting the existing key. - Add your public certificate to the local java install. This is installed alongside WebViewer Server.
WebViewer-Server/openjdk/bin/keytool -importcert -file cert.crt -alias ssl_wvs -keystore WebViewer-Server/openjdk/lib/security/cacerts -storepass changeit
- If you still encounter issues, follow this guide to install the cert globally on your computer:
It is also possible to place your certificates somewhere instead of WebViewer-Server/libs/ssl - this can be controlled by the TRN_SSLCERT_PATH and TRN_SSLCERTKEY_PATH options found within our configuration documentation. We recommend ensuring WebViewer Server has access to the location you place these SSL certificates.
Using self-signed certs with Windows for file servers
To do so on Windows, you will use keytool to install it directly into Java. Perform the following command using keytool:
Bat
The file you pass in the self signed cert file section should be the public certificate which goes with your server's private key.
You may install it globally if this does not work as well following this guide:
For more information on what certificates work with keytool, refer to this documentation
Scaling to multiple backend nodes with HAProxy
The container (along with webviewer) now has built-in support for using multiple backends behind a load balancer.
As the container is not entirely stateless, the balancer needs to fulfill a few requirements:
- operates at layer 7 (http)
- supports instance affinity ("stickiness") via cookies.
- supports http health checks at a specific path
There is a sample configuration included in the download archive which demonstrates a fully working load balancer setup. Running docker-compose -f docker-compose_load_balance.yml up will launch a container composed of two WebViewer Server nodes with an HAProxy load balancer front end.
In the sample setup, incoming connections are directed to the least occupied backend node, and will remain attached to that node for the remainder of the session, or until the node starts to become overloaded.
If there are no available healthy nodes, then WebViewer will attempt to continue in client-only rendering mode.
Fetching files and Authorization
WebViewer Server does not handle authorization. If authentication is required for a file server, WebViewer Server needs to be passed it on a per request basis. We offer several options for passing authentication data to the WebViewer Server so it can fetch documents that require authorization.
In the WebViewer loadDocument call you are able to specify custom headers - these can contain things such as authorization tokens. When the WebViewer Server requests the URL specified in loadDocument, it will append these customHeaders.
WebViewer accepts signed links as an authorization method - the server will use these same links to successfully fetch files.
You may pass session cookies. This can be enabled as specified in WebViewer Server config guide, but only works when WebViewer Server and the file server in question share a domain.
In addition we have [several options that allow users to better control the security of the WebViewer Server](/web/guides/wv-server-config/#security-options**.
Caching on WebViewer Server
The cache on WebViewer Server works with a simple policy: if the link or name passed for the document is the same, the document cache is the same. This means, if you provide the url http://apryse.com/mydoc.pdf, a cache will be created for this link. If you request this same link, you will recieve this cached item. If you change this link, the cache will now be remade regardless of the document being the same. Take for example these two links, they will return different cached items; http://apryse.com/mydoc.pdf and http://apryse.com/mydoc.pdf?revision=1. This is also the case when uploading files to WebViewer Server, however, these files will only cache based on the filename.
If you need to get around these cache limitations because of the nature of your file server, we provide several ways to do so.
Using the on disk cache
The cache is controlled by two variables, TRN_MAX_CACHED_MB (MB) and TRN_MAX_CACHE_AGE_MINUTES (minutes). By default these values are both set to 0. In this default case the conditions for clearing data from the cache are as follows:
- If the system disk has less than 1 GB available > clear all items older than 1 minute until remaining disk is greater than 1 GB
- If cache items are younger than
TRN_MAX_CACHE_AGE_MINUTES> do not clear - If
TRN_MAX_CACHED_MBis set to -1 -> do not clear - If cache items are younger than 3 minute -> do not clear
- If cache size exceeds the
TRN_MAX_CACHED_MB> clear items above TRN_MAX_CACHE_AGE_MINUTES until TRN_MAX_CACHED_MB is reached
When we delete cache items, we start with the oldest first and will continue deleting items until the necessary conditions have been met or we hit this 30 minute item age limit.
In summary:
TRN_MAX_CACHED_MB has a minimum of 1 GB and a maximum of the disk size minus 1 GB. Setting to -1 makes cache never clear unless disk is nearing 0. TRN_MAX_CACHE_AGE_MINUTES has a minimum of 3 minutes and no maximum. Setting to -1 makes this age infinite.
Ensuring the disk does not completely fill holds precedence over all.
A note on when the disk cleaner runs, its execution occurs at 30 second intervals. What this means is that the disk you provide the server should be large enough for those 30 seconds of time between cleaner executions.
Using customHeaders when caching
The first way to alter this behaviour is to use customHeaders which can be passed in your loadDocument code on WebViewer. All fields added to custom headers will be appended to the link when fetching the document, and not taken into consideration when creating the cache entry.
JavaScript
Using cacheKey when caching
You may also choose to specify a cacheKey in the loadDocument call, when setting a cacheKey you are defining the name the item is cached against. This means, if you request a specific cacheKey, you will always recieve the cache for that specific cacheKey.
JavaScript
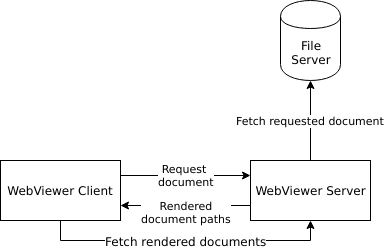
WebViewer Server interactions within a network
WebViewer Server was designed to work alongside the WebViewer client. Document requests are made through WebViewer to the server, the server then fetches the document requested , renders it, and returns the completed document links to WebViewer. The WebViewer client then fetches these documents directly from the server's /data directory. The diagram below depicts this process.
The only limitation on this fetching WebViewer Server does is that it is only able to follow a single redirect when retrieving the file, this is done for both security and stability.
In addition, when WebViewer is working in conjunction with WebViewer Server, it will choose to use the fonts from the server instead of our publicly hosted fonts for WebViewer.
Outside of the file server and the WebViewer client, WebViewer Server has no interactions with other systems.
WebViewer Server in a distributed environment
A distributed environment constitutes something such as Kubernetes and the AWS Elastic Container Service. In these environments you may have more than one copy of the server running at once.
Stickiness using query parameters
As of WebViewer client version 6.2 and server version 1.5.0, stickiness by query parameter is integrated into WebViewer. This stickiness will appear as the query parameter bcid on all outgoing requests from WebViewer.
What this means is that HAProxy will be able to control where requests from WebViewer go based on a per document assigned query parameter. You do not need to enable any settings to use this feature. This feature was implemented for scenarios where the sharing of cross origin cookies does not work as intended. Such as communication over HTTP in Chrome version 80, where alterations to same-site cookie sharing has been created.
When this feature is enabled, it takes precedence over our normal cookie stickiness.
Our WVS server wrapper also supports stickiness using this feature.
Maintaining user state across multiple servers
In a distributed environment WebViewer Server requires stability with connecting users. This is because the WebViewer Server container has a stateful cache. Whenever a user interacts with the server for a document conversation, they must continue communicating with the server they started the communication with until they request a new document. At this point, the user may be redirected to another server.
WebViewer Server achieves this in the AWS Auto-Scaling template with a HAProxy container that comes as part of the compose file. It manages user stickiness for each server, until their currently used server forces a reset of their stickiness cookie, which would occur when a new document is requested. The HAProxy configuration code here depicts how we handle the cookie settings. This can be found in haproxy/haproxy.cfg of our WebViewer Server package.
Bash
You may also run any sticky session solution you want with WebViewer Server, as long as it maintains a session with the server for the duration of the a document or client connection.
Health Checks
You likely require a health check for your distributed environment. We offer one on your running WebViewer Server at http://your-address/blackbox/HealthCheck. This health check only signifies if the server is overloaded or non-responsive. You can learn more about it in our usage section.
We also offer a check to see if the server is in a non-functional state, called the 'life check'. See guide for more on life check.
WebViewer in Single Server Mode
When WebViewer is set in single server mode, WebViewer will not attempt to swap hosts when the server reports as 'overloaded' through the health check. When this is disabled, any active connection will not be broken and will continue if a health failure occurs. You can set this in the WebViewer constructor, like so:
JavaScript
Requires WebViewer 7.3+
Retrieving the BCID
The BCID can be used for managing client stickiness. As such, we have a way to retrieve this ID client side. The following WebViewer code shows how this is done:
JavaScript
Cloud services
We detail some setup options for simple and distributed servers in the cloud in our guides on Azure and AWS
Did you find this helpful?
Trial setup questions?
Ask experts on DiscordNeed other help?
Contact SupportPricing or product questions?
Contact Sales