Product:
Build a .NET PDF library app with Apryse Server SDK
This guide shows how to build a simple .NET PDF application that uses the Apryse Server SDK and PDFNet library to generate a PDF programmatically. You’ll set up a minimal project, install the SDK, and add the required code to create a blank PDF document. This example provides a practical foundation for building more advanced document‑generation workflows.
To get started, choose your preferred platform from the following tabs.
Prerequisites
Before you start:
- Install Visual Studio to build, test, and deploy applications.
- Install the latest active version of the .NET SDK to build your application.
- Get your Apryse trial key.
License Key
Apryse collects some data regarding your usage of the SDK for product improvement.
If you wish to continue without data collection, contact us and we will email you a no-tracking trial key for you to get started.
Run Apryse SDK in production
A commercial license key is required for use in a production environment. Contact sales to purchase a commercial license key.
Keep your commercial license key confidential
License keys are uniquely generated and strictly confidential. Don't publish or store them in any public location, including public GitHub repositories.
1. Set up your project
Set up your project by creating a folder and preparing your workspace for the application.
- Open Visual Studio and go to File > New > Project.
- When creating a new project, select Console App, then click Next.
- Add a Project name.
- Specify where to save your project using the Location field, then click Next.
Info
Remember the file location for your project. You'll need it later when verifying this workflow.
5. In the Framework dropdown, select the .NET version. For example, .NET 8 (Long Term Support), then click Create. A default app is created, where you can run and debug your project.
2. Add the Apryse SDK
Next, integrate the Apryse Server SDK into your .NET application and add the code needed to generate a PDF.
- In Visual Studio, go to Tools > NuGet Package Manager > Manage NuGet Packages for Solution.
- From the Browse tab, enter Apryse in the Search field. This shows you the various packages that Apryse has published.
- From the search results, select PDFTron.NET.x64.
- In the Manage Packages for Solution dialog, select the project, then click Install.
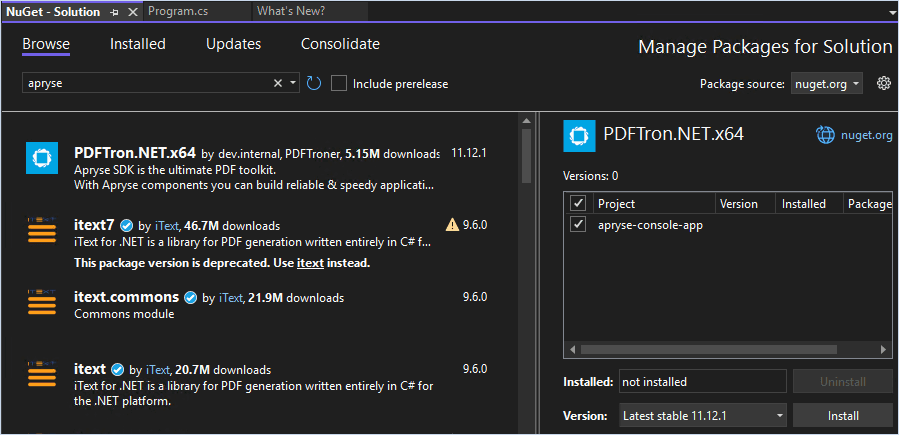
Manage NuGet Packages dialog in Visual Studio with PDFTron.NET.x64 installation options.
5. In the Preview Changes modal, click Apply to install the package in your project.
6. Check the Output window (Package Manager) to confirm the installation completed successfully:
Text
7. Go to the Program.cs file in the Solutions Explorer. Replace the entire file with this code, making sure to update your license key and save the file:
C#
Program.cs
Info
If you're signed in with an Apryse account, your license key is automatically prepopulated in all code snippets.
With this code, you can:
- Import the required Apryse
PDFNetnamespaces. - Define a console application entry point using
Main. - Log a startup message to the console.
- Initialize the Apryse SDK with a license key.
- Create a new PDF document, add a blank page, and save it as a linearized PDF.
- Automatically release document resources with the
usingstatement.
3. Verify your output
Finally, build and run your application to confirm that the Apryse Server SDK is working correctly. After the application runs successfully, it will generate a blank PDF file locally.
- In Visual Studio, run the app by selecting the Start button on the toolbar, or by pressing F5. A successful output looks similar to:
Command Prompt
2. Navigate to this directory, where the build output is created by default:
Text
3. Verify the blank output.pdf file was generated programmatically using the Apryse Server SDK. The folder structure looks similar to:
Text
This guide will help you set up Apryse SDK serverless Azure functions. Your free trial includes unlimited trial usage and support from solution engineers.
Prerequisites
Initial setup
In this particular guide, we will demonstrate how to set up an Azure function to use Apryse SDK.
First, create an Azure function using this guide.
Next, edit your csproj to include PDFNetC.dll and reference PDFTronDotNet.dll from the download package.
Integrate into your application
Once you have followed the initial setup instructions, you can begin calling Apryse SDK APIs in your Azure function source. For example:
C#
Run Sample Code
You can update C# script of your Azure function project with the following code or download the source code from our github repository. This snippet shows how to process a request sent from a client to convert an office document to PDF and send the output to client.
C#
The last step is to publish your Azure function and have it running and its url ready. Make sure to set Settings/Configuration/General settings/Platform to 64-bit in Azure portal.
Testing
In order to use this Azure function to convert an office document to PDF, the client needs to post a REST API request to the server. The request must include json data structured as in C# code above.
Python
Upon receiving a client's request, a response will be sent back to the client including the base64 encoded pdf output using the same json structure. All the client needs to do now is decode the encoded data into pdf. That's it!
You can access the sample python code on Github. After cloning the repository and installing necessary packages, please refer to /client/README.txt for detailed instructions. Navigate to the client folder, run the following command, and see the reponse to client's request in the console and check the output in the output folder:
sh
The client will send a REST API request to convert /input/simple-word_2007.docx to pdf and the server will send back the encoded data, which will then be saved as pdf in the output folder.
You can experiment with your own office document by putting it inside input folder:
sh
We have shown how to set an Azure function using Apryse SDK. You can now experiment making your own functions, URLs, and can fully utilize Apryse SDK. If your have any questions, please don't hesitate to contact us!
Prerequisites
Before you start:
- Install Visual Studio Code or another code editor to develop and debug your code.
- Install the latest version of .NET to build your application. See the Ubuntu for Developers how-to guide. To install different runtimes or SDKs, see Installing .NET components and available .NET versions.
- Get your Apryse trial key.
License Key
Apryse collects some data regarding your usage of the SDK for product improvement.
If you wish to continue without data collection, contact us and we will email you a no-tracking trial key for you to get started.
Run Apryse SDK in production
A commercial license key is required for use in a production environment. Contact sales to purchase a commercial license key.
Keep your commercial license key confidential
License keys are uniquely generated and strictly confidential. Don't publish or store them in any public location, including public GitHub repositories.
Info
For Alpine Linux-specific instructions, see the Alpine Linux guide.
1. Set up your project
Set up your project by creating a folder and preparing your workspace for the application.
- In your file manager, create a Documents > NewApryseProject folder.
- Right-click the NewApryseProject folder and select Open in Terminal.
- In your terminal, create a new .NET console application:
Bash
A successful output looks similar to:
Bash
2. Add the Apryse SDK
Next, integrate the Apryse Server SDK into your .NET application and add the code needed to generate a PDF.
- Navigate to the
~/Documents/NewApryseProjectdirectory in your terminal, then run one of these commands to install the Apryse SDK:
Bash
The command downloads the .NET package from NuGet and makes the library available to your application. A successful output looks like:
Bash
2. Open the Program.cs file in Visual Studio Code or your preferred code editor:
Text
3. Replace Program.cs with the following code, update your license key, and save your changes:
C#
Program.cs
Info
If you're signed in with an Apryse account, your license key is automatically prepopulated in all code snippets.
With this code, you can:
- Import the required Apryse
PDFNetnamespaces. - Define a console application entry point using
Main. - Log a startup message to the console.
- Initialize the Apryse SDK with a license key.
- Create a new PDF document, add a blank page, and save it as a linearized PDF.
- Automatically release document resources with the
usingstatement.
3. Verify your output
Finally, build and run your application to confirm that the Apryse Server SDK is working correctly. After the application runs successfully, it will generate a blank PDF file locally.
- Go to the Documents > NewApryseProject folder, and right-click to select Open in Terminal.
- In the terminal, build and launch the application:
Bash
A successful output looks similar to:
Bash
3. Go to the Documents > NewApryseProject folder using the file manager.
4. Verify the blank output.pdf file was generated programmatically using the Apryse Server SDK. The folder structure looks similar to:
Text
Prerequisites
Before you start:
- Install Visual Studio Code or another code editor to develop and debug your code.
- Install the latest active version of the .NET SDK to build your application.
- Get your Apryse trial key.
License Key
Apryse collects some data regarding your usage of the SDK for product improvement.
If you wish to continue without data collection, contact us and we will email you a no-tracking trial key for you to get started.
Run Apryse SDK in production
A commercial license key is required for use in a production environment. Contact sales to purchase a commercial license key.
Keep your commercial license key confidential
License keys are uniquely generated and strictly confidential. Don't publish or store them in any public location, including public GitHub repositories.
1. Set up your project
Set up your project by creating a folder and preparing your workspace for the application.
- In your file manager, create a Documents > NewApryseProject folder.
- Right-click the NewApryseProject folder and select New Terminal at Folder.
- In your terminal, create a new .NET console application:
Bash
A successful output looks similar to:
Bash
2. Add the Apryse SDK
Next, integrate the Apryse Server SDK into your .NET application and add the code needed to generate a PDF.
- Navigate to the
~/Documents/NewApryseProjectdirectory in your terminal, then install the Apryse SDK:
Bash
The command downloads the .NET package from NuGet and makes the library available to your application. A successful output looks like:
Bash
2. Open the Program.cs file in Visual Studio Code or your preferred code editor:
Text
3. Replace Program.cs with the following code, update your license key, and save your changes:
C#
Program.cs
Info
If you're signed in with an Apryse account, your license key is automatically prepopulated in all code snippets.
With this code, you can:
- Import the required Apryse
PDFNetnamespaces. - Define a console application entry point using
Main. - Log a startup message to the console.
- Initialize the Apryse SDK with a license key.
- Create a new PDF document, add a blank page, and save it as a linearized PDF.
- Automatically release document resources with the
usingstatement.
3. Verify your output
Finally, build and run your application to confirm that the Apryse Server SDK is working correctly. After the application runs successfully, it will generate a blank PDF file locally.
- Go to the Documents > NewApryseProject folder, and right-click to select New Terminal at Folder.
- In the terminal, build and launch the application:
Bash
A successful output looks similar to:
Bash
3. Go to the Documents > NewApryseProject folder using the file manager.
4. Verify the blank output.pdf file was generated programmatically using the Apryse Server SDK. The folder structure looks similar to:
Text
Get started video
Get started with the Apryse Server SDK and .NET on Windows by watching this 4-minute video.
Get started video for Apryse Server SDK on the Windows platform
Next Steps
Did you find this helpful?
Trial setup questions?
Ask experts on DiscordNeed other help?
Contact SupportPricing or product questions?
Contact Sales