Product:
Deploy WebViewer Server with Kubernetes
Kubernetes is a container orchestration system that can be used to deploy WebViewer Server. For more detailed information on Kubernetes, please review the Kubernates documentation.
In this guide, we'll walk you through setting up WebViewer Server in Kubernetes and deploying our pre-made Helm chart. Using the Helm chart resolves typical deployment issues that can occur when using Kubernates to deploy WebViewer Server.
The Helm chart is designed to be a starting point for your infrastructure. We do not actively support alterations to this Helm chart or managing infrastructure in your environment. While it will work out of the box, you will have to alter and manage the chart yourself.
We do not recommend you use this in a production environment without first verifying your setup and environment yourself.
How the Helm chart helps with deployment
WebViewer Server can be difficult to deploy in the traditional scheme of Kubernetes because:
- WebViewer Server requires sticky sessions.
- WebViewer Server uses a persistent cache and requires high throughput on read and write.
To address these issues, the Helm chart uses the following configuration:
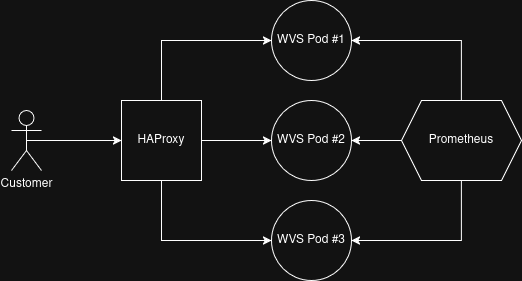
- Deployed WebViewer Server pods as headless.
- All WebViewer Server pods are provided their own IP for proper sticky routing by HAProxy.
- HAProxy is placed in front of WebViewer Server to manage routing and stickiness.
- Within HAProxy, we use the dynamic Kubernetes DNS resolver to make sure we can respond to deployment adjustments.
- We've added stickiness using our BCID query parameter and stick tables.
- For each WebViewer Server pod, we've added a persistent volume mounted to their
/home/tomcat/wv-server/static_datapath. - Prometheus integration to support the tracking of scaling metrics
Below is a diagram of how this infrastructure is constructed:
Configure the Helm Chart
The Helm chart contains a values.yaml file which contains variables you can alter. They are as follows:
YAML
In the above code, the only items you should modify, in normal operation, are:
image: The name of the WebViewer Server docker image to use.tag: The tag of the WebViewer Server docker image you wish to use.max_instances: The maximum number of WebViewer Server instances you wish to allow the scale to go to.minReplicas: The minimum required instances of WebViewer Server.maxReplicas: The maximum possible instances of WebViewer Server. The number should be set to the same value asmax_instances.scaleThresholdMiliseconds: The number of milliseconds of acceptable average delay for customer jobs. If this value is exceeded for the scale window, a new WebViewer Server instance will be added.
Deploy the Helm Chart
Our Helm chart can be used to deploy a Kubernetes setup and ready to go with built in autoscaling and Prometheus monitoring.
To deploy the Helm chart, download the chart using the download button in the introduction section of this article above, extract it, and navigate to the extracted folder. Execute the following command:
Keep in mind you will have to have already connected to your existing Kubernetes cluster and have setup Helm for it.
Bash
Did you find this helpful?
Trial setup questions?
Ask experts on DiscordNeed other help?
Contact SupportPricing or product questions?
Contact Sales