Product:
Get Started with Apryse WebViewer SDK in a React with Vite Project
The Apryse WebViewer SDK delivers high-quality rendering, conversion, and document manipulation capabilities through a single, customizable component. Supporting PDF, Office, CAD, and images, it's fully featured out of the box, delivering great usability and functionality.
Adding WebViewer to your application allows users to view and edit PDFs without going outside of your application. This reduces reliance on third-party systems, multiple vendors, and file downloads for everyday tasks without compromising control, compliance, or security.
Interact with our showcase demo to test out all of the Apryse WebViewer SDK functionality.
While create-react-app was the go to tool for scaffolding React apps in the past, that is deprecated, and many users now use Vite instead. That's why we've created this guide to use React with Vite to get you started with WebViewer.
This guide walks you through how to integrate the WebViewer SDK into your React application with Vite. By the end, you'll be able to render a PDF document in the UI.
Get started video
Get started with the Apryse WebViewer SDK in a React project with Vite by viewing our video. This video includes instructions for successfully integrating the WebViewer SDK into your application. You can also skip the video and, instead, follow the steps below to get started.
Video on how integrate the Apryse WebViewer SDK into a React app with Vite
Prerequisites
Before you start:
- Install Node and npm to use as your run-time environment and package manager.
- Open a text editor like Visual Studio Code.
- Get your Apryse trial key.
License Key
Apryse collects some data regarding your usage of the SDK for product improvement.
If you wish to continue without data collection, contact us and we will email you a no-tracking trial key for you to get started.
1. Scaffold React project with Vite
First, you'll create your project.
If you already have a React project with Vite, skip to step 3.
1. On the command line, cd to where you want your new project to sit.
2. Run the following on the command line (we used Vite 7 to create this guide):
shell
3. Next, complete the following tasks from the command line during project creation:
a. Change the default Project name to a project name of your choice.
b. Select React for your framework.
c. Select Javascript for your variant.

Options you must select during React with Vite project setup.
2. Navigate to new React project
Enter the following on the command line to navigate into your new project, replacing <project-name> with the name you chose:
sh
3. Integrate WebViewer
Run the following command on the command line, from your React project directory:
sh
4. Copy static assets
You have to copy the static assets required for WebViewer to run. The files must be moved into a location that will be served and publicly accessible.
1. Via your text editor, create a subfolder within the existing public folder in your project and name it lib/webviewer.
2. Next, copy specific static assets required for WebViewer. The static folders to copy are located in node_modules/@pdftron/webviewer/public in your project and are as follows:
coreui
3. Paste the select folders you copied to the new lib/webviewer public location that will be served.
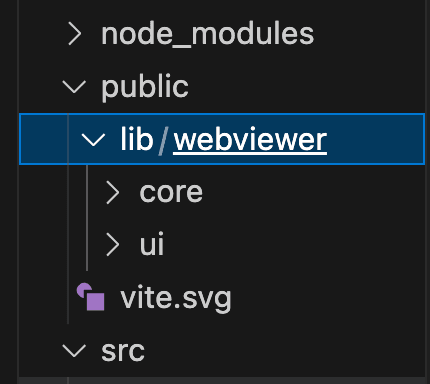
Copied WebViewer static assets Core and UI in public/lib/webviewer
5. Remove default code
Vite scaffolds a fully working app, but much of what was created isn’t needed to be successful getting started with WebViewer in this guide.
Delete everything in the src/App.css file. You'll want to add things back in as you move from a prototype to production, but for now you can delete all the contents.
6. Instantiate and mount WebViewer in project
1. Delete everything in the src/App.jsx file.
2. Add the following code to the src/App.jsx file, keeping in mind the following:
- The html below creates a div where WebViewer will be mounted.
- An element with a
useRefis specified. - WebViewer is substantiated within a
useEffecthook. - In the
useEffect, the options you want are specified and include the element where it should be mounted.-
pathis the path to the copied static assets. - Add your own license key in place of 'YOUR_LICENSE_KEY'. If you've created your license key and you're logged in, your key is already in the code below.
- An initial PDF document is specified to open when WebViewer starts using the
initialDocparameter.
-
JavaScript
7. Add styling for WebViewer class
To add styling for the WebViewer class:
1. Delete everything in the src/index.css file.
2. Add the following code to the src/index.css file:
This styling could be added in App.css instead, but we'll place it in index.css since this is only a proof of concept.
CSS
8. Resolve strict mode issue
If you were to run WebViewer in the browser now, a second WebViewer instance would display. This isn’t an issue with WebViewer. It's caused by recent versions of React. Prior to React v18, a useEffect with an empty dependency array would fire just a single time when the page loaded, and this was used to construct WebViewer.
However, since React v18, if StrictMode is specified (and Vite does so by default), then the useEffect fires a second time in Development builds. This isn’t an issue with Production builds though – so it’s an artificial problem.
A simple way to solve the problem in a Development build is to remove the StrictMode tags. We'll do that for this simple proof of concept:
1. Delete the StrictMode tags from the src/main.jsx file. Your file should look like this after the deletion:
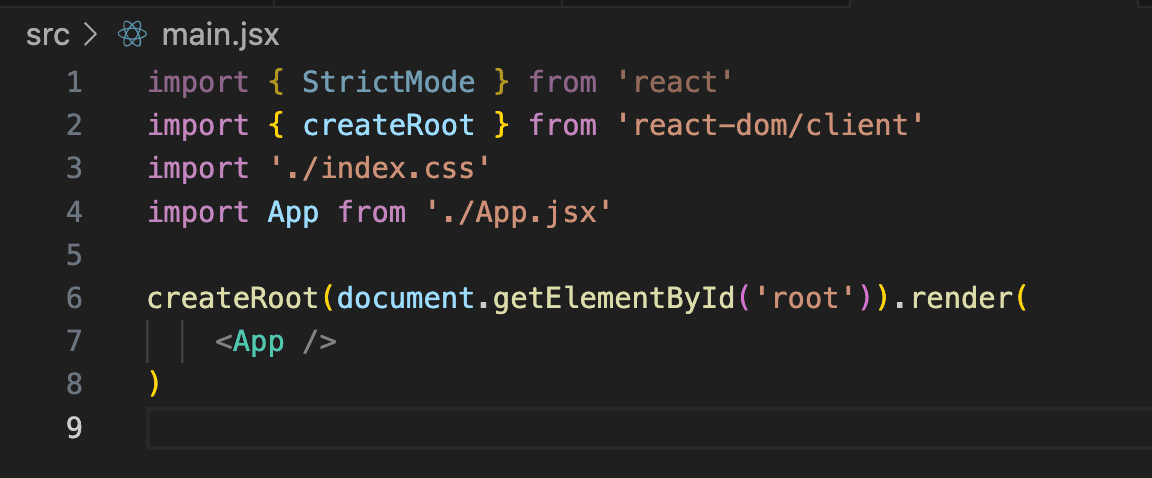
The main.jsx file after you've deleted the StrictMode tags
Removing StrictMode isn’t ideal. It was implemented as a way to find memory leaks. That might not be a problem in a proof of concept like this, but you would definitely care about in a more complex project. Read more about common workarounds.
9. View PDF in WebViewer UI
After you've saved all of the files, you'll serve the webpage so you can see the WebViewer UI and the PDF you included to open in WebViewer.
1. Run the following command on the command line from your project directory to run the project.
sh
2. Click the localhost link created in your terminal to view the WebViewer UI and PDF file locally.
Next steps
Did you find this helpful?
Trial setup questions?
Ask experts on DiscordNeed other help?
Contact SupportPricing or product questions?
Contact Sales